API quickstart
The DataRobot API provides a programmatic alternative to the web interface for creating and managing DataRobot projects. The API can be used via REST or with DataRobot's Python or R clients in Windows, UNIX, and OS X environments. This guide walks you through setting up your environment and then you can follow a sample problem that outlines an end-to-end workflow for the API.
Note
Note that the API quickstart guide uses methods for 3.x versions of DataRobot's Python client. If you are a Self-Managed AI Platform user, consult the API resources table to verify which versions of DataRobot's clients are supported for your version of the DataRobot application.
Prerequisites
Before proceeding, access and install the DataRobot client package for Python or R.
Install the client
Note
Self-Managed AI Platform users may want to install a previous version of the client in order to match their installed version of the DataRobot application. Reference the available versions to map your installation to the correct version of the API client.
pip install datarobot
(Optional) If you would like to build custom blueprints programmatically, install two additional packages: graphviz and blueprint-workshop.
For Windows users:
Download the graphviz installer
For Ubuntu users:
sudo apt-get install graphviz
For Mac users:
brew install graphviz
Once graphviz is installed, install the workshop:
pip install datarobot-bp-workshop
install.packages(“datarobot”)
Configure your environment
Using DataRobot APIs, you will execute a complete modeling workflow, from uploading a dataset to making predictions on a model deployed in a production environment.
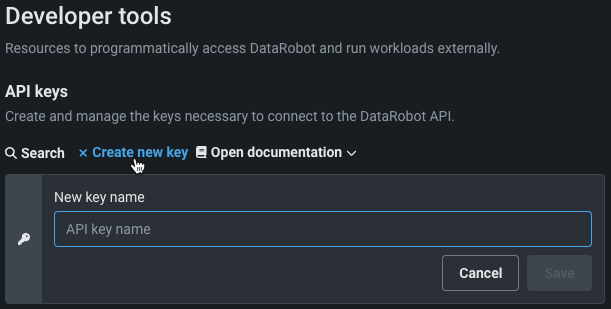
Create a DataRobot API key
-
From the DataRobot UI, click your user icon in the top right corner and select Developer Tools.
-
Click Create new key.
-
Name the new key, and click Save. This activates your new key, making it ready for use.
Once created, each individual key has three pieces of information:

| Label | Element | Description |
|---|---|---|
| 1 | Key | The name of the key, which you can edit. |
| 2 | Date | The date the key was last used. Newly created and not yet used keys display “Wasn’t used.” |
| 3 | Key value | The key itself. |
Retrieve the API endpoint
DataRobot provides several deployment options to meet your business requirements. Each deployment type has its own set of endpoints. Choose from the tabs below:
The AI Platform (US) offering is primarily accessed by US and Japanese users. It can be accessed at https://app.datarobot.com.
API endpoint root: https://app.datarobot.com/api/v2
The AI Platform (EU) offering is primarily accessed by EMEA users. It can be accessed at https://app.eu.datarobot.com.
API endpoint root: https://app.eu.datarobot.com/api/v2
For Self-Managed AI Platform users, the API root will be the same as your DataRobot UI root. Replace {datarobot.example.com} with your deployment endpoint.
API endpoint root: https://{datarobot.example.com}/api/v2
Configure API authentication
To authenticate with DataRobot's API, your code needs to have access to an endpoint and token from the previous steps. This can be done in three ways:
drconfig.yaml is a file that the DataRobot Python and R clients automatically look for. This is DataRobot's recommended authentication method. You can instruct the API clients to look for the file in a specific location, ~/.config/datarobot/drconfig.yaml by default, or under a unique name. Therefore, you can leverage this to have multiple config files. The example below demonstrates the format of the .yaml:
endpoint: 'https://app.datarobot.com/api/v2'
token: 'NjE3ZjA3Mzk0MmY0MDFmZGFiYjQ0MztergsgsQwOk9G'
Once created, you can test your access to the API.
For Python:
If the config file is located at ~/.config/datarobot/drconfig.yaml, then all you need to do is import the library:
import datarobot as dr
Otherwise, use the following command:
import datarobot as dr
dr.Client(config_path = "<file-path-to-drconfig.yaml>")
For R:
If the config file is located at ~/.config/datarobot/drconfig.yaml, then all you need to do is load the library:
library(datarobot)
Otherwise, use the following command:
ConnectToDataRobot(configPath = "<file-path-to-drconfig.yaml>"))
Set up an endpoint by setting environment variables in the UNIX shell:
export DATAROBOT_ENDPOINT=https://app.datarobot.com/api/v2
export DATAROBOT_API_TOKEN=your_api_token
Once set, authenticate to connect to DataRobot.
For Python:
import datarobot as dr
dr.Project.list()
For R:
library(datarobot)
For cURL:
curl --location -X GET "${DATAROBOT_API_ENDPOINT}/projects" --header "Authorization: Bearer ${DATAROBOT_API_TOKEN}"
(Optional) Be cautious to never commit your credentials to Git.
For Python:
import datarobot as dr
dr.Client(endpoint='https://app.datarobot.com/api/v2', token='NjE3ZjA3Mzk0MmY0MDFmZGFiYjQ0MztergsgsQwOk9G')
For R:
ConnectToDataRobot(endpoint =
"https://app.datarobot.com/api/v2",
token =
'NjE3ZjA3Mzk0MmY0MDFmZGFiYjQ0MztergsgsQwOk9G')
For cURL:
GET https://app.datarobot.com/api/v2/ HTTP/1.1
Authorization: Bearer DnwzBUNTOtKBO6Sp1hoUByG4YgZwCCw4
Use the API: Predicting fuel economy
Once you have configured your API credentials, endpoints, and environment, you can use the DataRobot API to follow this example. The example uses the Python client and the REST API (using cURL), so a basic understanding of Python3 or cURL is required. It guides you through a simple problem: predicting the miles-per-gallon fuel economy from known automobile data (e.g., vehicle weight, number of cylinders, etc.).
Note
Python client users should note that the following workflow uses methods introduced in version 3.0 of the client. Ensure that your client is up-to-date before executing the code included in this example.
The following sections provide sample code, for Python and cURL, that will:
- Upload a dataset.
- Train a model to learn from the dataset.
- Test prediction outcomes on the model with new data.
- Deploy the model.
- Predict outcomes on the deployed model using new data.
Upload a dataset
The first step to create a project is uploading a dataset. This example uses the dataset auto-mpg.csv, which you can download here.
import datarobot as dr
dr.Client()

# Set to the location of your auto-mpg.csv and auto-mpg-test.csv data files
# Example: dataset_file_path = '/Users/myuser/Downloads/auto-mpg.csv'
training_dataset_file_path = ''
test_dataset_file_path = ''

# Load dataset
training_dataset = dr.Dataset.create_from_file(training_dataset_file_path)

# Create a new project based on dataset
project = dr.Project.create_from_dataset(training_dataset.id, project_name='Auto MPG DR-Client')
# Set to the location of your auto-mpg.csv and auto-mpg-test.csv data files
# Example: dataset_file_path = '/Users/myuser/Downloads/auto-mpg.csv'
training_dataset_file_path <- ""
test_dataset_file_path <- ""
training_dataset <- utils::read.csv(training_dataset_file_path)
test_dataset <- utils::read.csv(test_dataset_file_path)
head(training_dataset)
project <- SetupProject(dataSource = training_dataset, projectName = "Auto MPG DR-Client", maxWait = 60 * 60)
DATAROBOT_API_TOKEN=${DATAROBOT_API_TOKEN}
DATAROBOT_ENDPOINT=${DATAROBOT_ENDPOINT}
location=$(curl -Lsi \
  -X POST \
  -H "Authorization: Bearer ${DATAROBOT_API_TOKEN}" \
  -F 'projectName="Auto MPG"' \
  -F "file=@${DATASET_FILE_PATH}" \
  "${DATAROBOT_ENDPOINT}"/projects/ | grep -i 'Location: .*$' | \
  cut -d " " -f2 | tr -d '\r')
echo "Uploaded dataset. Checking status of project at: ${location}"
while true; do
  project_id=$(curl -Ls \
    -X GET \
    -H "Authorization: Bearer ${DATAROBOT_API_TOKEN}" "${location}" \
    | grep -Eo 'id":\s"\w+' | cut -d '"' -f3 | tr -d '\r')
  if [ "${project_id}" = "" ]
  then
    echo "Setting up project..."
    sleep 10
  else
    echo "Project setup complete."
    echo "Project ID: ${project_id}"
    break
  fi
done
Train models
Now that DataRobot has data, it can use the data to train and build models with Autopilot. Autopilot is DataRobot's "survival of the fittest" modeling mode that automatically selects the best predictive models for the specified target feature and runs them at increasing sample sizes. The outcome of Autopilot is not only a selection of best-suited models, but also identification of a recommended model—the model that best understands how to predict the target feature "mpg." Choosing the best model is a balance of accuracy, metric performance, and model simplicity. You can read more about the model recommendation process in the UI documentation.
# Use training data to build models
from datarobot import AUTOPILOT_MODE

# Set the project's target and initiate Autopilot (runs in Quick mode unless a different mode is specified)
project.analyze_and_model(target='mpg', worker_count=-1, mode=AUTOPILOT_MODE.QUICK)

# Open the project's Leaderboard to monitor the progress in UI.
project.open_in_browser()

# Wait for the model creation to finish
project.wait_for_autopilot()

model = project.get_top_model()
# Set the project target and initiate Autopilot
SetTarget(project,
  target = "mpg")
# Block execution until Autopilot is complete
WaitForAutopilot(project)
model <- GetRecommendedModel(project, type = RecommendedModelType$RecommendedForDeployment)
response=$(curl -Lsi \
  -X PATCH \
  -H "Authorization: Bearer ${DATAROBOT_API_TOKEN}" \
  -H "Content-Type: application/json" \
  --data '{"target": "mpg", "mode": "quick"}' \
  "${DATAROBOT_ENDPOINT}/projects/${project_id}/aim" | grep 'location: .*$' \
  | cut -d " " | tr -d '\r')
echo "AI training initiated. Checking status of training at: ${response}"
while true; do
  initial_project_status=$(curl -Ls \
  -X GET \
  -H "Authorization: Bearer ${DATAROBOT_API_TOKEN}" "${response}" \
  | grep -Eo 'stage":\s"\w+' | cut -d '"' -f3 | tr -d '\r')
  if [ "${initial_project_status}" = "" ]
  then
    echo "Setting up AI training..."
    sleep 10
  else
    echo "Training AI."
    echo "Grab a coffee or catch up on email."
    break
  fi
done

project_status=$(curl -Lsi \
  -X GET \
  -H "Authorization: Bearer ${DATAROBOT_API_TOKEN}" \
  "${DATAROBOT_ENDPOINT}/projects/${project_id}/status" \
  | grep -Eo 'autopilotDone":\strue'
  )
if [ "${project_status}" = "" ]
then
  echo "Autopilot training in progress..."
  sleep 60
else
  echo "Autopilot training complete. Model ready to deploy."
  break
fi
done
Make predictions against the model
After building models and identifying the top performers, you can further test a model by making predictions on new data. Typically, you would test predictions with a smaller dataset to ensure the model is behaving as expected before deploying the model to production. DataRobot offers several methods for making predictions on new data. You can read more about prediction methods in the UI documentation.
This code makes predictions on the recommended model using the test set you identified in the first step (test_dataset_file_path), when you uploaded data.
# Test predictions on new data
predict_job = model.request_predictions(test_dataset_file_path)
predictions = predict_job.get_result_when_complete()
predictions.head()
This code makes predictions on the recommended model using the test set you identified in the first step (test_dataset_file_path), when you uploaded data.
# Uploading the testing dataset
scoring <- UploadPredictionDataset(project, dataSource = test_dataset)

# Requesting prediction
predict_job_id <- RequestPredictions(project, modelId = model$modelId, datasetId = scoring$id)

# Grabbing predictions
predictions_prob <- GetPredictions(project, predictId = predict_job_id, type = "probability")
head(predictions_prob)
This code makes predictions on the recommended model using the test set you identified in the first step (test_dataset_file_path), when you uploaded data.
# Test predictions on new data
# shellcheck disable=SC2089
prediction_location=$(curl -Lsi\
-X POST \
-H "Authorization: Bearer ${DATAROBOT_API_TOKEN}" \
-F "file=@${TEST_DATASET_FILE_PATH}" \
"${DATAROBOT_ENDPOINT}/projects/${project_id}/predictionDatasets/fileUploads/"\
| grep -i 'location: .*$' | cut -d " " -f2 | tr -d '\r')
echo "Uploaded prediction dataset. Checking status of upload at: ${prediction_location}"
while true; do
  prediction_dataset_id=$(curl -Ls \
  -X GET \
  -H "Authorization: Bearer ${DATAROBOT_API_TOKEN}" "${prediction_location}" \
  | grep -Eo 'id":\s"\w+' | cut -d '"' -f3 | tr -d '\r')
  if [ "${prediction_dataset_id}" = "" ]
  then
  echo "Uploading predictions..."
  sleep 10
  else
  echo "Predictions upload complete."
  echo "Predictions dataset ID: ${prediction_dataset_id}"
  break
  fi
  done
  prediction_request_data="{\
      \"modelId\":\"${recommended_model_id}\",\
      \"datasetId\":\"${prediction_dataset_id}\"\
  }"
  predict_job=$(curl -Lsi \
  -X POST \
  -H "Content-Type: application/json" \
  -H "Authorization: Bearer ${DATAROBOT_API_TOKEN}" \
  --data "${prediction_request_data}" \
  "${DATAROBOT_ENDPOINT}/projects/${project_id}/predictions/"\
  | grep -i 'location: .*$' | cut -d " " -f2 | tr -d '\r')
while true; do
  initial_job_response=$(curl -Ls \
    -X GET \
    -H "Authorization: Bearer ${DATAROBOT_API_TOKEN}" "${predict_job}" \
    | grep -Eo 'status":\s"\w+' | cut -d '"' -f3 | tr -d '\r')
  if [ "${initial_job_status}" = "inprogress" ]
  then
    echo "Generating predictions..."
    sleep 10
  else
    echo "Predictions complete."
    break
  fi
done

curl -Ls \
  -X GET \
  -H "Authorization: Bearer ${DATAROBOT_API_TOKEN}" "${predict_job}"
Deploy the model
Deployment is the method by which you integrate a machine learning model into an existing production environment to make predictions with live data and generate insights. See the machine learning model deployment overview for more information.
# Deploy model
deployment = dr.Deployment.create_from_learning_model(
  model_id=model.id, label="MPG Prediction Server",
  description="Deployed with DataRobot client")

# View deployment stats
service_stats = deployment.get_service_stats()
print(service_stats.metrics)
# Deploy model
prediction_server = dr.PredictionServer.list()[0]
deployment = dr.Deployment.create_from_learning_model(
  model_id=model.id, label="MPG Prediction Server",
  description="Deployed with DataRobot client",
  default_prediction_server_id=prediction_server.id
)

# View deployment stats
service_stats = deployment.get_service_stats()
print(service_stats.metrics)
predictionServer <- ListPredictionServers()[[1]]
deployment <- CreateDeployment(model,
                               label = "MPG Prediction Server",
                               description = "Deployed with DataRobot client",
                               defaultPredictionServerId = predictionServer)
recommended_model_id=$(curl -s \
-X GET \
-H "Authorization: Bearer ${DATAROBOT_API_TOKEN}" \
"${DATAROBOT_ENDPOINT}/projects/${project_id}/recommendedModels"\
"/recommendedModel/" \
| grep -Eo 'modelId":\s"\w+' | cut -d '"' -f3 | tr -d '\r')
server_data=$(curl -s -X GET \
-H "Authorization: Bearer ${DATAROBOT_API_TOKEN}" \
"${DATAROBOT_ENDPOINT}/predictionServers/")
default_server_id=$(echo $server_data \
| grep -Eo 'id":\s"\w+' | cut -d '"' -f3 | tr -d '\r')
server_url=$(echo $server_data | grep -Eo 'url":\s".*?"' \
| cut -d '"' -f3 | tr -d '\r')
server_key=$(echo $server_data | grep -Eo 'datarobot-key":\s".*?"' \
| cut -d '"' -f3 | tr -d '\r')
request_data="{\
    \"defaultPredictionServerId\":\"${default_server_id}\",\
    \"modelId\":\"${recommended_model_id}\",\
    \"description\":\"Deployed with cURL\",\
    \"label\":\"MPG Prediction Server\"\
}"
deployment_response=$(curl -Lsi -X POST \
-H "Authorization: Bearer ${DATAROBOT_API_TOKEN}" \
-H "Content-Type: application/json" \
--data "${request_data}" \
"${DATAROBOT_ENDPOINT}/deployments/fromLearningModel/")
deploy_response_code_202=$(echo $deployment_response | grep -Eo 'HTTP/2 202')
if [ "${deploy_response_code_202}" = "" ]
then
  deployment_id=$(echo "$deployment_response" | grep -Eo 'id":\s"\w+' \
  | cut -d '"' -f3 | tr -d '\r')
  echo "Prediction server ready."
else
  deployment_status=$(echo "$deployment_response" | grep -Eo 'location: .*$' \
  | cut -d " " | tr -d '\r')
  while true; do
    deployment_ready=$(curl -Ls \
      -X GET \
      -H "Authorization: Bearer ${DATAROBOT_API_TOKEN}" "${deployment_status}" \
      | grep -Eo 'id":\s"\w+' | cut -d '"' -f3 | tr -d '\r')
    if [ "${deployment_ready}" = "" ]
    then
      echo "Waiting for deployment..."
      sleep 10
    else
      deployment_id=$deployment_ready
      echo "Prediction server ready."
      break
    fi
  done
fi
Make predictions against the deployed model
When you have successfully deployed a model, you can use the DataRobot Prediction API to make predictions. This allows you to access advanced model management features such as data drift, accuracy, and service health statistics.
You can also reference a Python prediction snippet from the UI. Navigate to the Deployments page, select your deployment, and go to Predictions > Prediction API to reference the snippet for making predictions.
import requests
from pprint import pprint
import json
import os
# JSON records for example autos for which to predict mpg
autos = [
    {
        "cylinders": 4,
        "displacement": 119.0,
        "horsepower": 82.00,
        "weight": 2720.0,
        "acceleration": 19.4,
        "model year": 82,
        "origin": 1,
    },
    {
        "cylinders": 8,
        "displacement": 120.0,
        "horsepower": 79.00,
        "weight": 2625.0,
        "acceleration": 18.6,
        "model year": 82,
        "origin": 1,
    },
]
# Create REST request for prediction API
prediction_server = deployment.default_prediction_server
prediction_headers = {
    "Authorization": "Bearer {}".format(os.getenv("DATAROBOT_API_TOKEN")),
    "Content-Type": "application/json",
    "datarobot-key": prediction_server['datarobot-key']
}

predictions = requests.post(
    f"{prediction_server['url']}/predApi/v1.0/deployments"
    f"/{deployment.id}/predictions",
    headers=prediction_headers,
    data=json.dumps(autos),
)
pprint(predictions.json())
# Prepare to connect to the prediction server
URL <- paste0(deployment$defaultPredictionServer$url,
        "/predApi/v1.0/deployments/",
        deployment$id,
        "/predictions")
  USERNAME <- "deployment$owners$preview$email" # This should be your DR email account
  API_TOKEN <- Sys.getenv("DATAROBOT_API_TOKEN") # This is configured implicitly when you first run `library(datarobot)`

  # Invoke Predictions API with the test_dataset
  response <- httr::POST(URL,
                   body = jsonlite::toJSON(test_dataset),
                   httr::add_headers("datarobot-key" = deployment$defaultPredictionServer$dataRobotKey),
                   httr::content_type_json(),
                   authenticate(USERNAME, API_TOKEN, "basic"))

  # Parse the results from the prediction server
  predictionResults <- fromJSON(httr::content(response, as = "text"),
                   simplifyDataFrame = TRUE,
                   flatten = TRUE)$data
  print(predictionResults)
autos='[{
  "cylinders": 4,
  "displacement": 119.0,
  "horsepower": 82.00,
  "weight": 2720.0,
  "acceleration": 19.4,
  "model year": 82,
  "origin":1
},{
  "cylinders": 8,
  "displacement": 120.0,
  "horsepower": 79.00,
  "weight": 2625.0,
  "acceleration": 18.6,
  "model year": 82,
  "origin":1
}]'
curl -X POST \
  -H 'Content-Type: application/json' \
  -H "Authorization: Bearer ${DATAROBOT_API_TOKEN}" \
  -H "datarobot-key: ${server_key}" \
  --data "${autos}" \
  "${server_url}/predApi/v1.0/deployments/${deployment_id}/predictions"
Learn more
After getting started with DataRobot's APIs, navigate to the user guide for overviews, Jupyter notebooks, and task-based tutorials that help you find complete examples of common data science and machine learning workflows. You can also read the reference documentation available for DataRobot's programmatic tools.
Note
Log in to GitHub before accessing these GitHub resources.