Blueprint Workshop overview
Note
If you are using JupyterLab, "Contextual Help" is supported and assists you with general use of the Blueprint Workshop. You can drag the tab to be side-by-side with your notebook to provide instant documentation on the focus of your text cursor.
Initialization
Before proceeding, ensure you have initialized the workshop and completed the required setup.
Note
The command will fail unless you have correctly followed the instructions in configuration.
Use the following code to initialize the workshop. This is necessary for any Python code examples to work correctly.
from datarobot_bp_workshop import Workshop
w = Workshop()
All of the following examples assume you have initialized the workshop as above.
Understanding blueprints
It's important to understand what a "blueprint" is within DataRobot. A blueprint represents the high-level end-to-end procedure for fitting the model, including any preprocessing steps, algorithms, and post-processing.
In the Blueprint Workshop, blueprints are represented with a BlueprintGraph, which can be created by constructing a DAG via
Tasks.
pni = w.Tasks.PNI2(w.TaskInputs.NUM)
rdt = w.Tasks.RDT5(pni)
binning = w.Tasks.BINNING(pni)
keras = w.Tasks.KERASC(rdt, binning)
keras_blueprint = w.BlueprintGraph(keras, name='A blueprint I made with the Python API')
You can save a created blueprint for later use in either the Blueprint Workshop, or the DataRobot UI.
keras_blueprint.save()
You can also visualize the blueprint
keras_blueprint.show()

In the UI, blueprints are represented graphically with nodes and edges. Both may be selected and provide contextual buttons for performing actions on nodes and edges such as removing, modifying, or adding them.
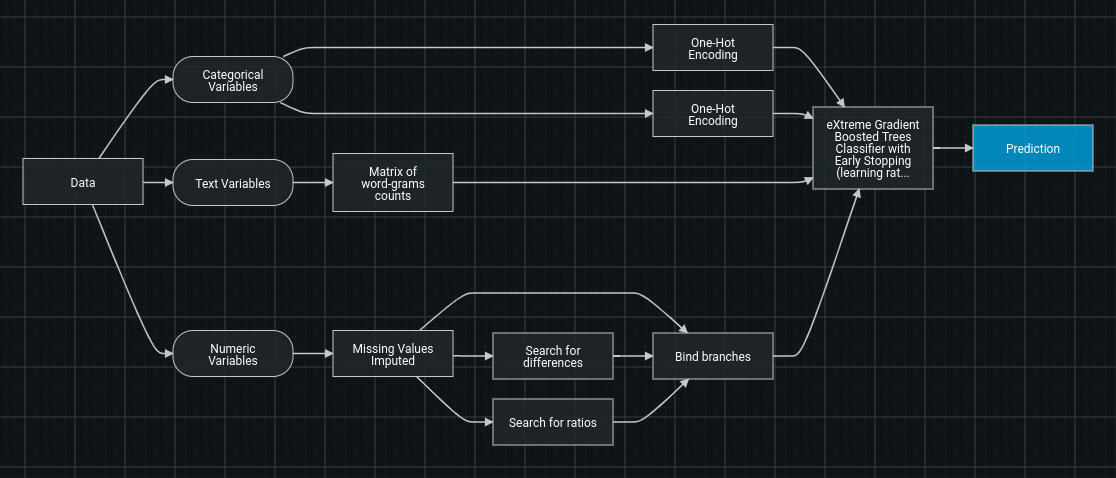
Each blueprint has a few key components:
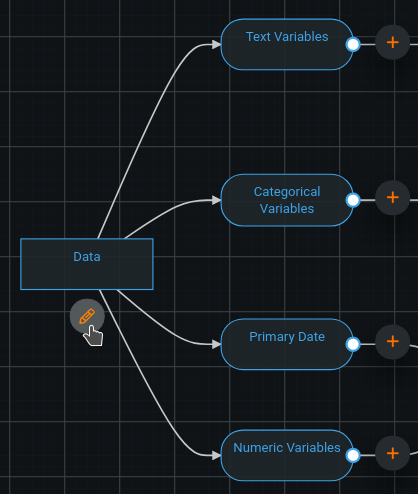
- The incoming data ("Data"), separated into type (categorical, numeric, text, image, geospatial, etc.).
- The tasks performing transformations to the data, for example, "Missing Values Imputed."
- The model(s) making predictions or possibly supplying stacked predictions to a subsequent model.
- Post-processing steps, such as "Calibration."
- The data sent as the final predictions, ("Prediction").
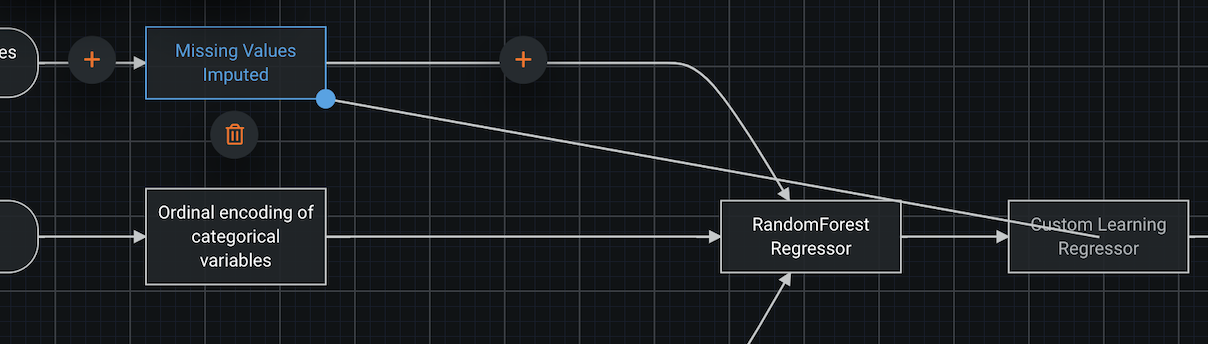
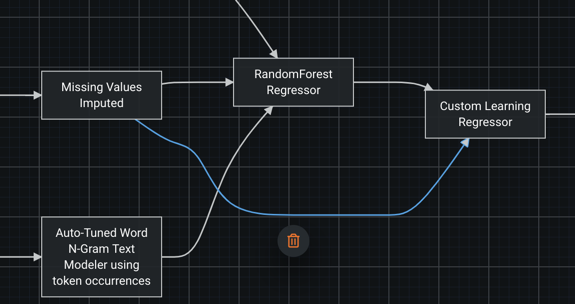
Each blueprint also has nodes and edges (i.e., connections). A node will take in data, perform an operation, and output the data in its new form. An edge is a representation of the flow of data.
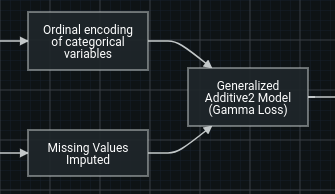
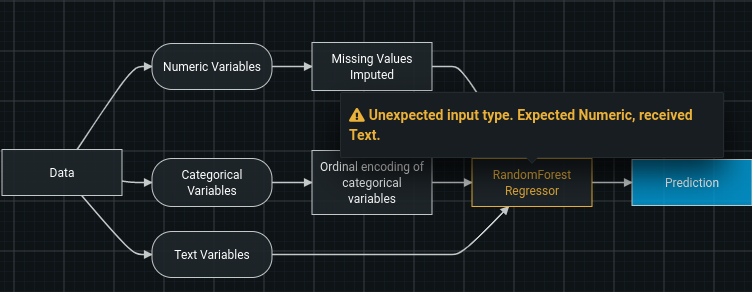
The image below is a representation of two edges that are received by a single node; the two sets will be stacked horizontally. The column count of the incoming data will be the sum of the two sets of columns, and the row count will remain the same.
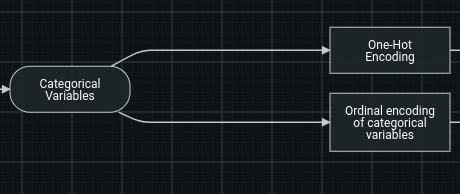
If two edges are output by a single node, it means that the two copies of the output data are being sent to other nodes.
Understanding tasks
The following sections outline what tasks are and how they are used in DataRobot.
Types of tasks
There are two types of tasks available in DataRobot:
-
The estimator class predicts a new value(s) (y) by using the input data (x). The final task in any blueprint must be an estimator. Examples of estimator tasks are LogisticRegression, LightGBM regressor, and Calibrate.
-
The transform class transforms the input data (x) in some way. Examples of transforms are One-hot encoding and Matrix n-gram.
These class types share some similarities:
-
Both class types have a
fit()method which is used to train them; they learn some characteristics of the data. For example, a binning task requiresfit()to define the bins based on training data, and then applies those bins to all incoming data in the future. -
Both transform and estimator can be used for data preprocessing inside a blueprint. For example, Auto-Tuned N-Gram is an estimator and the next task gets its predictions as an input.
How tasks work together in a blueprint
Data is passed through a blueprint sequentially, task by task, left to right.
During training:
-
Once data is passed to an estimator, DataRobot first fits it on the received data, then uses the trained estimator to predict on the same data, then passes the predictions further. To reduce overfit, DataRobot passes stacked predictions when the estimator is not the final step in a blueprint.
-
Once data is passed to a transform, DataRobot first fits it on the received data, then uses it to transform the training data, and passes the result to the next task.
When the trained blueprint is used to make predictions, data is passed through the same steps. However, fit() is skipped for data.
Constructing Blueprints
Tasks are at the core of the blueprint construction process. Understanding how to add, remove, and modify them in a blueprint is vital to successfully constructing a blueprint.
Defining tasks to be used in a blueprint in Python requires knowing the task code to construct it. Fortunately, you can search tasks by name, description, or category, and leverage autocomplete (type w.Tasks.<tab>, where you press the Tab key at <tab>) to get started with construction.
Once you know the task code, you can instantiate it.
binning = w.Tasks.BINNING()
If you will be working with the UI, you will need to start with a blueprint from the Leaderboard, so it is recommended you first read how to modify an existing blueprint, and then return here.
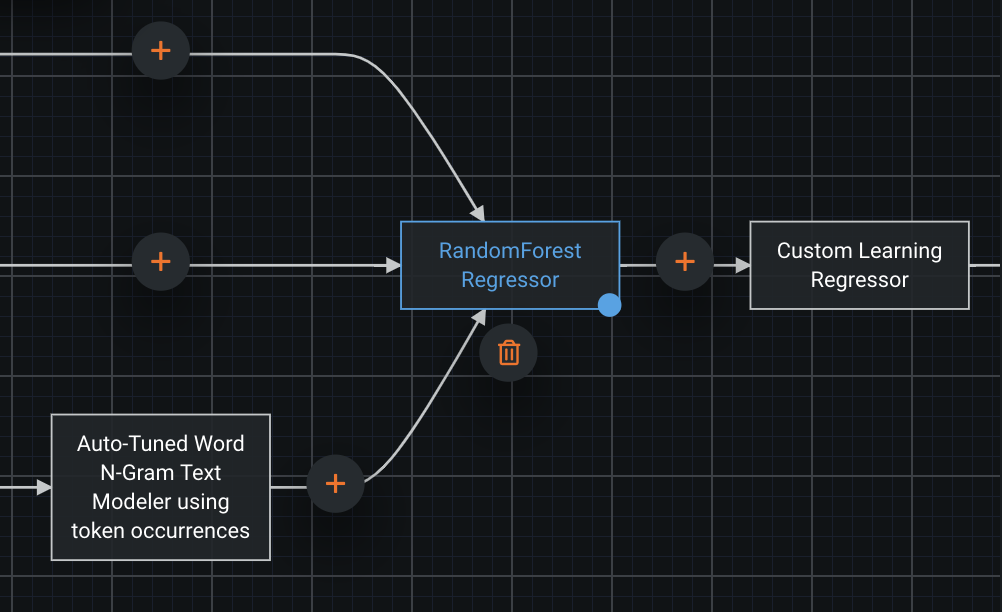
The blueprint editor allows you to add, remove, and modify tasks, their hyperparameters, and their connections.
To modify a task, click a node, then on the associated pencil icon, and edit the task or parameters as desired. Click "Update" when satisfied. (More details <modifying-a-task>)
To add a task, select the node to be its input or output, and click the associated plus sign button. Once the empty node and task dialog appear, choose the task and configure as desired. (More details <modifying-a-task>)
To remove a node, select it and click the trash can icon.
Pass data between tasks
As mentioned in Understanding Blueprints, data is passed from task to task, determined by the structure of the blueprint.
In the following code, you enter a numeric input into a task to perform binning on the numeric input for the blueprint (determined by project and feature list).
binning = w.Tasks.BINNING(w.TaskInputs.NUM)
Now that you have the binning task defined, pass its output to an.
kerasc = w.Tasks.KERASC(binning)
And now we can save, visualize, or train what you've just created by turning it into a BlueprintGraph, as shown in the example notebook.
keras_bp = w.BlueprintGraph(kerasc)
You may pass multiple inputs to a task at construction time, or add more later. The following code will append to the existing input of kerasc.
impute_missing = w.Tasks.NDC(w.TaskInputs.NUM)
kerasc(impute_missing)
You may replace the input instead by passing replace_inputs=True.
kerasc(impute_missing, replace_inputs=True)
The BlueprintGraph will reflect these changes, as shown by calling .show(), but to save the changes, you will need to call .save().
keras_bp.save().show()
To add a connection, select the starting node and drag the blue knob to the output point.
To remove a connection, select the edge which you'd like to remove and click the trash can icon. If the trash can icon does not appear, deleting the connection is not permitted. You must ensure the blueprint is still valid even when you remove the connection.
Modify a task
Modifying a task in the Blueprint Workshop means modifying only the task's parameters; however, in the UI, it can mean modifying the parameters or which task to use in the focused node. This is because you need to edit a task in order to substitute it for another.
Use a different task where the substitution is required and save the blueprint.
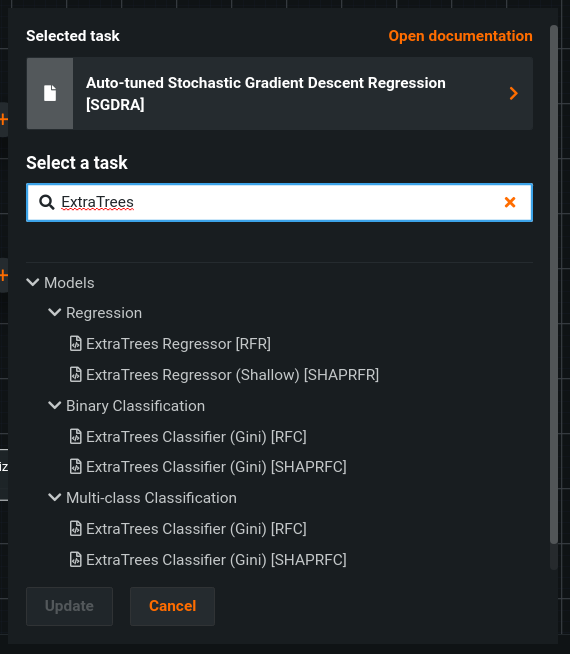
To modify an existing task, click on the node and then the pencil icon to open the task dialog.
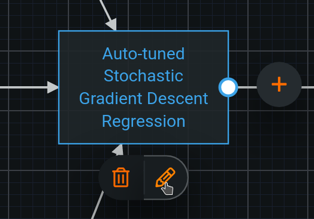
Click on the name of the task for a prompt to choose a new task.

Now you may search and find the specific task you'd like to use. Click Open documentation after selecting a task for details on how the task works.
Configure task parameters
Tasks have parameters you can configure to modify their behavior. These include, for example, the learning rate in a stochastic gradient descent algorithm, the loss function in a linear regressor, the number of trees in XGBoost, and the max cardinality of a one-hot encoding.
The following method is the best way to modify the parameters of a task. DataRobot also recommends viewing the documentation for a task when working with one. If you're using JupyterLab, "Contextual Help" is supported. You can call it using help(w.Tasks.BINNING).
You can continue working with the blueprint from the previous step by modifying the binning task. Specifically, you can raise the maximum number of bins and lower the number of samples needed to define a bin.
binning.set_task_parameters_by_name(max_bins=100, minimum_support=10)
There are a number of other ways to work with task parameters, both in terms of retrieving the current values, and modifying them. It's worth understanding that each parameter has both a "name" and "key". The "key" is the source of truth, but it is a highly condensed representation, often one or two characters. So it's often much easier to work with them by name when possible.
You can modify task parameters as well. Parameters display under the header and are dependent on the task type.
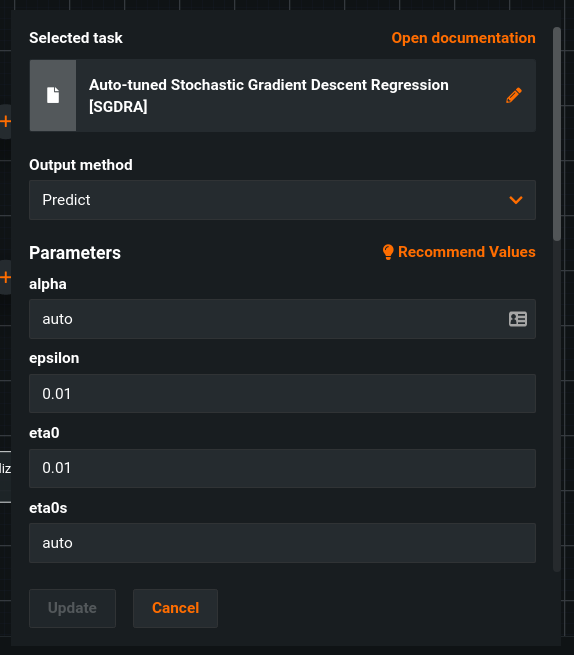
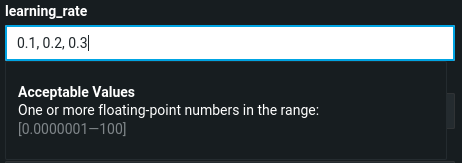
Acceptable values are displayed for each parameter as a single value or multiple values in a comma-delimited list.
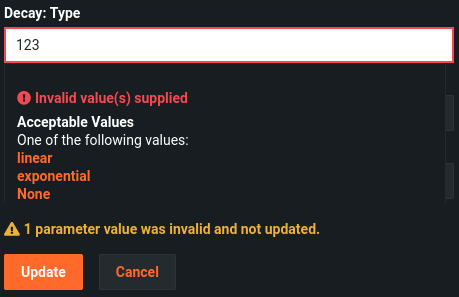
If the selected value is not valid, DataRobot returns an error:
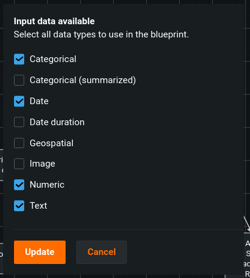
Add or remove data types
A project's data is organized into a number of different input data types. When constructing a blueprint, these types may be specifically referenced. When input data of a particular type is passed to a blueprint, only the input types referenced in the blueprint will be used. Similarly, any input types referenced in the blueprint which do not exist in a project will simply not be executed.
You can add input data types to tasks in the Blueprint Workshop just like you would add any other input(s) to a task. For the sake of demonstration, this code example adds a numeric input and then subsequently adds a date input. However, you can also add them both at once.
ndc = w.Tasks.NDC(w.TaskInputs.NUM)
ndc(w.TaskInputs.DATE)
If the current blueprint does not have all of the input variable types that you'd like to use, you can add more. Select the Data node, then click the pencil icon to modify the input data types available for the current blueprint.
In this modal, you can select any valid input data, even data not currently visible in the blueprint. You can then drag the connection handle in order to denote data passing to the target task.
Modify an existing blueprint
Consider that you have run Autopilot and have a Leaderboard of models, each with their performance measured. If you identify a model that you would like to use as the basis for further exploration in the blueprint workshop, you can use the instruction below.
First, set the project_id of the Workshop for the project that contains the model you want to use.
w.set_project(project_id=project_id)
Retrieve the blueprint_id associated with the model you want to use. You can do so in multiple ways:
If you are working with DataRobot's Python client, you can retrieve the desired blueprint by searching a project's menu:
menu = w.project.get_blueprints()
blueprint_id = menu[0].id
To visualize the blueprints and find the one you would like to clone, DataRobot provides an example workflow. You can also search a project's Leaderboard.
models = w.project.get_models()
blueprint_id = models[0].blueprint_id
By navigating to the Leaderboard in the UI, you can obtain a specific model ID via the URL bar, which can be used to directly retrieve a model, which has a blueprint_id field.
Once the blueprint_id is obtained, it may be used to clone a blueprint.
bp = w.clone(blueprint_id=blueprint_id)
The source code to create the blueprint from scratch can be retrieved with a simple command:
bp.to_source_code()
The command may output:
keras = w.Tasks.KERASC(...)
keras_blueprint = w.BlueprintGraph(keras)
This is the code necessary to execute to create the exact same blueprint from scratch. This is useful as it can be modified to create a desired blueprint similar to the cloned blueprint.
To make modifications to a blueprint and save in place (as opposed to making another copy), omit the final line which creates a new BlueprintGraph (the call to (w.BlueprintGraph)) and instead call the blueprint you'd like to overwrite on the new final task:
keras = w.Tasks.KERASC(...)
# keras_blueprint = w.BlueprintGraph(...)
bp(keras).save()
Navigate to "Describe > Blueprint" and choose Copy and Edit.
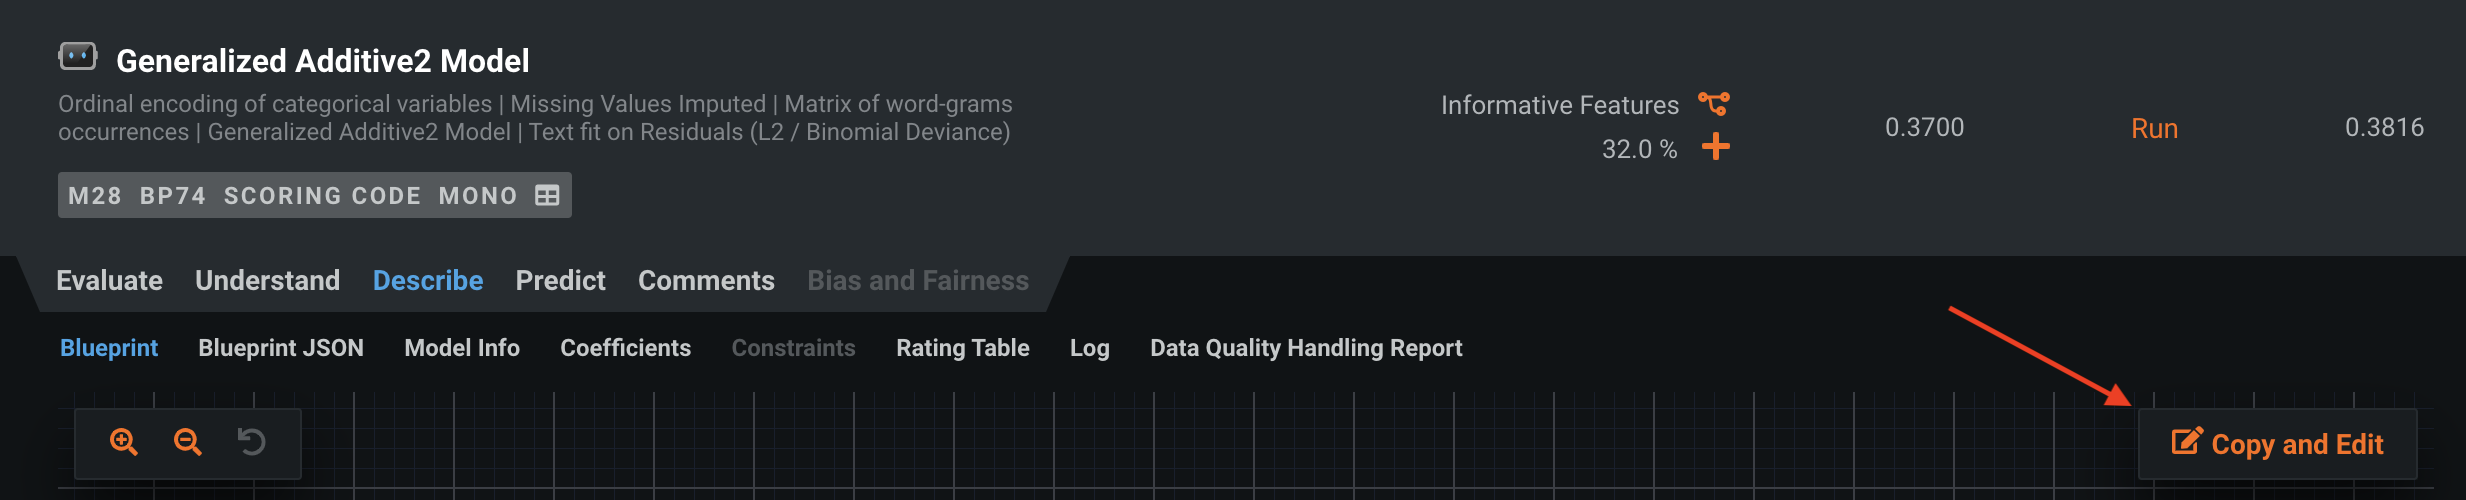
DataRobot opens the blueprint editor, where you can directly modify the blueprint to, for example, incorporate new preprocessing or to stack with other models. Alternatively, you can save it to be used with other projects.
Validation
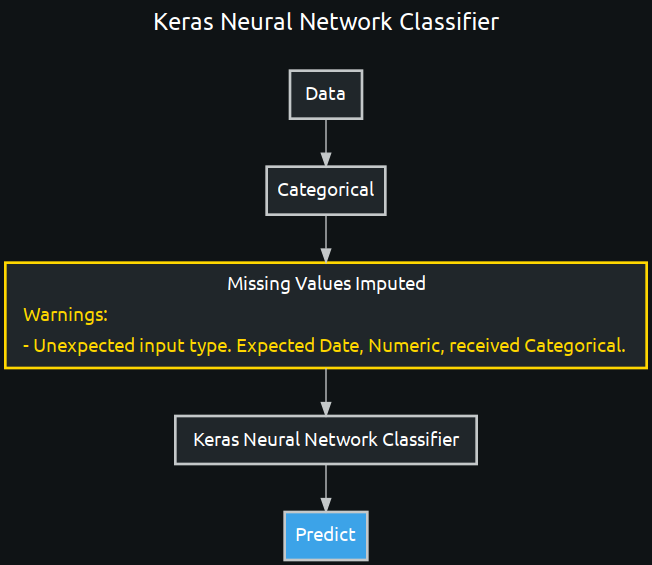
Blueprints have built-in validation and guardrails in both the DataRobot UI and Blueprint Workshop, allowing you to focus on your goals without worrying about remembering the requirements and the ways each task impacts the data from a specification standpoint. This means that the properties of each task are considered for you and you don't need to remember when a task only allows certain data types, requires a certain type of sparsity, handles missing values through imputation, imposes requirements on column count, or anything else. Blueprints automatically validate these properties and requirements, presenting you with warnings or errors if your edits introduce any issues.
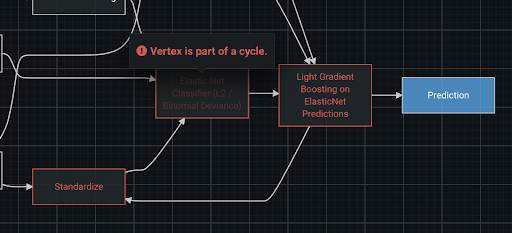
Furthermore, other structural checks will be performed to ensure that the blueprint is properly connected, contains no cycles, and can be executed.
In the Blueprint Workshop, call .save() and the blueprint is automatically validated.
pni = w.Tasks.PNI2(w.TaskInputs.CAT)
binning = w.Tasks.BINNING(pni)
keras = w.Tasks.KERASC(binning)
invalid_keras_blueprint = w.BlueprintGraph(keras).save()
invalid_keras_blueprint.show(vertical=True)
Constraints
Every blueprint is required to have no cycles; the flow of data must be in one direction and never pass through the same node more than once. If a cycle is introduced, DataRobot throws an error in the same fashion as validation, indicating which nodes caused the issue.
Train a blueprint
Use the keras_bp from previous examples. We can retrieve our project_id by navigating to a project in the UI and copying it from the URL bar .../project/<project_id>/..., or by calling .id on a DataRobot Project, if using the DR Python client.
keras_bp.train(project_id=project_id)
If the project_id is set on the Workshop, you may omit the argument to the train method.
w.set_project(project_id=project_id)
keras_bp.train()
Ensure your model is up-to-date, check for any warnings or errors, and click Train. Select any necessary settings.
Search for a blueprint
You may search blueprints by optionally specifying a portion of a title or description of a blueprint, and may specify one or more tags which you have created and tagged blueprints with.
By default, the search results will be a python generator, and the actual blueprint data will not be requested until yielded in the generator.
You may provide the flag as_list=True in order to retrieve all of the blueprints as a list immediately (note this will be slower, but all data will be delivered at once).
You may provide the flag show=True in order to visualize each blueprint returned which will automatically retrieve all data (as_list=True).
shown_bps = w.search_blueprints("Linear Regression", show=True)
# bp_generator = w.search_blueprints("Linear Regression")
# bps = w.search_blueprints(tag=["deployed"], as_list=True)
Searching for blueprints is done through the AI Catalog, and works just like searching for a dataset. You may filter by a specific tag, or search based on the title or description.
Share blueprints
Building a collection of blueprints for use by many individuals or an entire organization is a fantastic way to ensure maximum benefit and impact for your organization.
Sharing a blueprint with other individuals requires calling share on the blueprint, and specifying the role to assign (Consumer by default, if omitted).
The assigned role can be:
-   Consumer: The user can view and train the blueprint.
-   Editor: The user can view, train, and edit the blueprint.
-   Owner: The user can view, train, edit, delete, and manage permissions, which includes revoking access from any other owners (including you).
from datarobot_bp_workshop.utils import Roles
keras_bp.share(["<alice@your-org.com>", "<bob@your-org.com>"],role=Roles.CONSUMER)
# keras_bp.share(\[\"<alice@your-org.com>\","<bob@your-org.com>\"\], role=Roles.EDITOR)
# keras_bp.share(\[\"<alice@your-org.com>\", \"<bob@your-org.com>\"\], role=Roles.OWNER)
There are also similar methods to allow for sharing with a group or organization, which will require, respectively, a group_id or organization_id.
from datarobot_bp_workshop.utils import Roles

keras_bp.share_with_group(["<group_id>"], role=Roles.CONSUMER)
keras_bp.share_with_org(["<organization_id>"], role=Roles.CONSUMER)
In the UI, sharing a blueprint is just like sharing a dataset. Navigate to the AI Catalog, search for the blueprint to be shared, and select it.
Next, click "Share" and specify an individual(s), group(s), or organization(s), and choose the role you would like to assign.