Create custom models
Custom models are user-created, pretrained models that you can upload to DataRobot (as a collection of files) via the Model workshop. You can assemble custom models in either of the following ways:
-
Create a custom model without the environment requirements and a
start_server.shfile on the Assemble tab. This type of custom model must use a drop-in environment. Drop-in environments contain the requirements andstart_server.shfile used by the model. They are provided by DataRobot in the workshop. -
Create a custom model with the environment requirements and a
start_server.shfile on the Assemble tab. This type of custom model can be paired with a custom or drop-in environment.
Be sure to review the guidelines for assembling a custom model before proceeding. If any files overlap between the custom model and the environment folders, the model's files will take priority.
Testing custom models
Once a custom model's file contents are assembled, you can test the contents locally for development purposes before uploading it to DataRobot. After you create a custom model in the model workshop, you can run a testing suite from the Test tab.
Create a new custom model
To create a custom model in preparation for assembly:
-
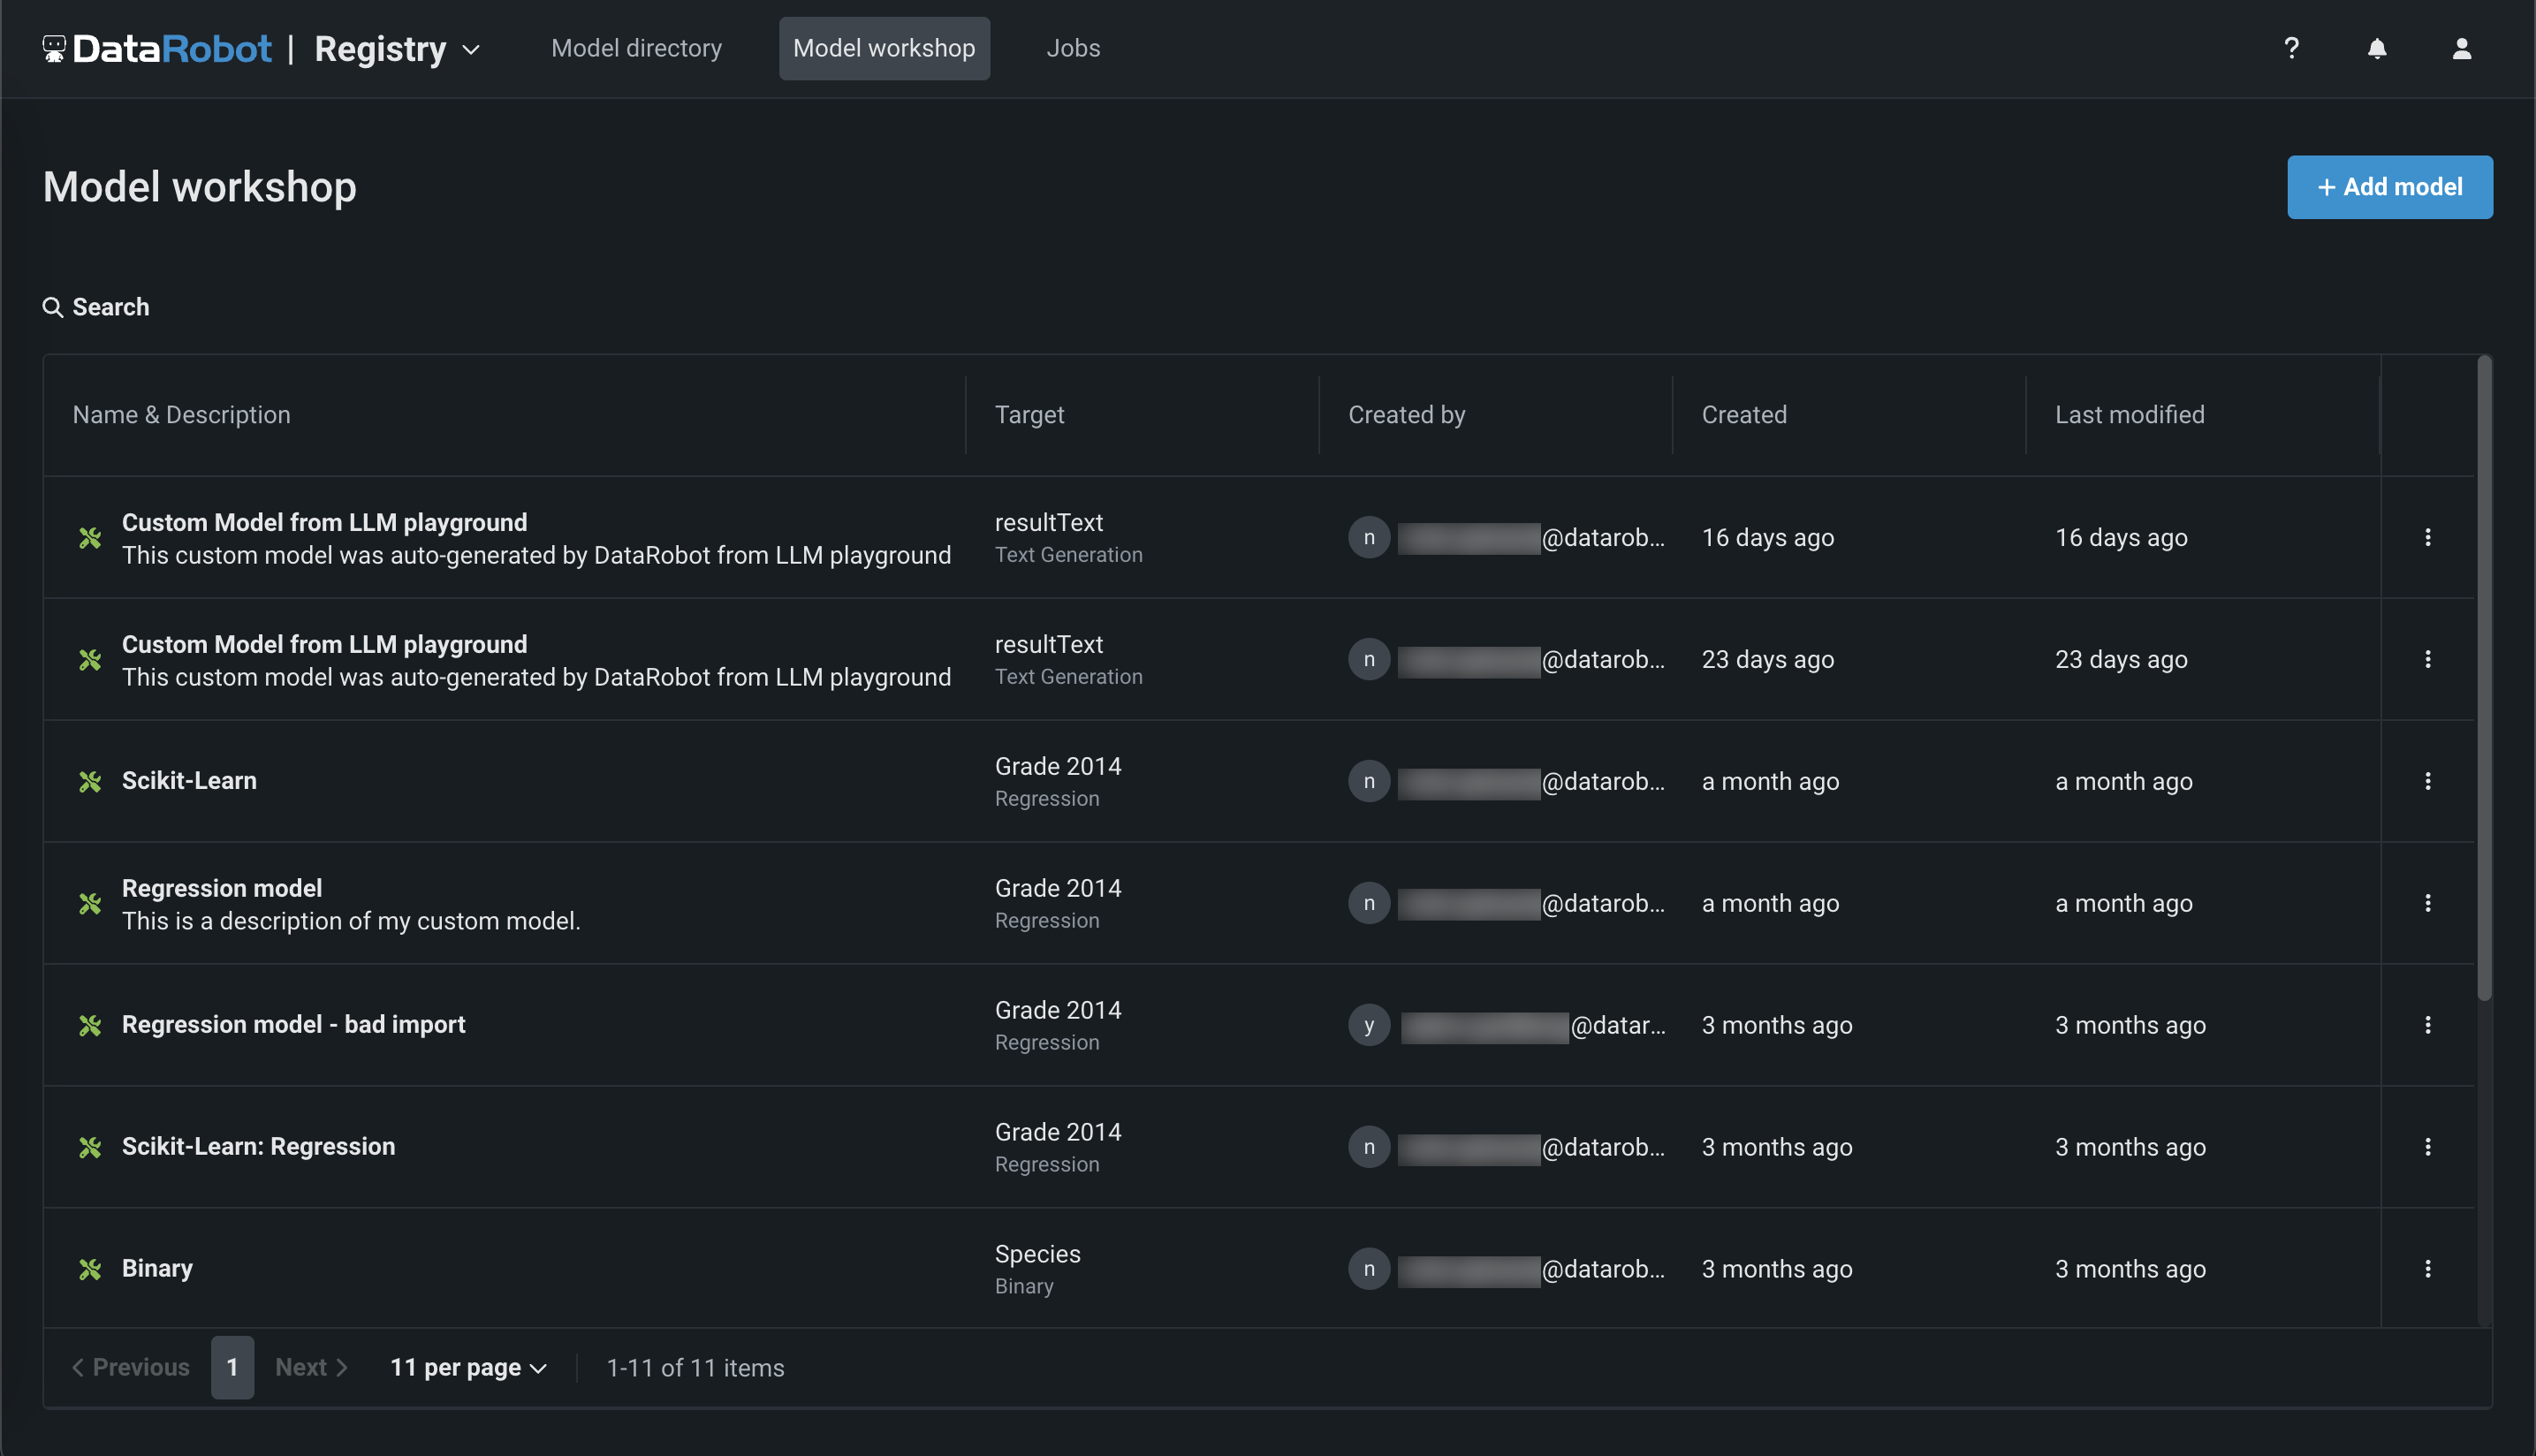
Click Registry > Model workshop. This tab lists the models you have created:
-
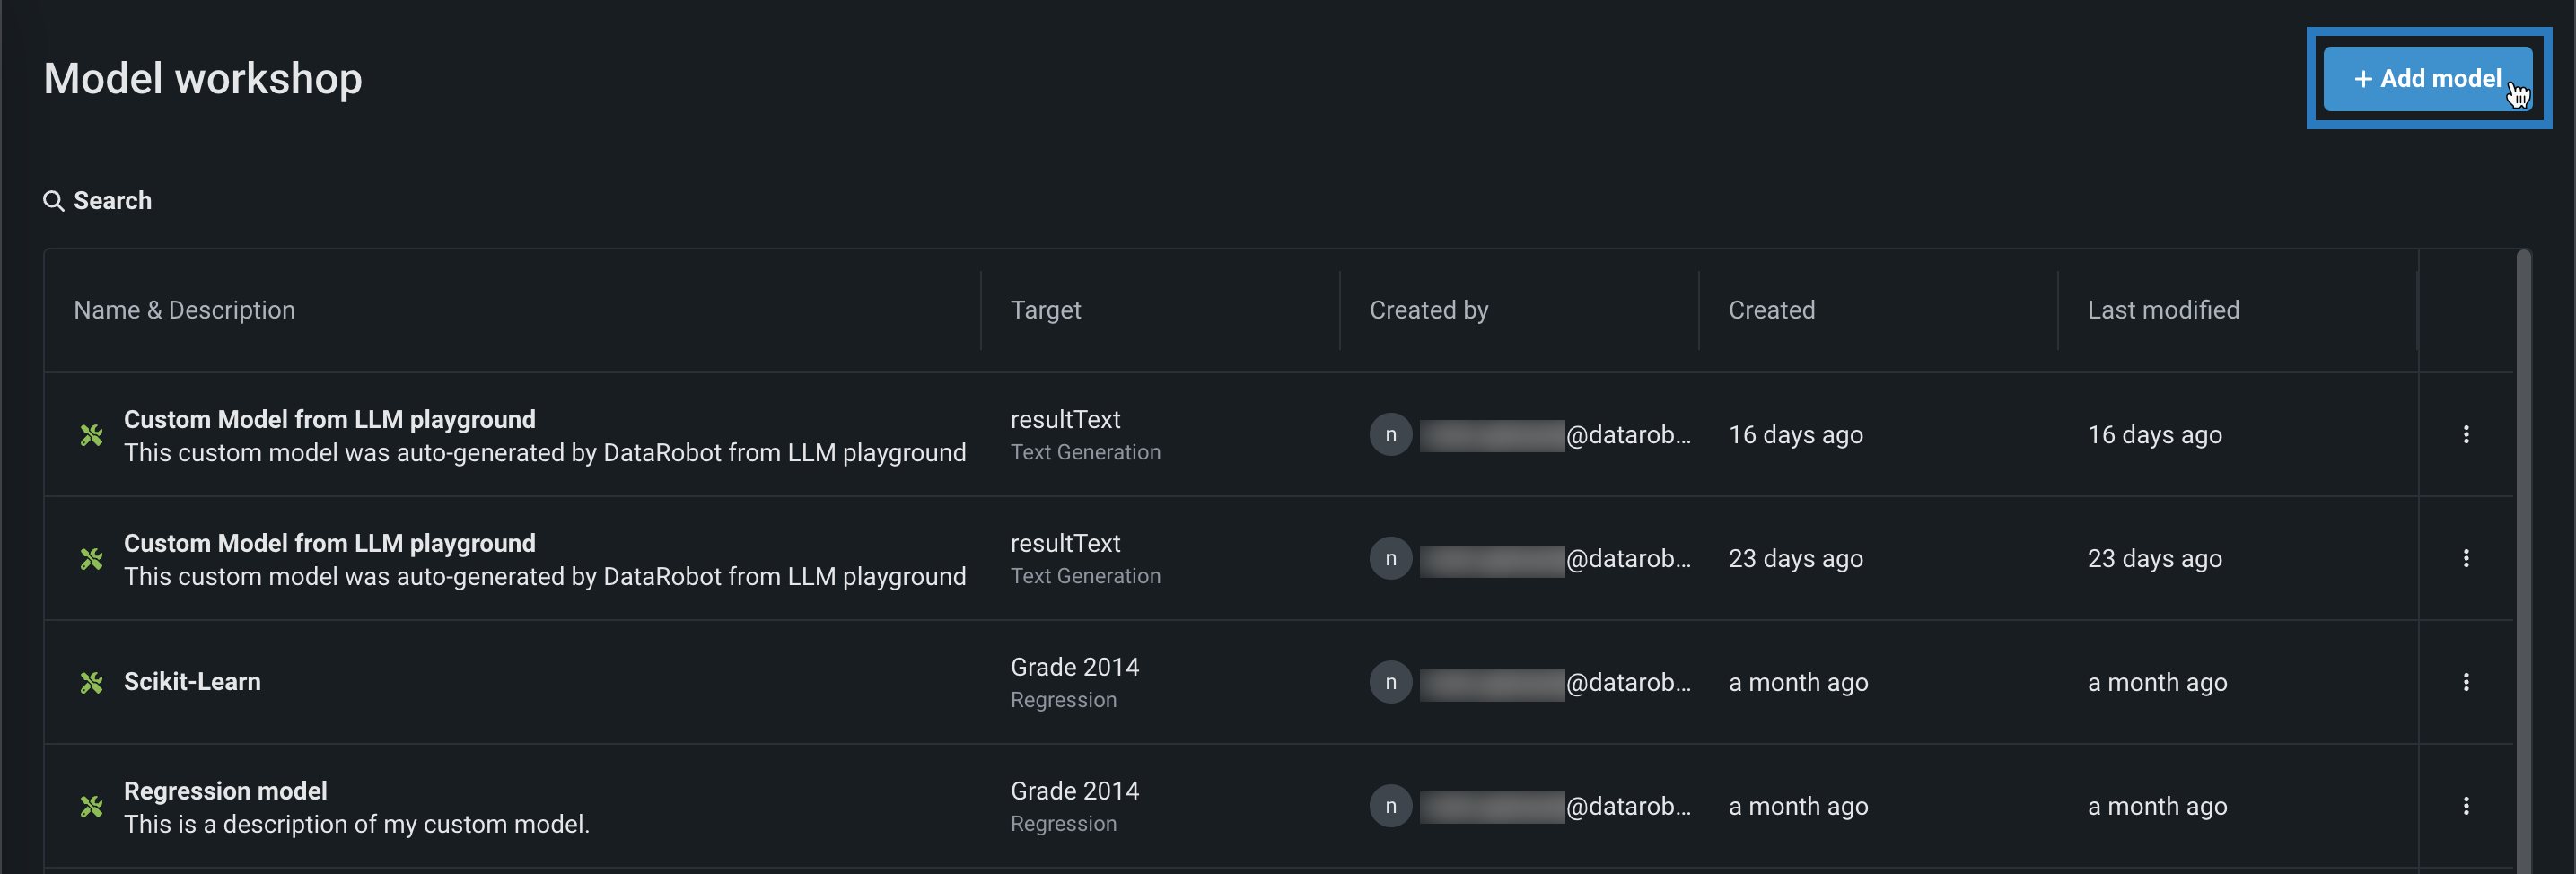
Click + Add model (or the button when the custom model panel is open):
-
On the Add a model page, enter the fields under Configure the model:
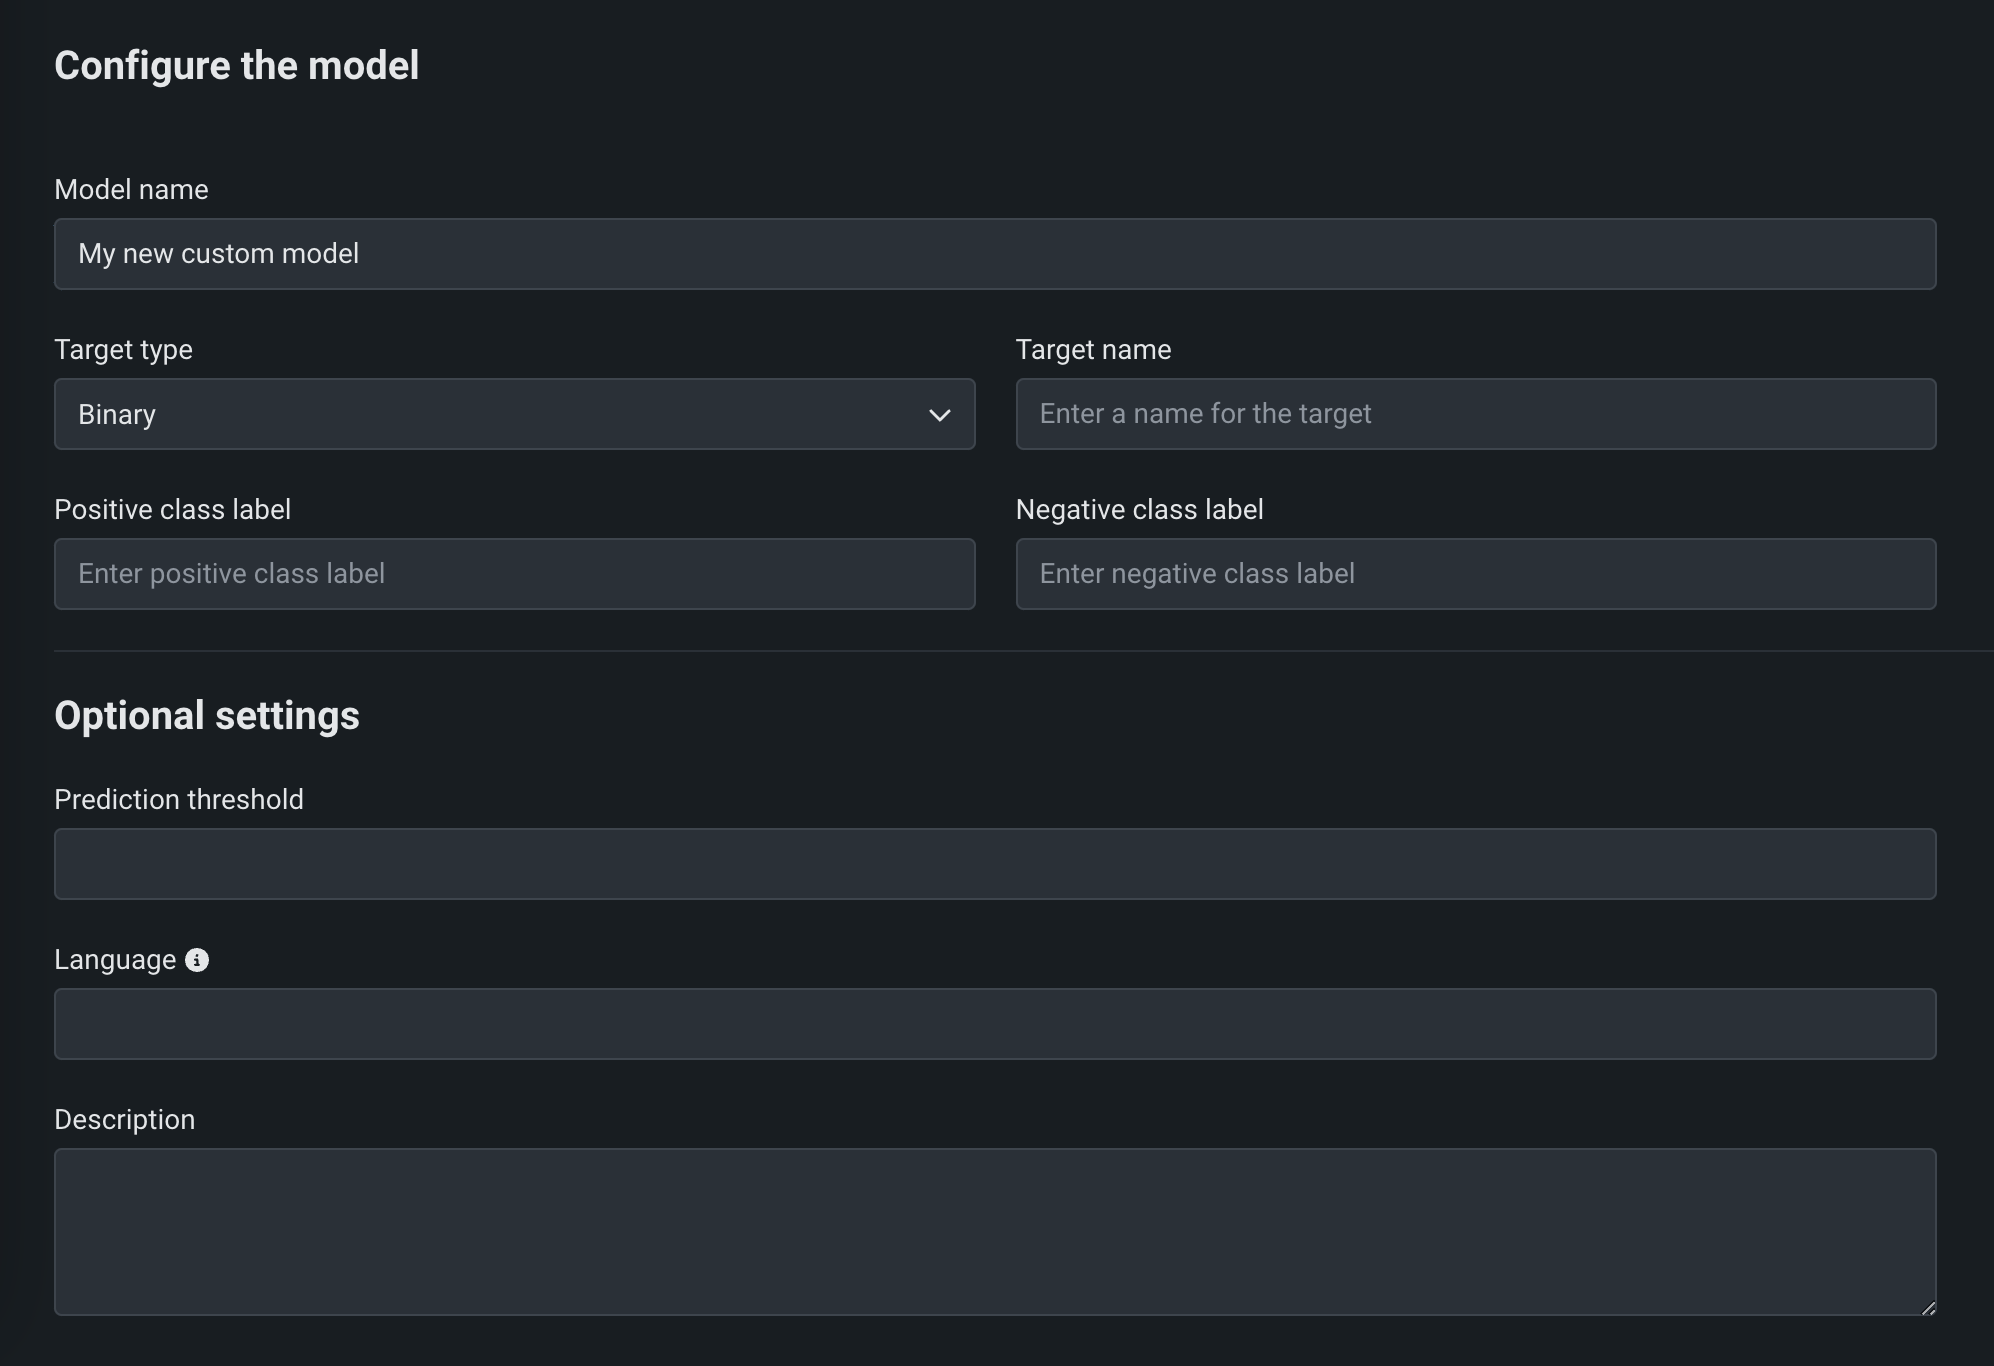
Field Description Model name A descriptive name for the custom model. Target type The type of prediction the model makes. Depending on the prediction type, you must configure additional settings: - Binary: For a binary classification model, enter the Positive class label and the Negative class label.
- Regression: No additional settings.
- Time Series (Binary): Preview feature. For a binary classification model, enter the Positive class label and the Negative class label and configure the time series settings.
- Time Series (Regression): Preview feature. Configure the time series settings.
- Multiclass: For a multiclass classification model, enter or upload (
.csv,.txt) the Target classes for your target, one class per line. To ensure that the classes are applied correctly to your model's predictions, enter classes in the same order as your model's predicted class probabilities. - Text Generation: Premium feature. No additional settings.
- Anomaly Detection: No additional settings.
- Unstructured: No additional settings. Unstructured models do not need to conform to a specific input/output schema and may use a different request format. Prediction drift, accuracy tracking, challengers, and humility are disabled for deployments with a "Unstructured" target type. Service health, deployment activity, and governance remain available.
Target name The dataset's column name that the model will predict on. This field isn't available for multiclass or anomaly detection models. Advanced configuration Language The programming language used to build the model. Description A description of the model's contents and purpose. -
After completing the fields, click Add model.
The custom model opens to the Assemble tab.
Configure time series settings
Availability information
Time series custom models are off by default. Contact your DataRobot representative or administrator for information on enabling this feature.
Feature flag: Enable Time Series Custom Models, Enable Feature Filtering for Custom Model Predictions
You can create time series custom models by configuring the following time series-specific fields, in addition to the fields required for binary classification and regression models. To create a time series custom model, select Time Series (Binary) or a Time Series (Regression) as a Target type, and configure the following settings while creating the model:
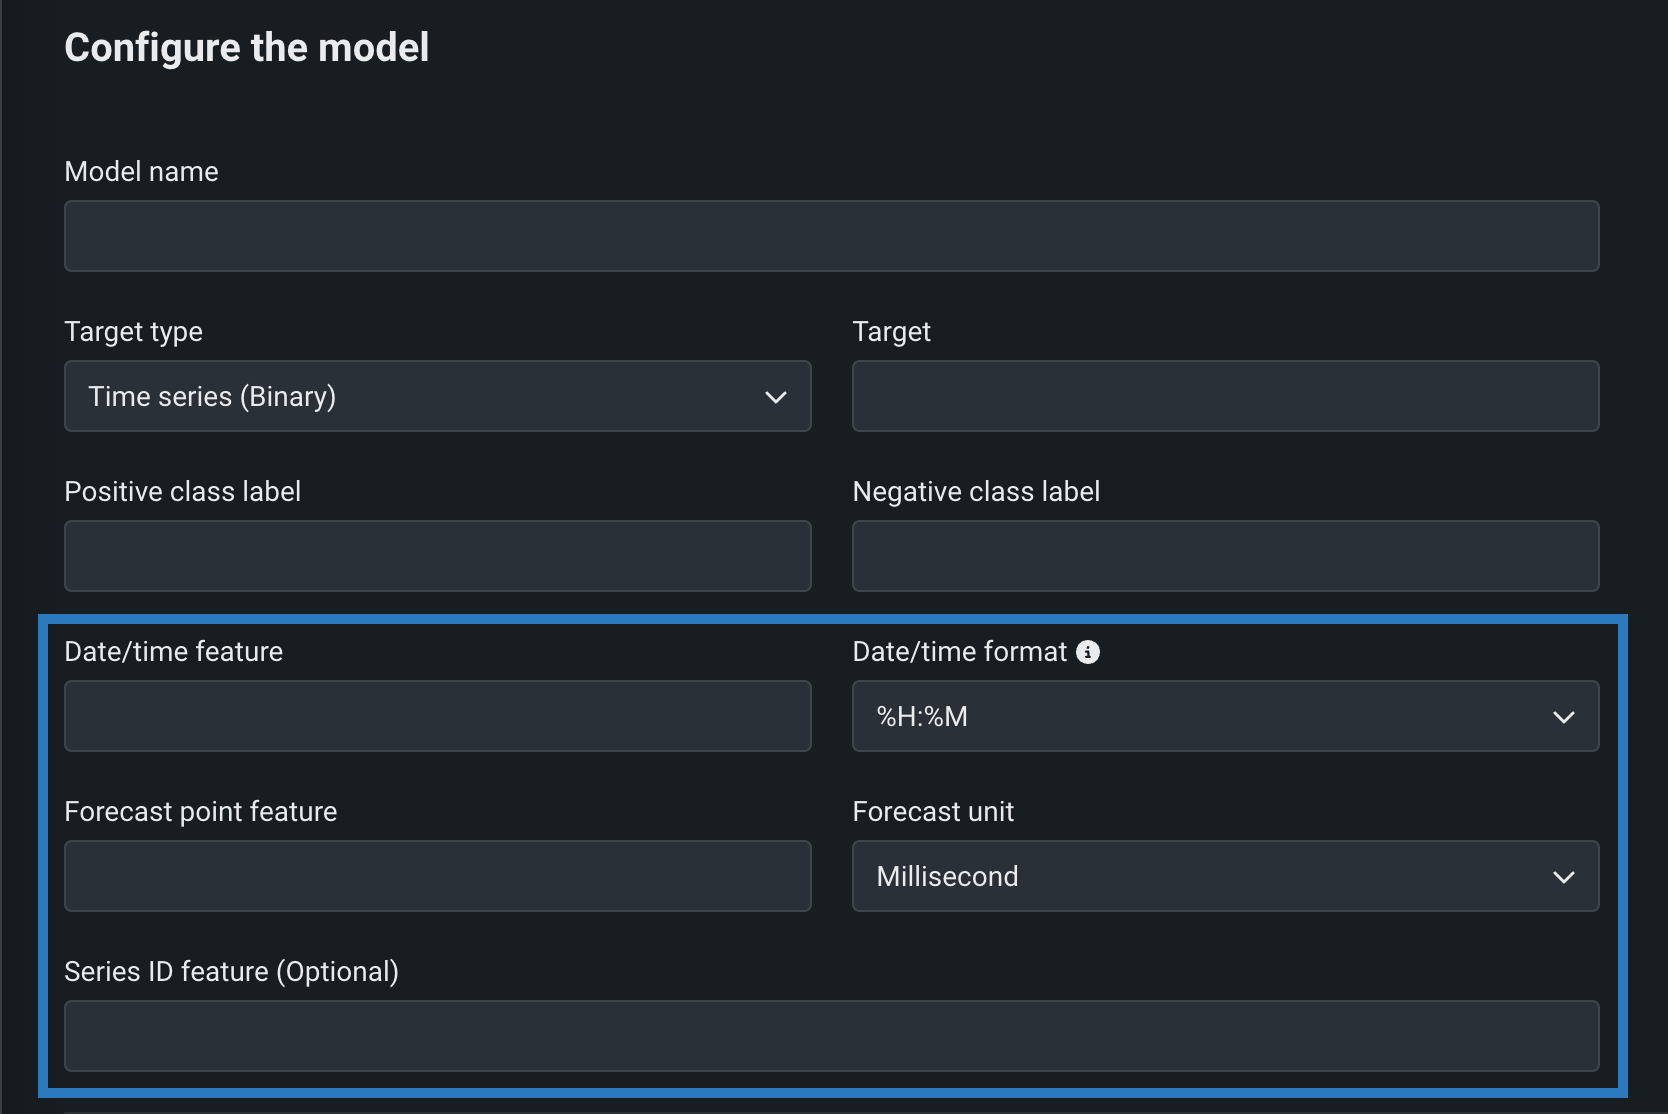
| Field | Description |
|---|---|
| Date/time feature | The column in the training dataset that contains date/time values of the given prediction row. |
| Date/time format | The format of the values in both the date/time feature column and the forecast point feature column, provided as a drop-down list of all possible values in GNU C library format. |
| Forecast point feature | The column in the training dataset that contains the point from which you are making a prediction. |
| Forecast unit | The time unit (seconds, days, months, etc.) that the time step uses, provided as a drop-down list of all possible values. |
| Series ID feature | Optional. For multiseries models, the column in the training dataset that identifies which series each row belongs to. |
When you make real-time predictions with a time series custom model, in the CSV serialization of the prediction response, any extra columns (beyond the prediction results) returned from the model have a column name suffixed with _OUTPUT.
Considerations for time series custom models
Time series custom models:
-
Cannot be selected as challengers.
-
Only support the model startup test during custom model testing.
-
Support real-time predictions, not batch predictions.
-
Do not support the portable prediction server (PPS).
Configure an anomaly detection model
You can create custom models that support anomaly detection problems. If you choose to build one, reference the DRUM template. (Log in to GitHub before clicking this link.) When deploying custom anomaly detection models, note that the following functionality is not supported:
- Data drift
- Accuracy and association IDs
- Challenger models
- Humility rules
- Prediction intervals
Assemble the custom model
After you create a custom model, you can provide the required environment, dependencies, and files:
-
In the model you want to assemble, on the Assemble tab, navigate to the Environment section and select a model environment from the Base environment dropdown menu.
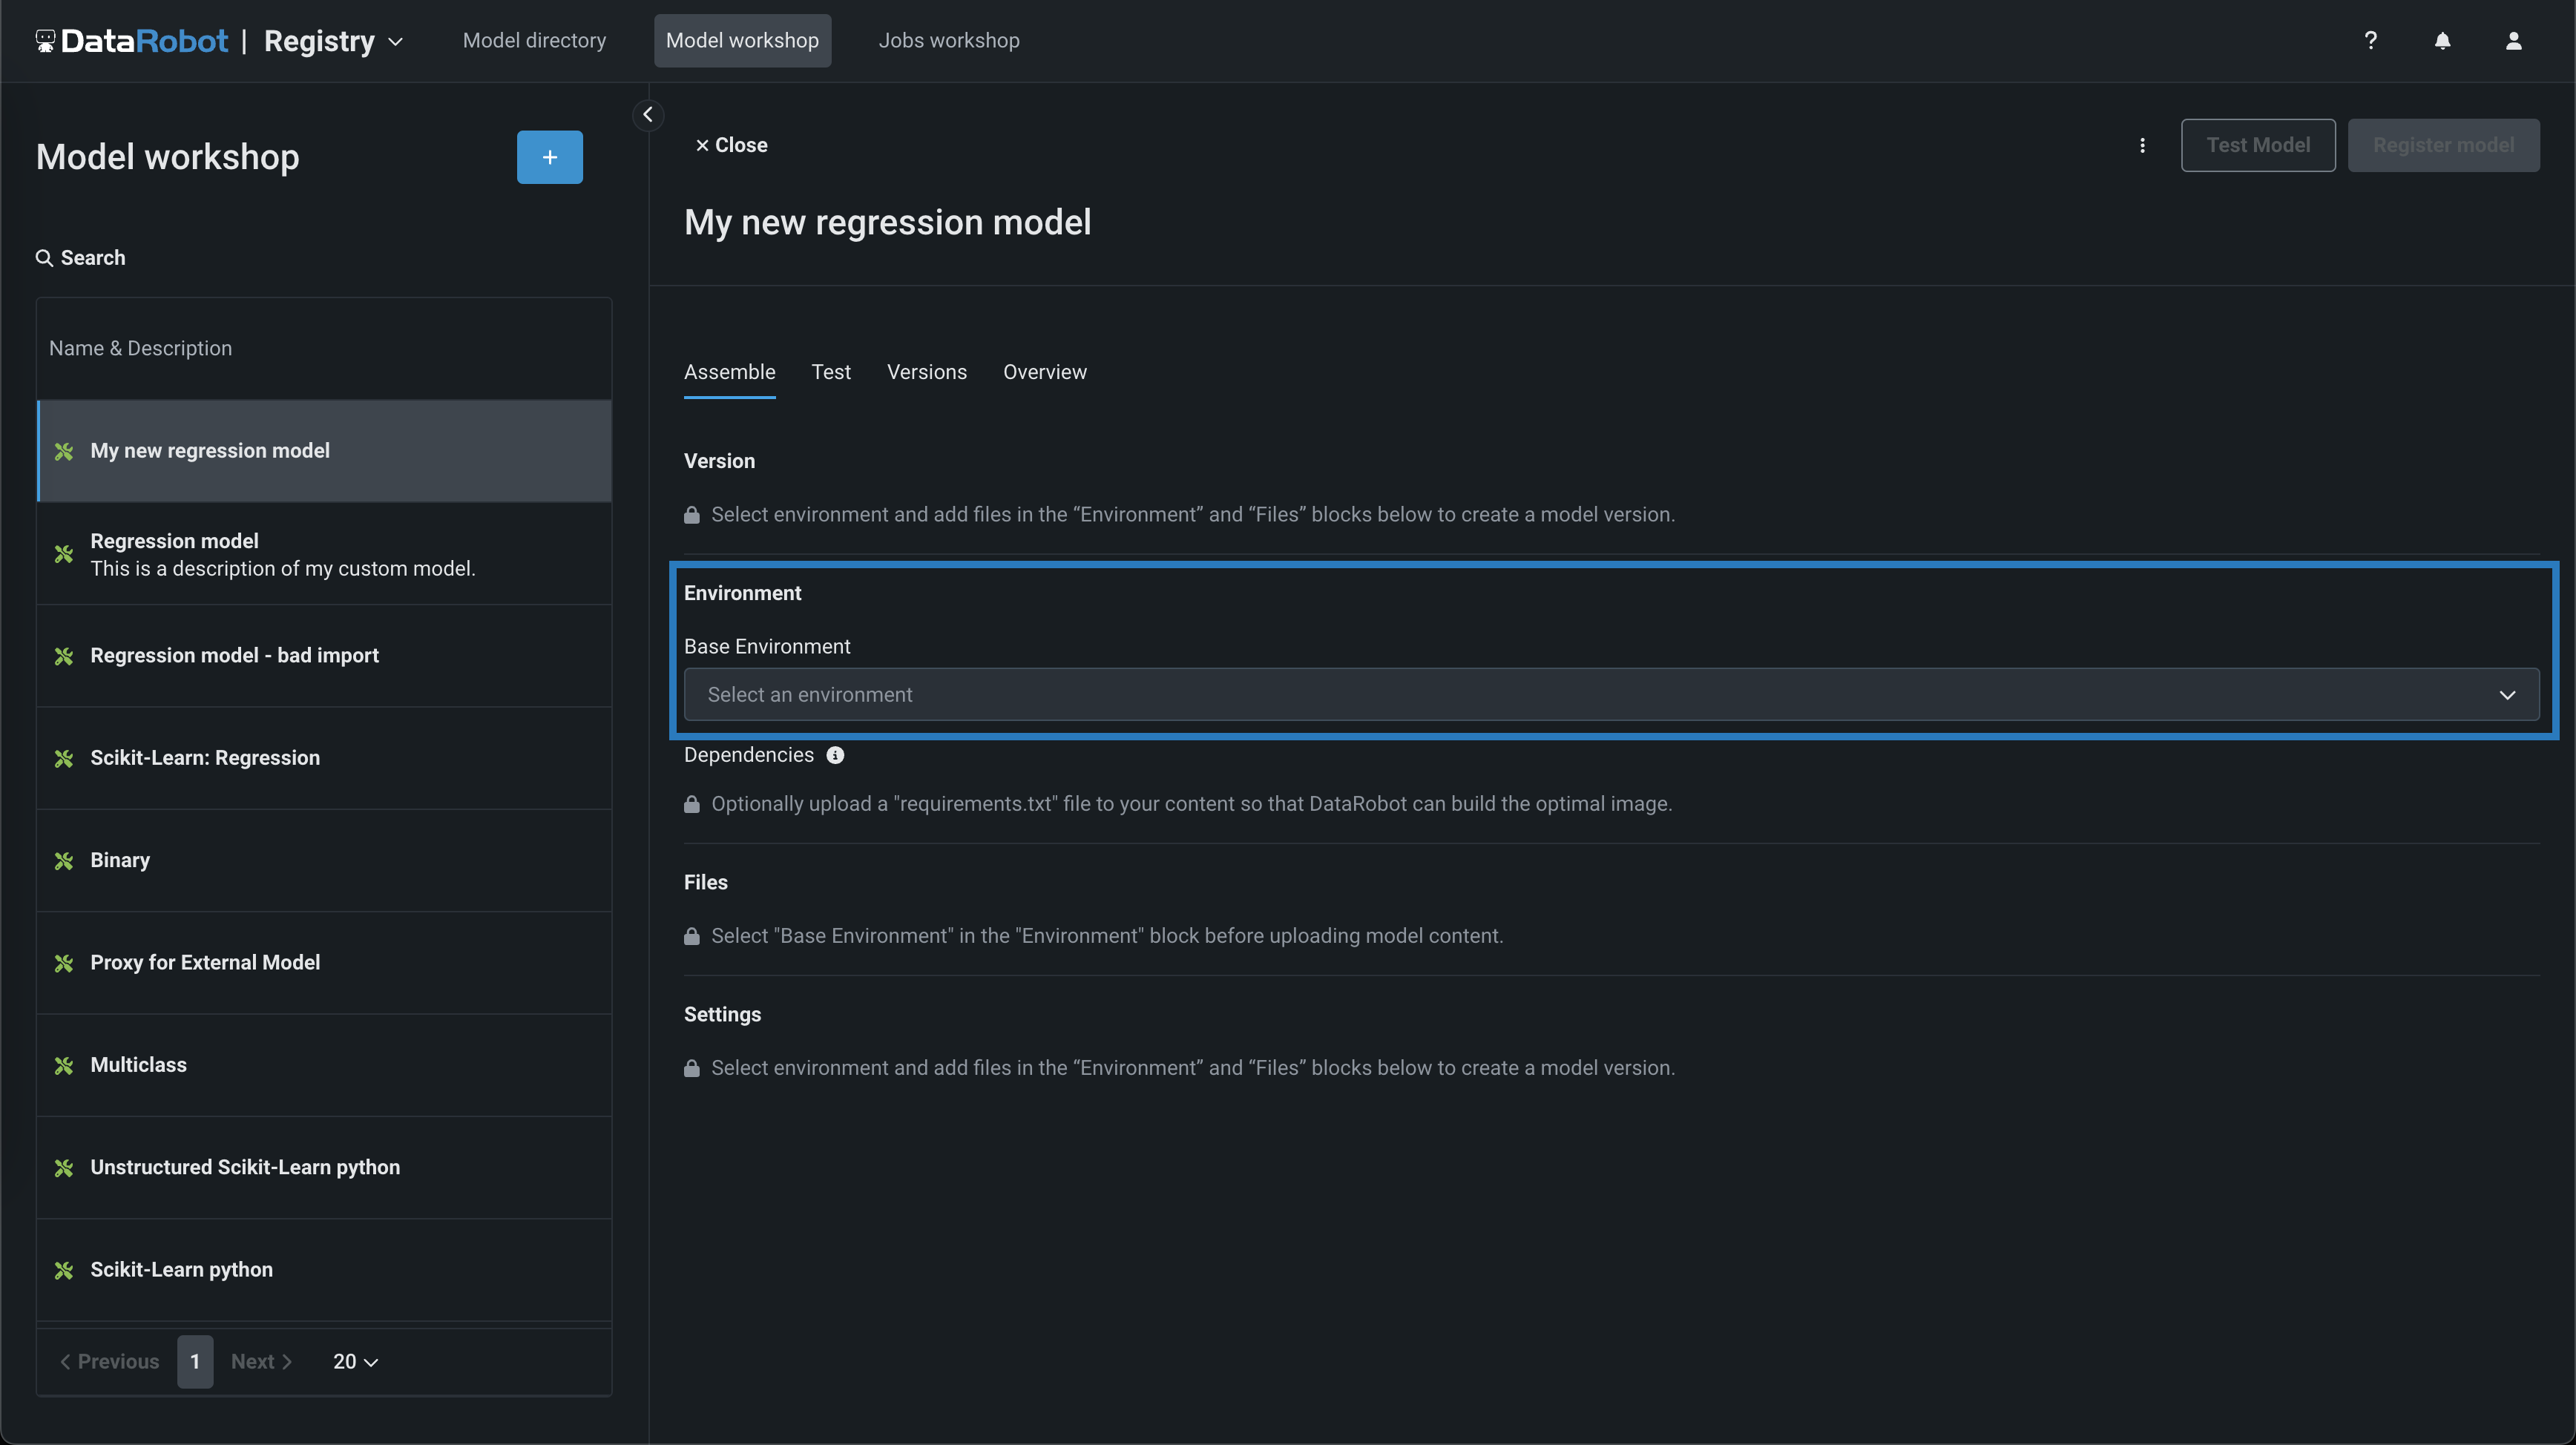
Model environments
The model environment is used for testing and deploying the custom model. The Base Environment drop-down list includes drop-in model environments and any custom environments that you can create.
-
To populate the Dependencies section, you can upload a
requirements.txtfile in the Files section, allowing DataRobot to build the optimal image. -
In the Files section, add the required custom model files. If you aren't pairing the model with a drop-in environment, this includes the custom model environment requirements and a
start_server.shfile. You can add files in several ways: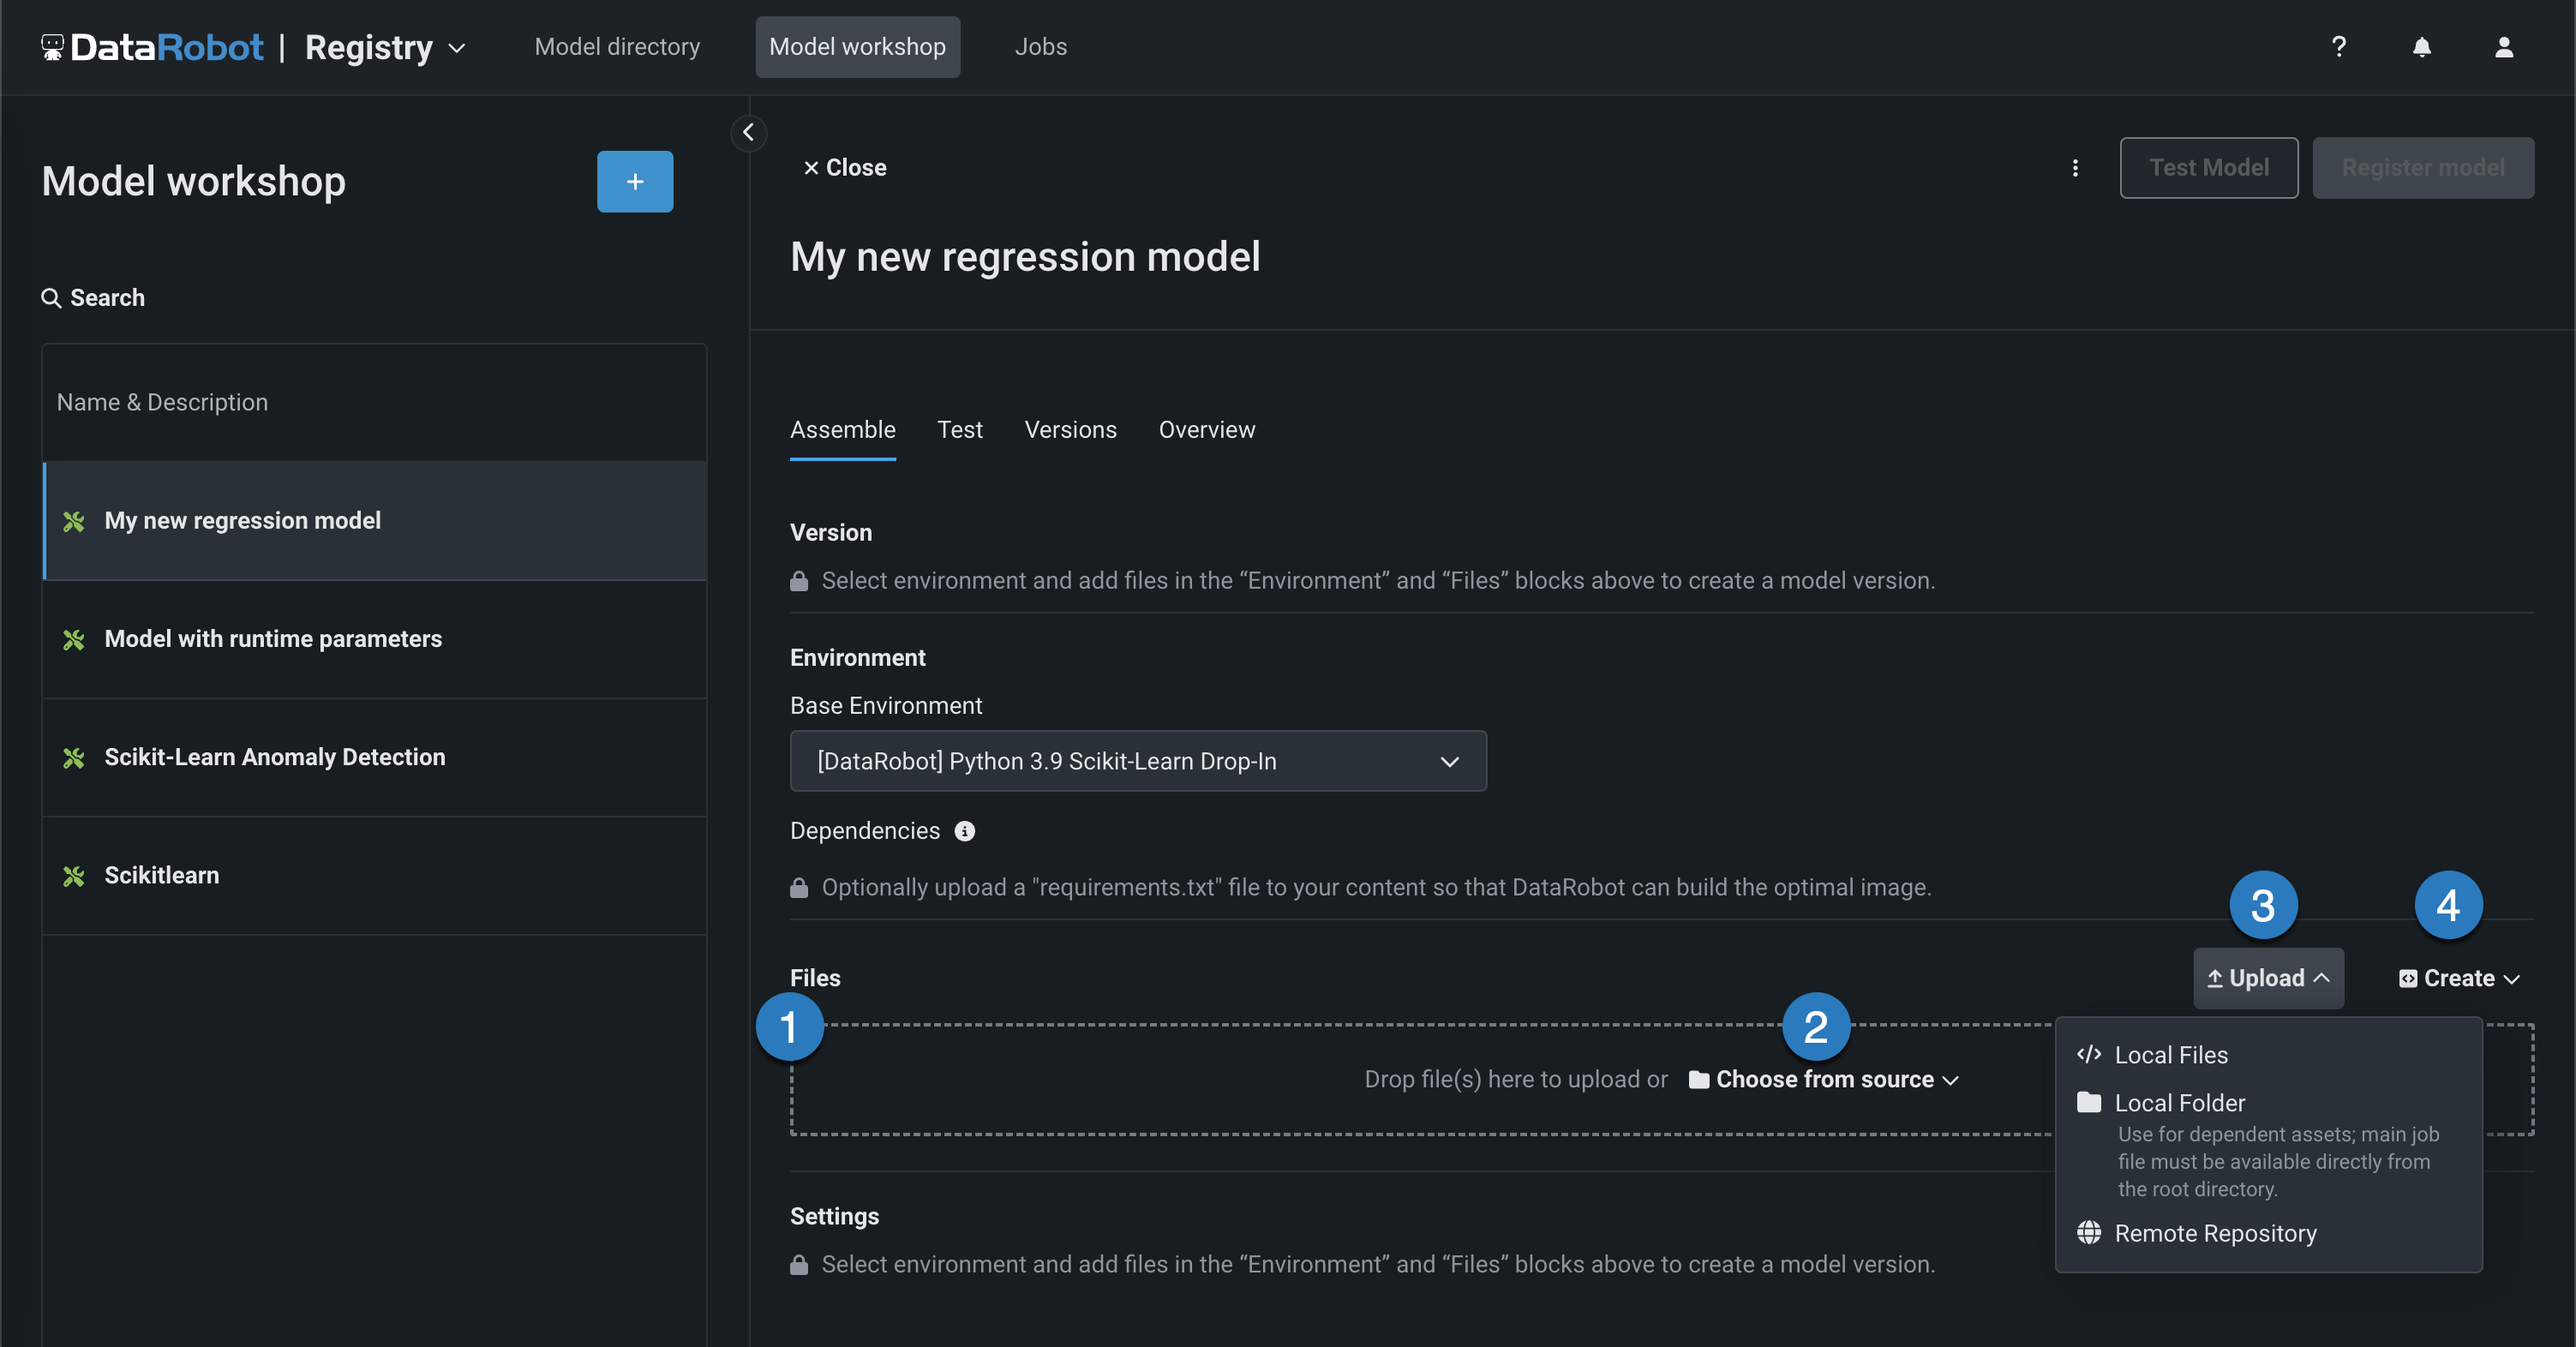
Element Description 1 Files Drag files into the group box for upload. 2 Choose from source Click to browse for Local Files or a Local Folder. 3 Upload Click to browse for Local Files or a Local Folder or to pull files from a remote repository. 4 Create Create a new file, empty or as a template, and save it to the custom model: - Create model-metadata.yaml: Creates a basic, editable example of a runtime parameters file.
- Create blank file: Creates an empty file. Click the edit icon () next to Untitled to provide a file name and extension, then add your custom contents.
File replacement
If you add a new file with the same name as an existing file, when you click Save, the old file is replaced in the Files section.
Model file location
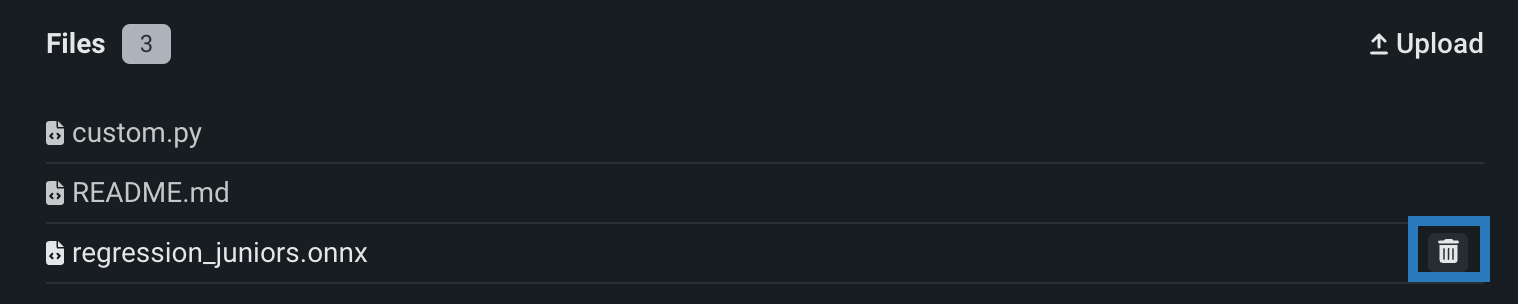
If you add files from a Local Folder, make sure the model file is already at the root of the custom model. Uploaded folders are for dependent files and additional assets required by your model, not the model itself. Even if the model file is included in the folder, it will not be accessible to DataRobot unless the file exists at the root level. The root file can then point to the dependencies in the folder.
If you incorrectly add one or more files or folders to the Assemble tab, in the Files section, you can click the delete () icon next to each file or folder to remove it from the custom model.
Remote repositories
In the Files section, if you click Upload > Remote Repository, the Add the content from remote repository panel opens. You can click Remote Repositories to register a new remote repository (A), or select an existing remote repository (B):
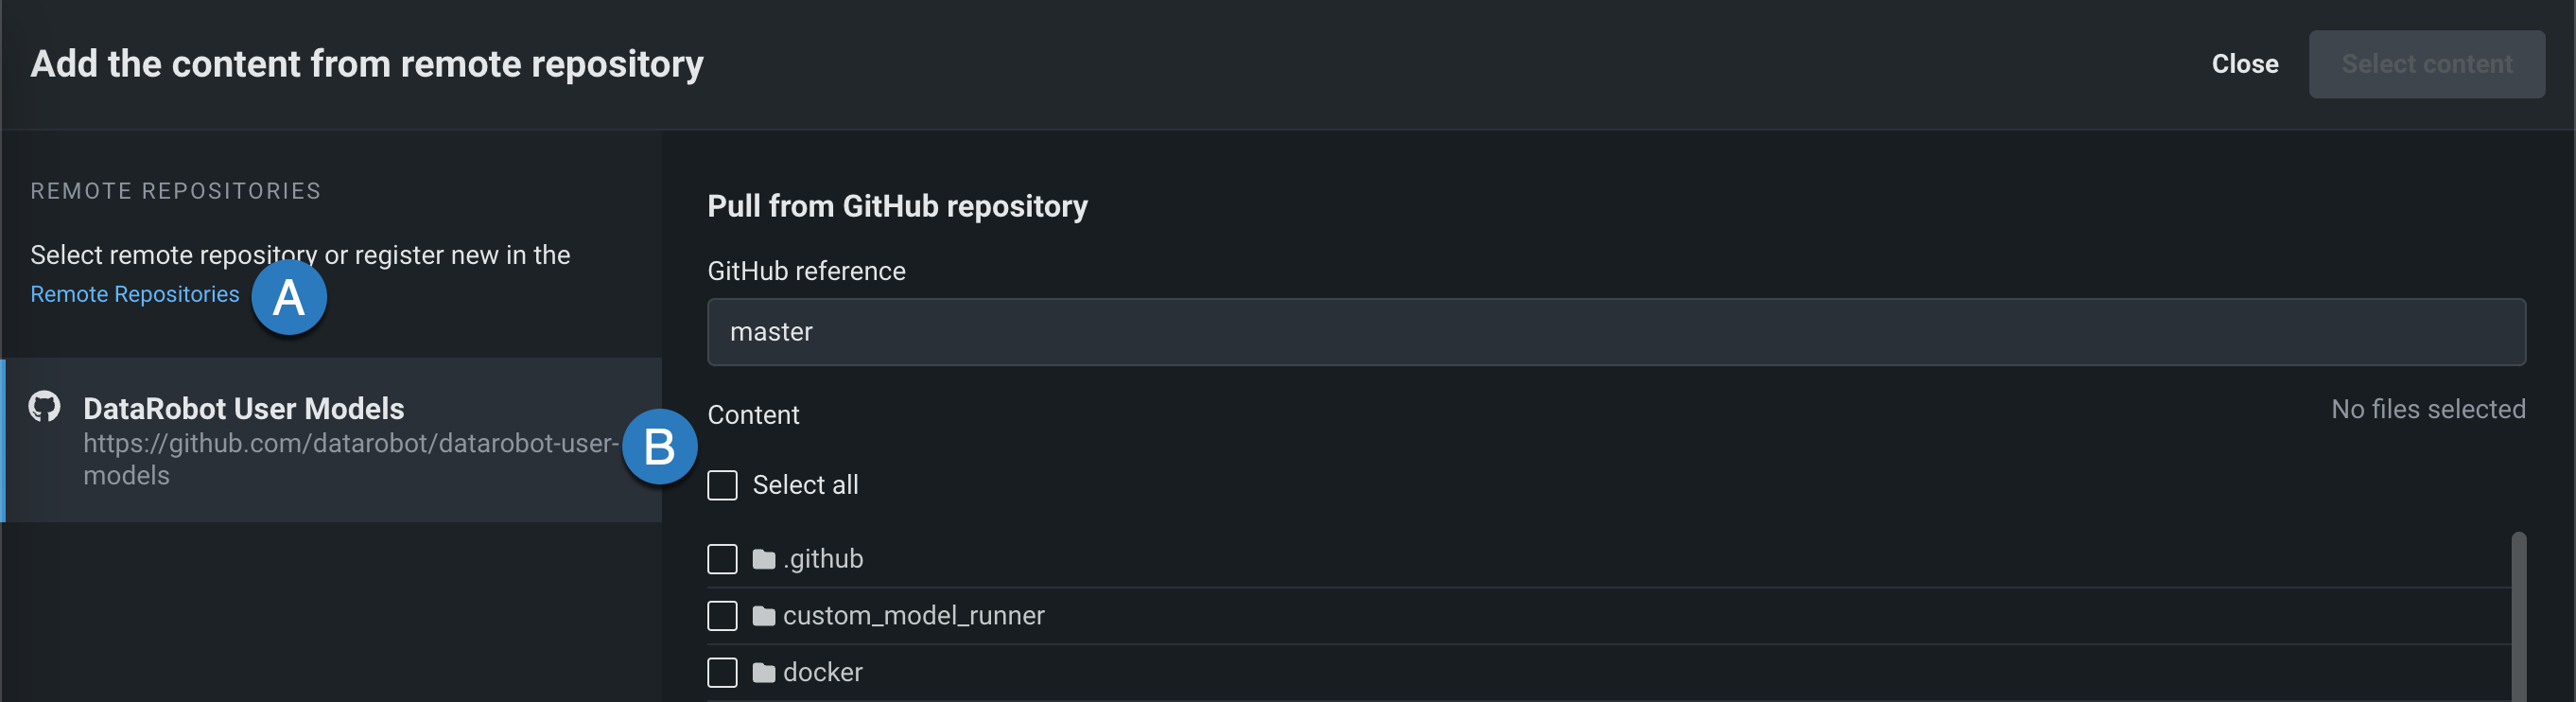
After registering and selecting a repository, you can select the check box for each file or folder you want to upload, and then click Select content:
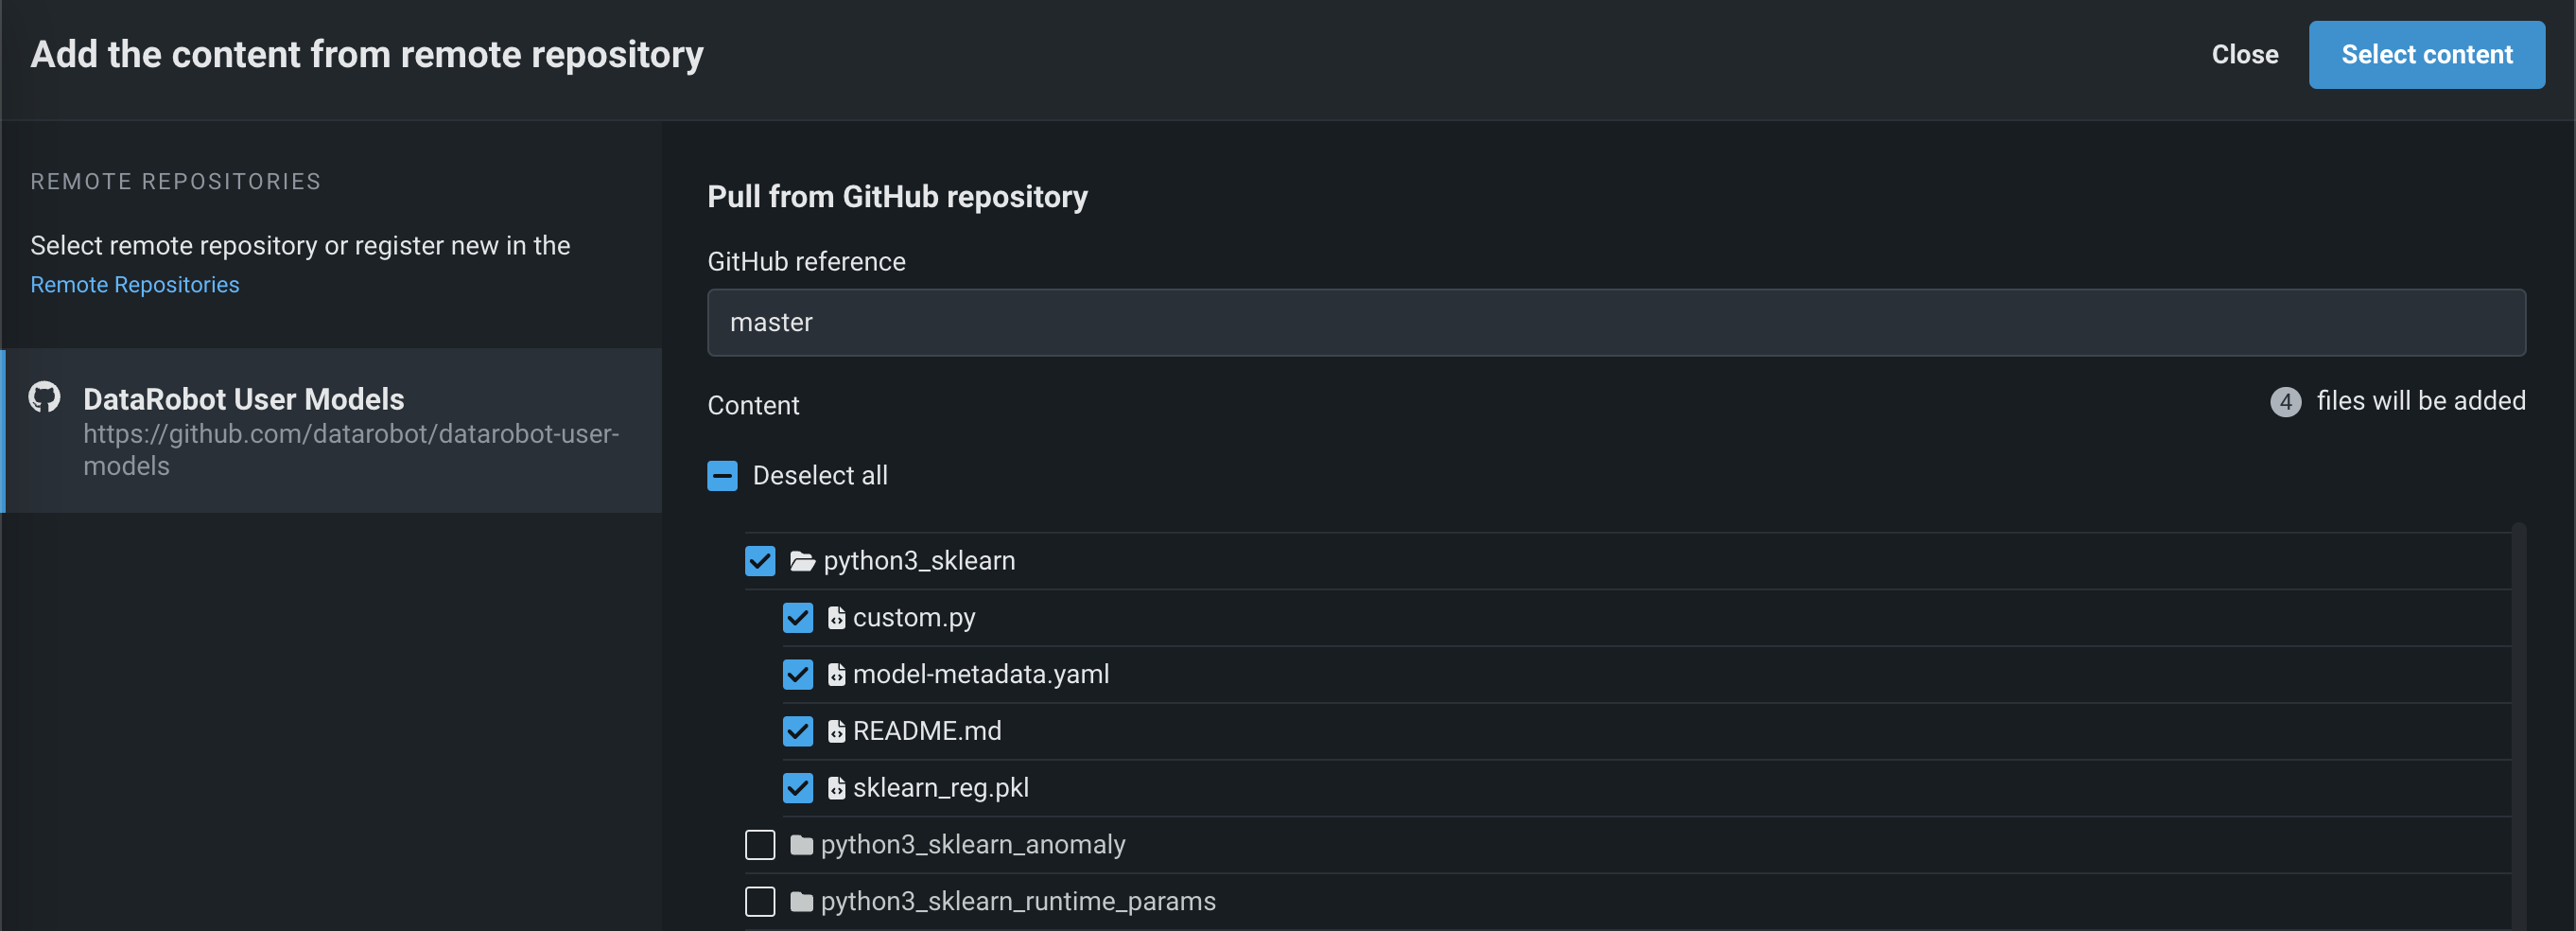
The selected files are pulled into the Files section.
Drop-in environments
DataRobot provides drop-in environments in the model workshop, defining the required libraries and providing a start_server.sh file. The following table details the drop-in environments provided by DataRobot and links to the template in the DRUM repository. Each environment is prefaced with [DataRobot] in the Environment section of the Model workshop's Assemble tab.
| Environment name & example | Model compatibility & artifact file extension |
|---|---|
| Python 3 ONNX Drop-In | ONNX models (.onnx) |
| Python 3 PMML Drop-In | PMML models (.pmml) |
| Python 3 PyTorch Drop-In | PyTorch models (.pth) |
| Python 3 Scikit-Learn Drop-In | Scikit-Learn models (.pkl) |
| Python 3 XGBoost Drop-In | Native XGBoost models (.pkl) |
| Python 3 Keras Drop-In | Keras models backed by tensorflow (.h5) |
| Java Drop-In | DataRobot Scoring Code models (.jar) |
| R Drop-in Environment | R models trained using CARET (.rds) Due to the time required to install all libraries recommended by CARET, only model types that are also package names are installed (e.g., brnn, glmnet). Make a copy of this environment and modify the Dockerfile to install the additional, required packages. To decrease build times when you customize this environment, you can also remove unnecessary lines in the # Install caret models section, installing only what you need. Review the CARET documentation to check if your model's method matches its package name. (Log in to GitHub before clicking this link.) |
| Julia Drop-In* | Julia models (.jlso) * The Julia drop-in environment isn't officially supported; it is provided as an example. |
Note
All Python environments contain Scikit-Learn to help with preprocessing (if necessary), but only Scikit-Learn can make predictions on sklearn models.
When using a drop-in environment, your custom model code can reference several environment variables injected to facilitate access to the DataRobot Client and MLOps Connected Client:
| Environment Variable | Description |
|---|---|
MLOPS_DEPLOYMENT_ID |
If a custom model is running in deployment mode (i.e., the custom model is deployed), the deployment ID is available. |
DATAROBOT_ENDPOINT |
If a custom model has public network access, the DataRobot endpoint URL is available. |
DATAROBOT_API_TOKEN |
If a custom model has public network access, your DataRobot API token is available. |
Configure evaluation and moderation
Availability information
Evaluation and moderation guardrails are off by default. Contact your DataRobot representative or administrator for information on enabling this feature.
Feature flag: Enable Moderation Guardrails, Enable Global Models in the Model Registry (Premium), Enable Additional Custom Model Output in Prediction Responses
Evaluation and moderation guardrails help your organization block prompt injection and hateful, toxic, or inappropriate prompts and responses. It can also prevent hallucinations or low-confidence responses and, more generally, keep the model on topic. In addition, these guardrails can safeguard against the sharing of personally identifiable information (PII). Many evaluation and moderation guardrails connect a deployed text generation model (LLM) to a deployed guard model. These guard models make predictions on LLM prompts and responses and report these predictions and statistics to the central LLM deployment. To use evaluation and moderation guardrails, first, create and deploy guard models to make predictions on an LLM's prompts or responses; for example, a guard model could identify prompt injection or toxic responses. Then, when you create a custom model with the Text Generation target type, define one or more evaluation and moderation guardrails.
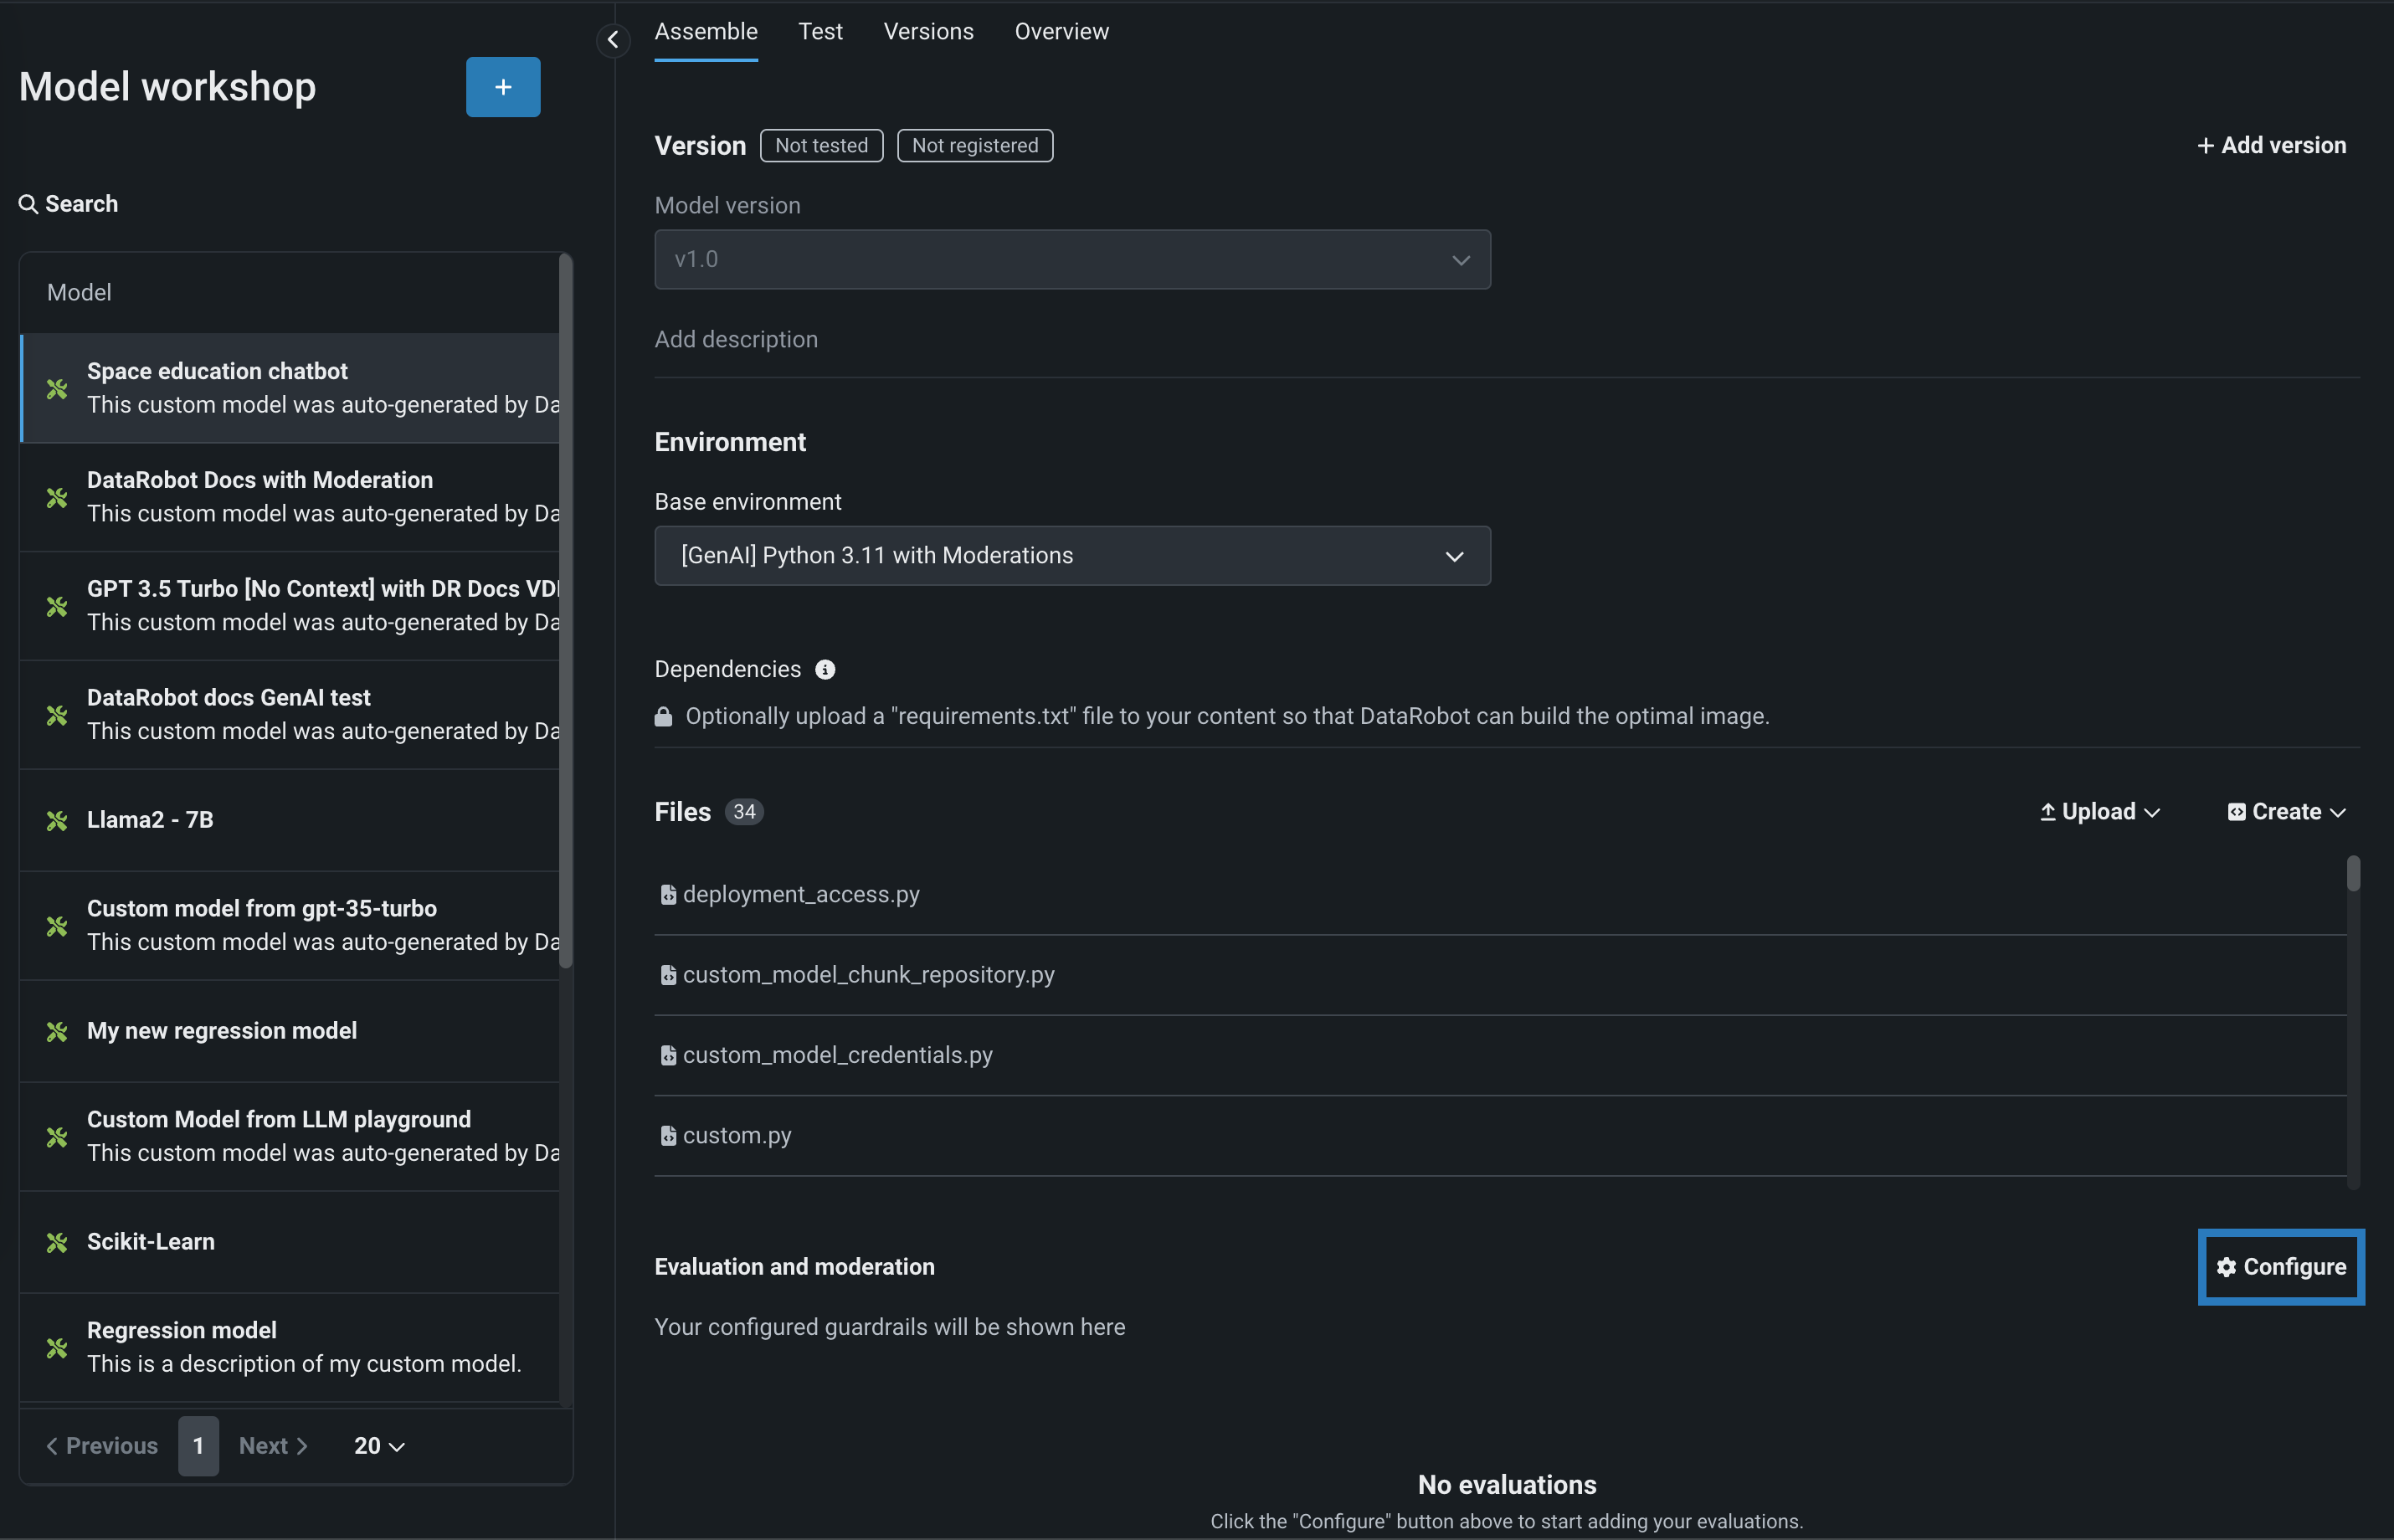
To select and configure evaluation and moderation guardrails, on the Assemble tab for a custom model with the Text Generation target type, scroll to Evaluation and Moderation and click Configure:
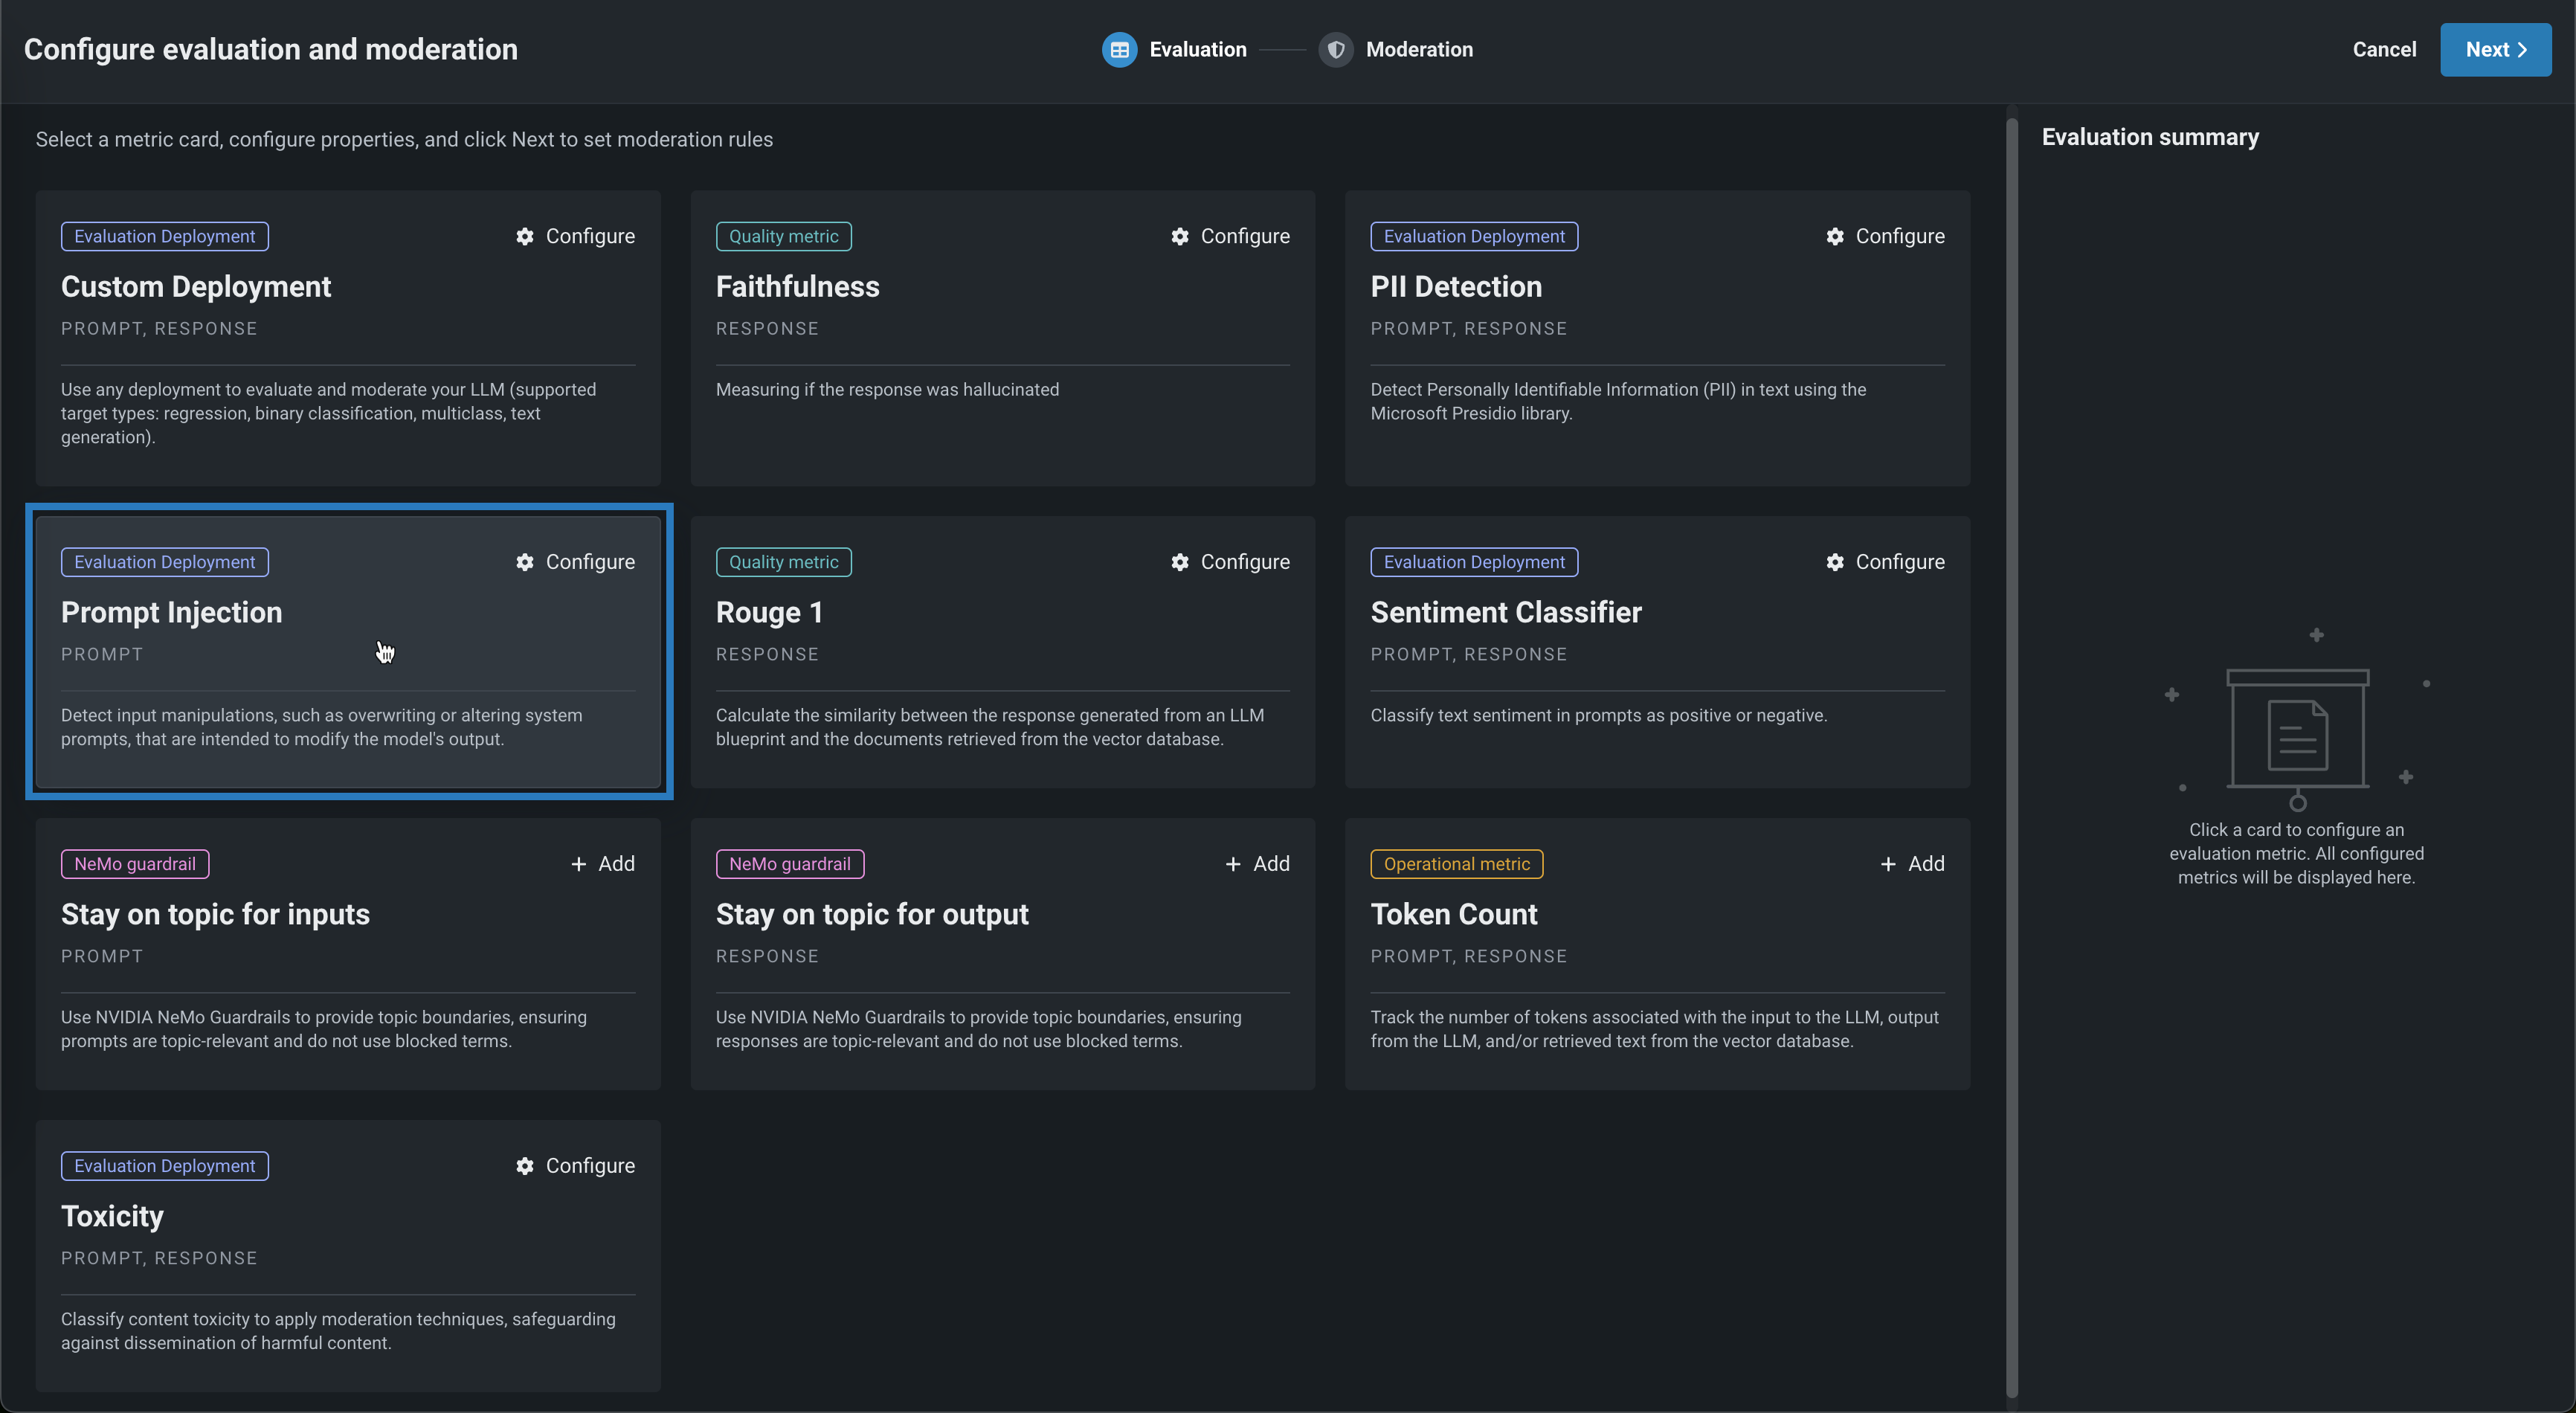
In the Configure evaluation and moderation panel, click a metric card, configure the required properties, and then click Add to return the the Evaluation tab:
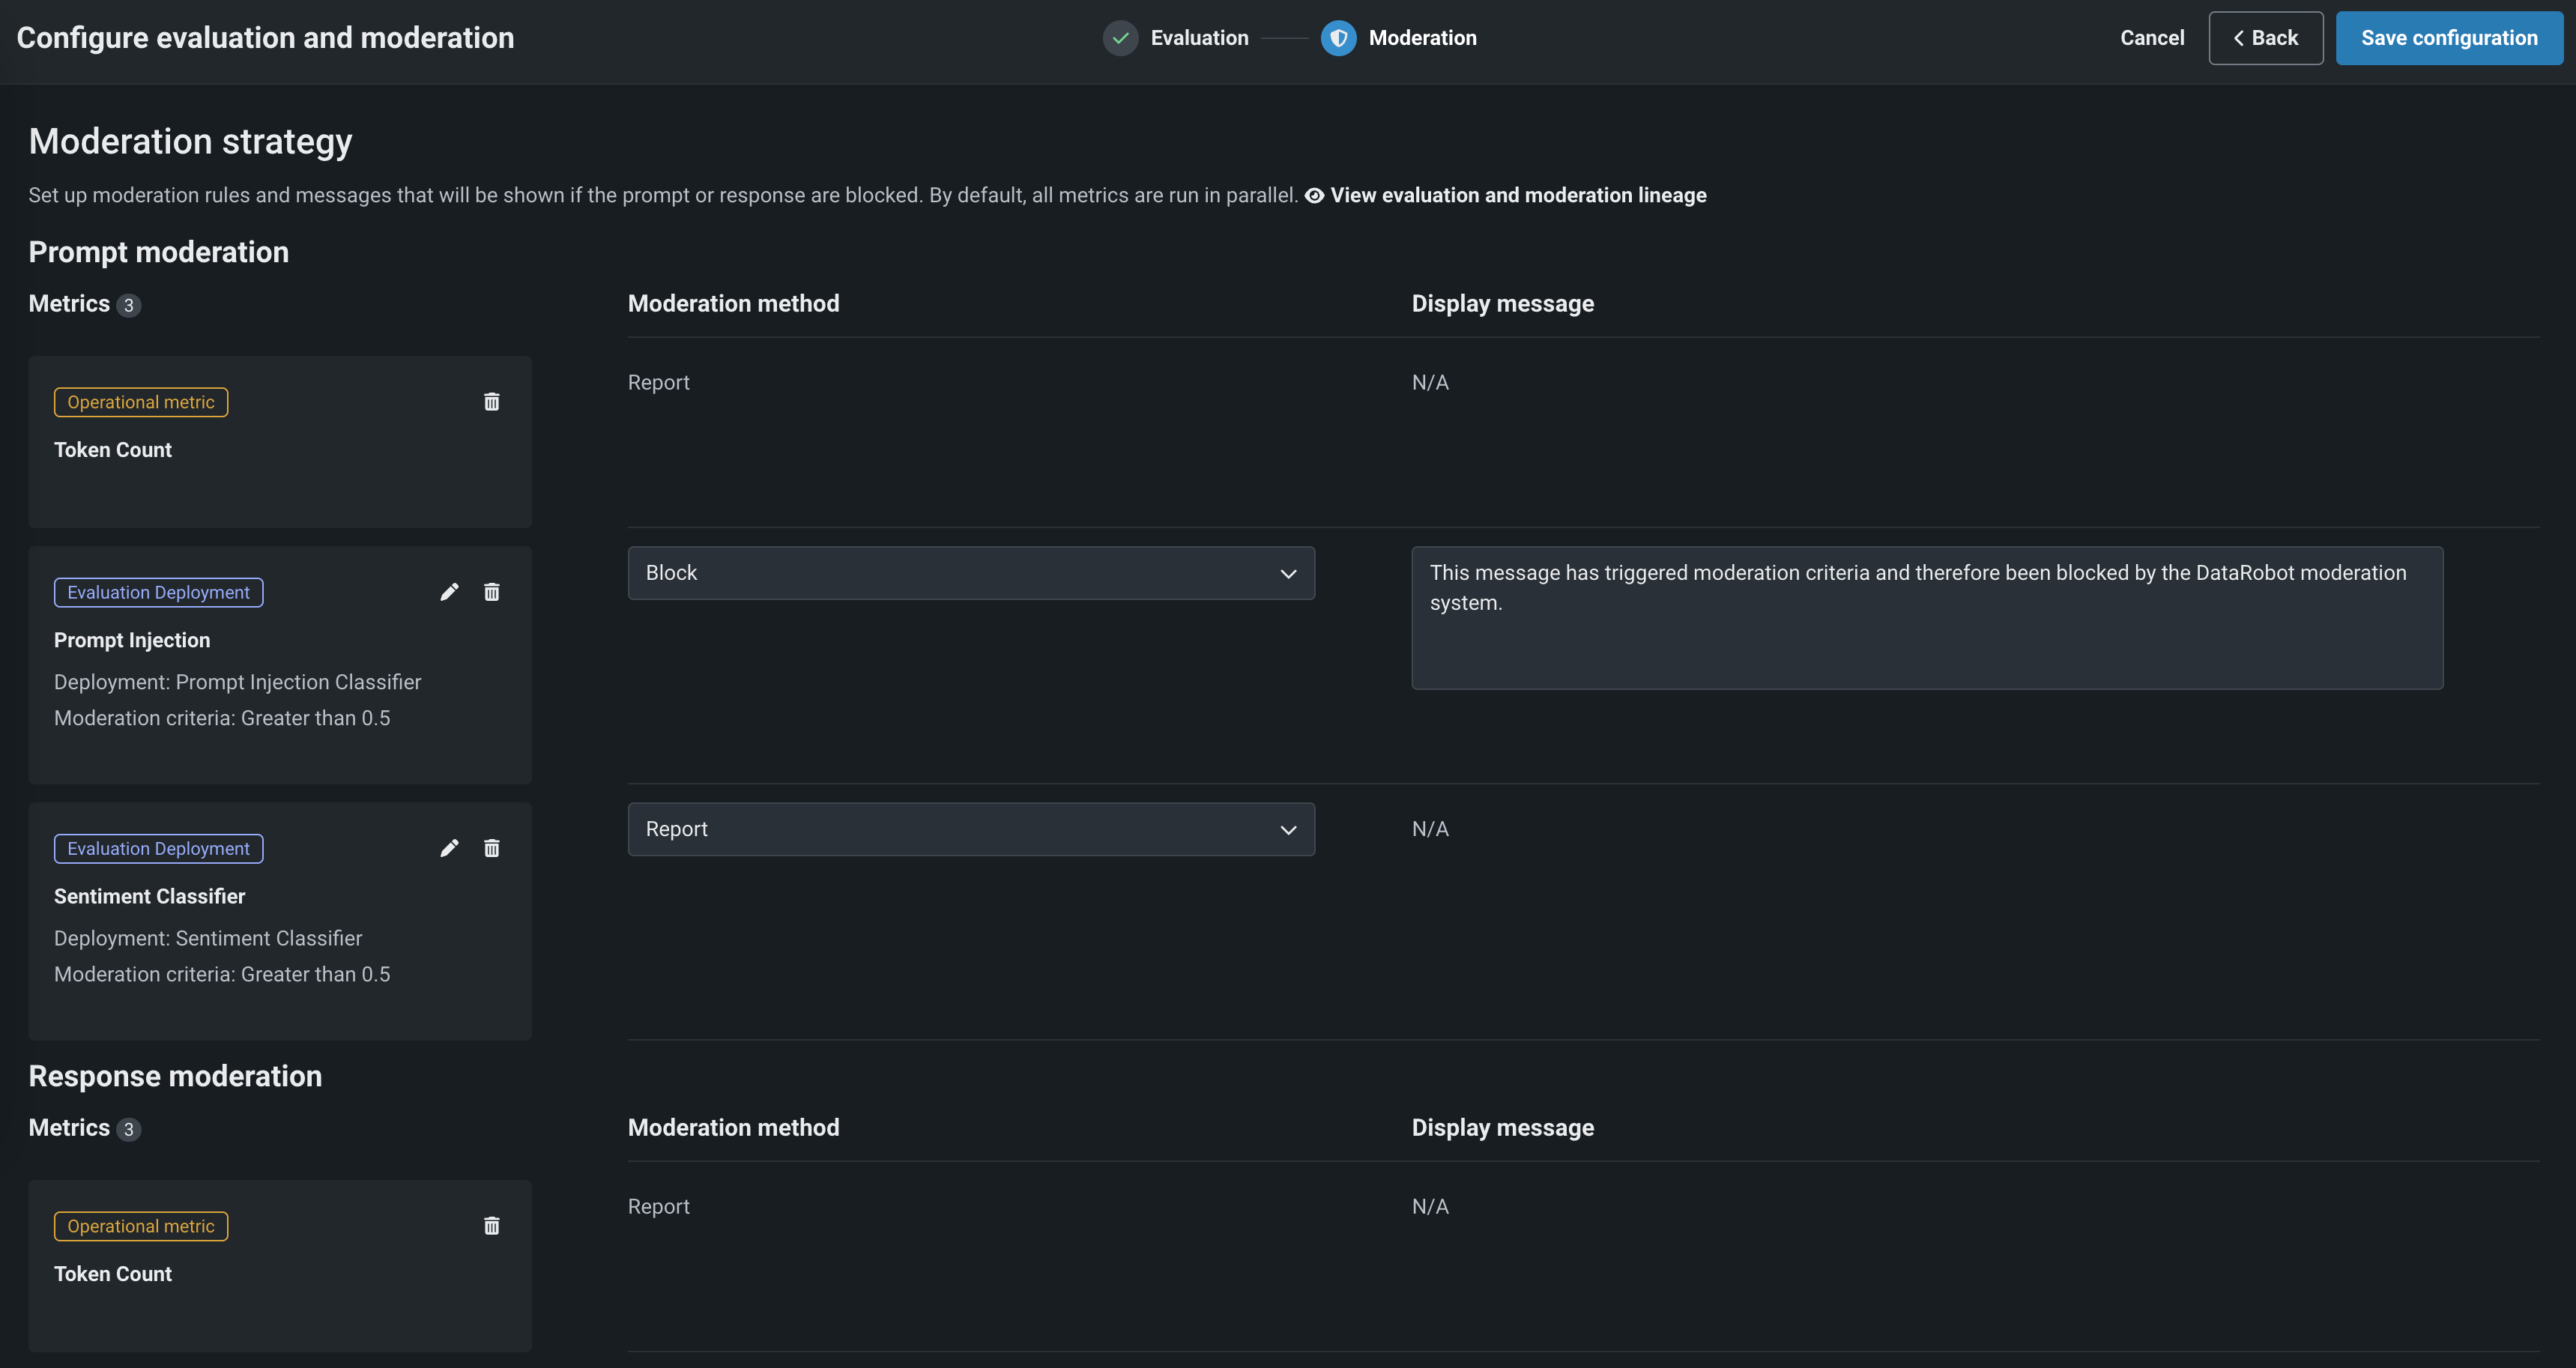
Select another metric or click Next to proceed to the Moderation tab to configure a Moderation strategy:
After adding guardrails to a text generation custom model, you can test, register, and deploy the model to make predictions in production. After you make predictions, you can view the evaluation metrics on the Custom metrics tab and prompts, responses, and feedback (if configured) on the Data exploration tab.
For more information, see Configure evaluation and moderation.
Define connected deployments
Availability information
Connected deployments are off by default. Contact your DataRobot representative or administrator for information on enabling this feature.
Feature flags: Enable Connecting Deployments
Connected deployments report predictions and statistics to a central text generation model deployment. To use connected deployments, first, create and deploy audit models to make predictions on an LLM's prompts or outputs; for example, an audit model could identify prompt injection or toxic responses. Then, when you create a custom model with the Text Generation target type, define one or more connected deployments to generate predictions and report them to the central model. The connected deployment predictions can be combined into the prediction output of the central, text generation model deployment.
To define connected deployments, upload or create a model-metadata.yaml file with one or more deployment-type runtime parameters. If you click Create > Create model-metadata.yaml the template includes an example:
runtimeParameterDefinitions:
- fieldName: DEPLOYMENT_PARAMETER
    type: deployment
    description: An example of a deployment parameter (for various purposes, such as connected deployments)
    defaultValue: null
In the example above replace null with the deployment ID of the deployment you want to connect, or, after saving the model-metadata.yaml file, click the Edit icon () to enter the deployment ID:
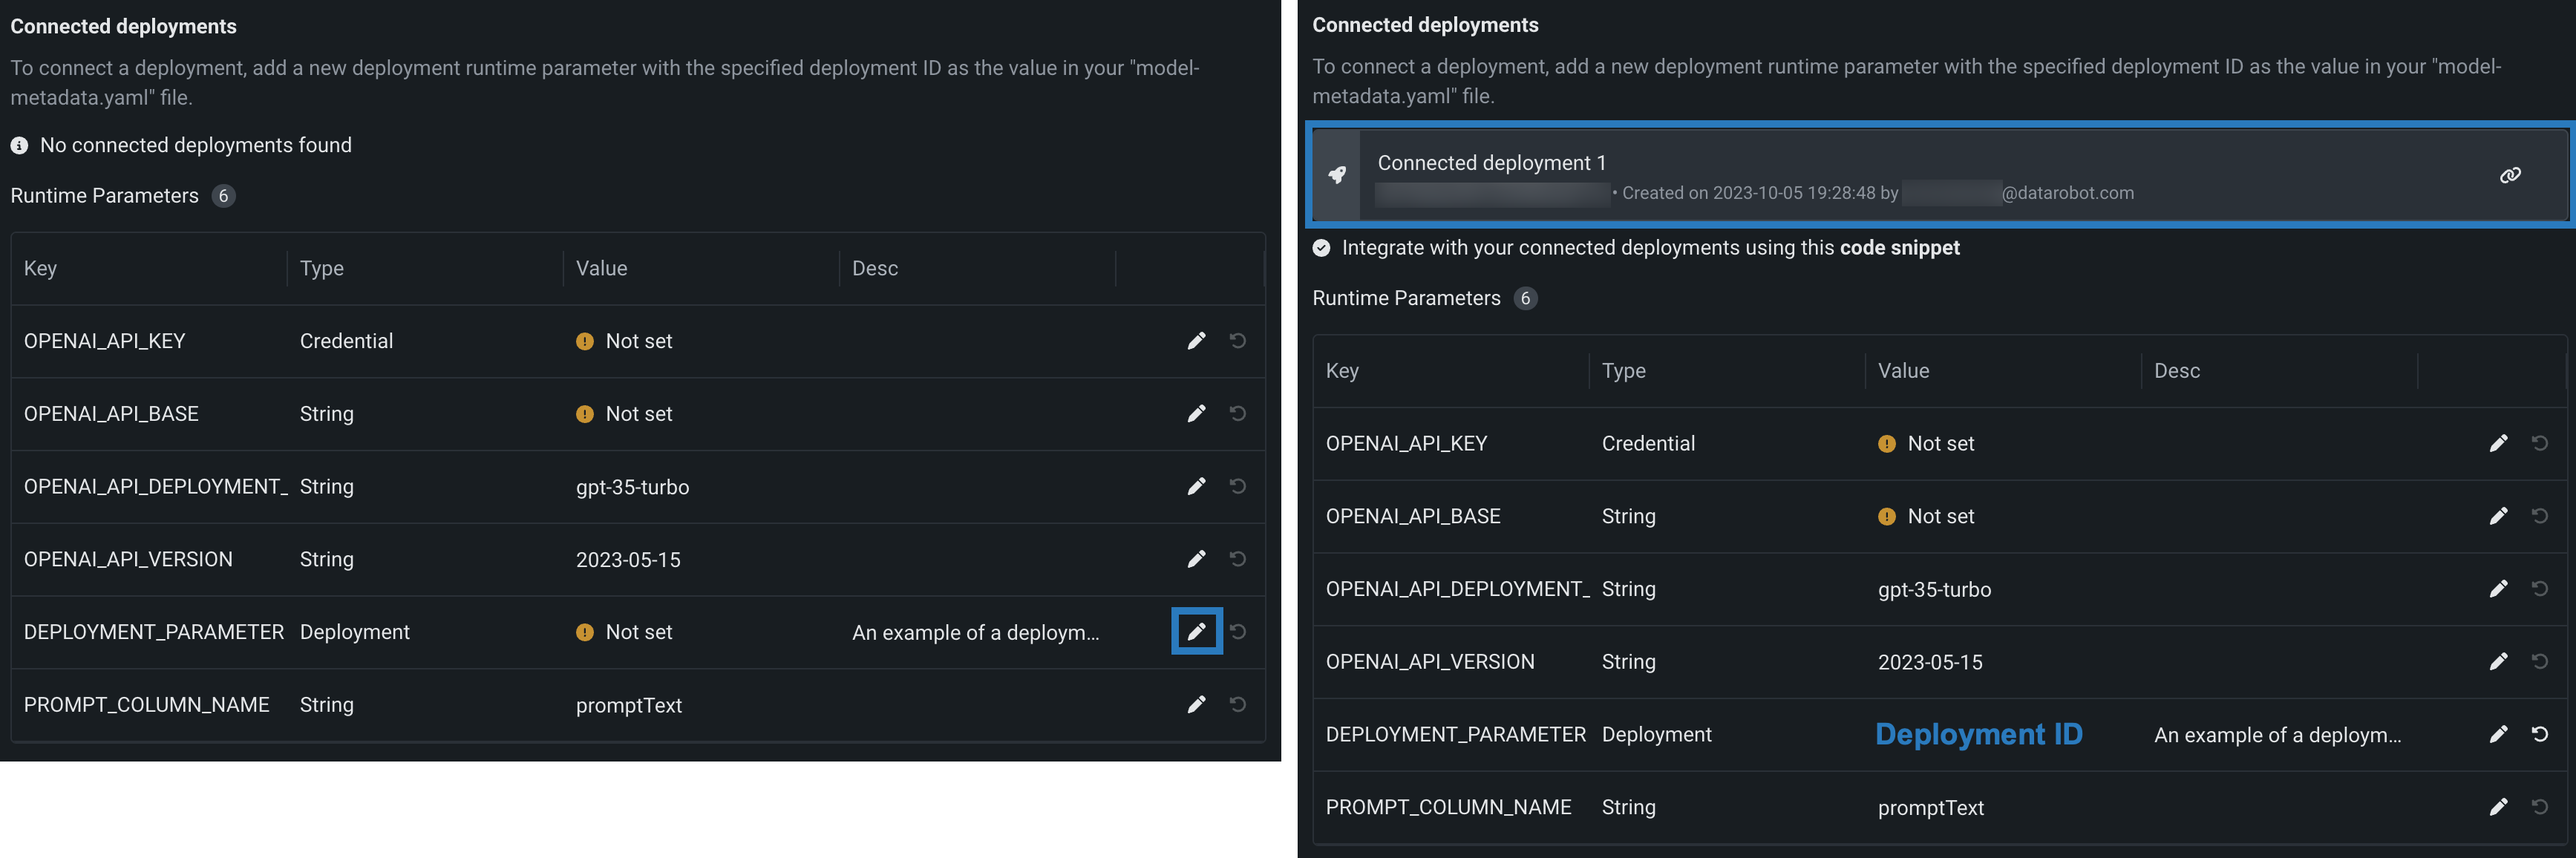
To use connected deployments, ensure that the custom model has the Text Generation target type. The target type can be defined in the model-metadata.yaml file as follows:
targetType: textgeneration
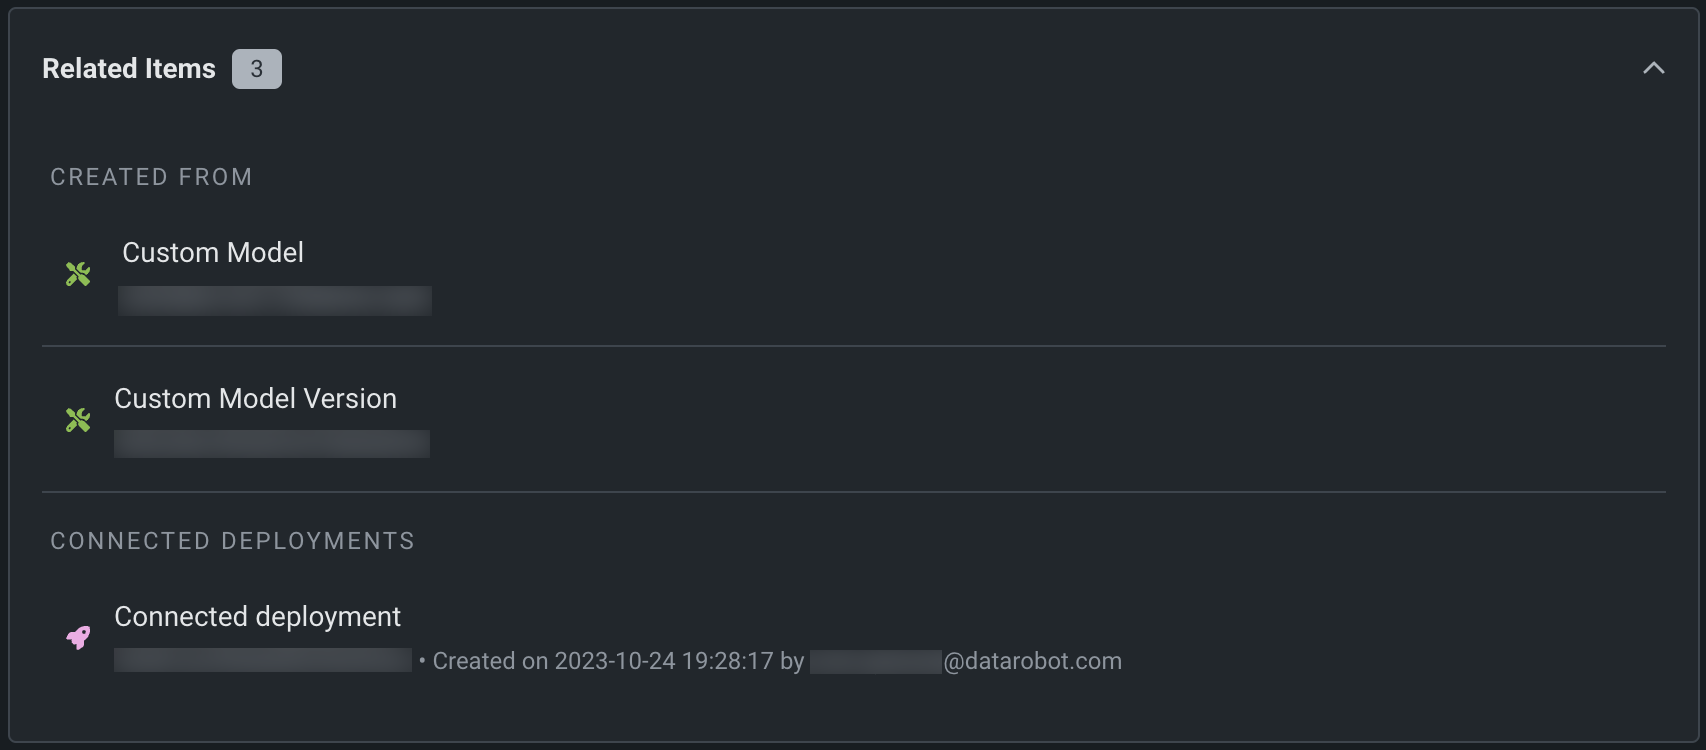
After you assemble and register a custom model, you can view the connected deployments in the registered model version's Related Items section:
Manage runtime parameters
If you defined any runtime parameters through runtimeParameterDefinitions in the model-metadata.yaml file, you can manage them in the Runtime Parameters section:
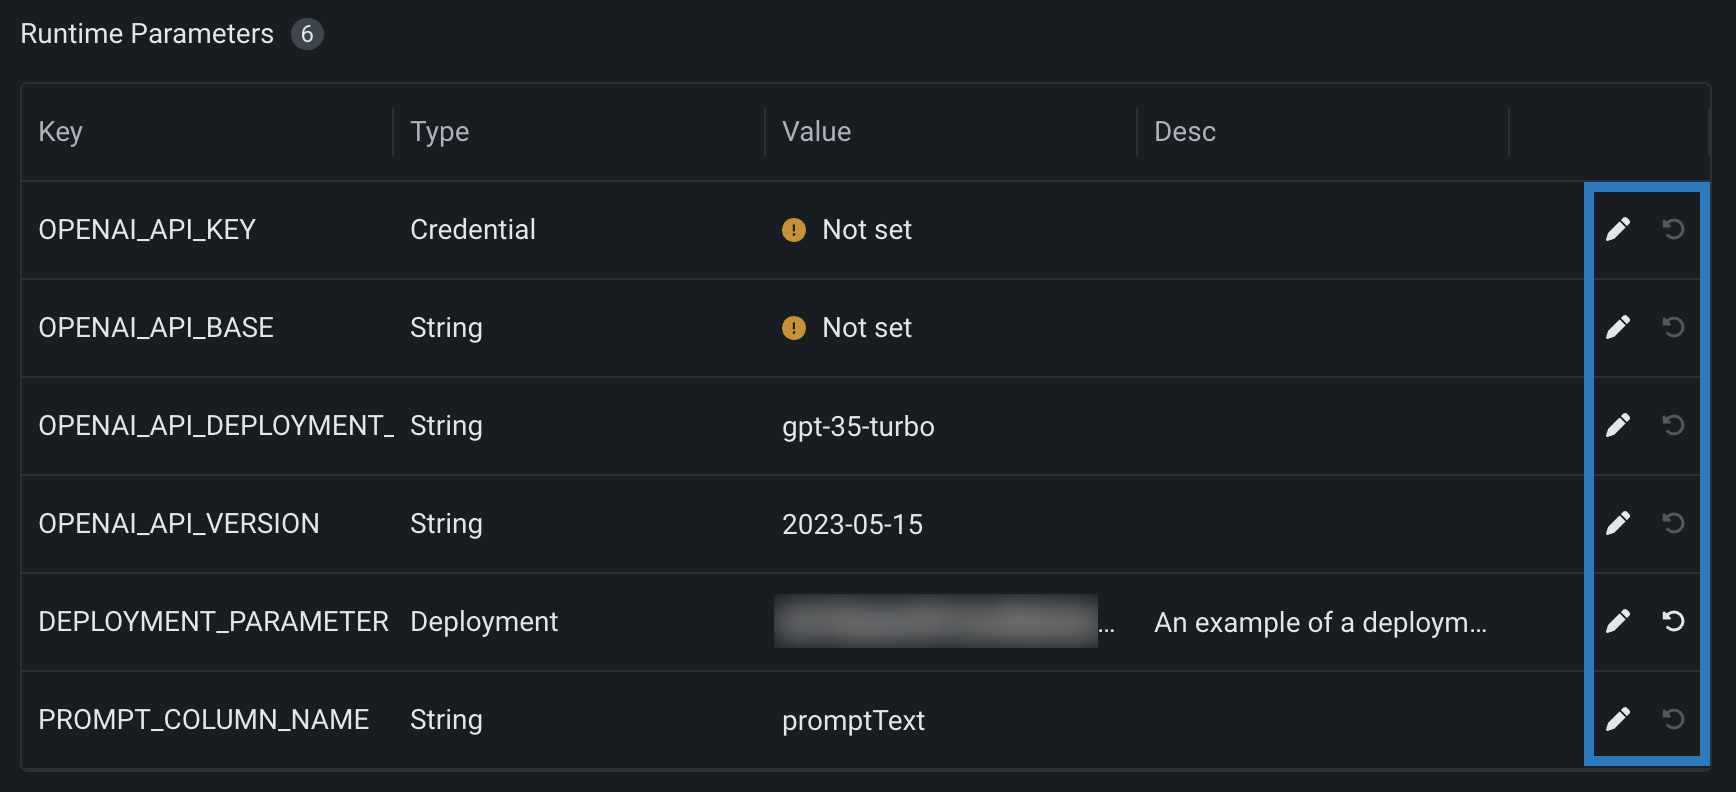
| Icon | Setting | Description |
|---|---|---|
| Edit | Open the Edit a Key dialog box to edit the runtime parameter's Value. | |
| Reset to default | Reset the runtime parameter's Value to the defaultValue set in the model-metadata.yaml file. |
If any runtime parameters have allowEmpty: false in the definition without a defaultValue, you must set a value before registering the custom model.
For more information on how to define runtime parameters and use them in your custom model code, see the Define custom mode runtime parameters documentation.
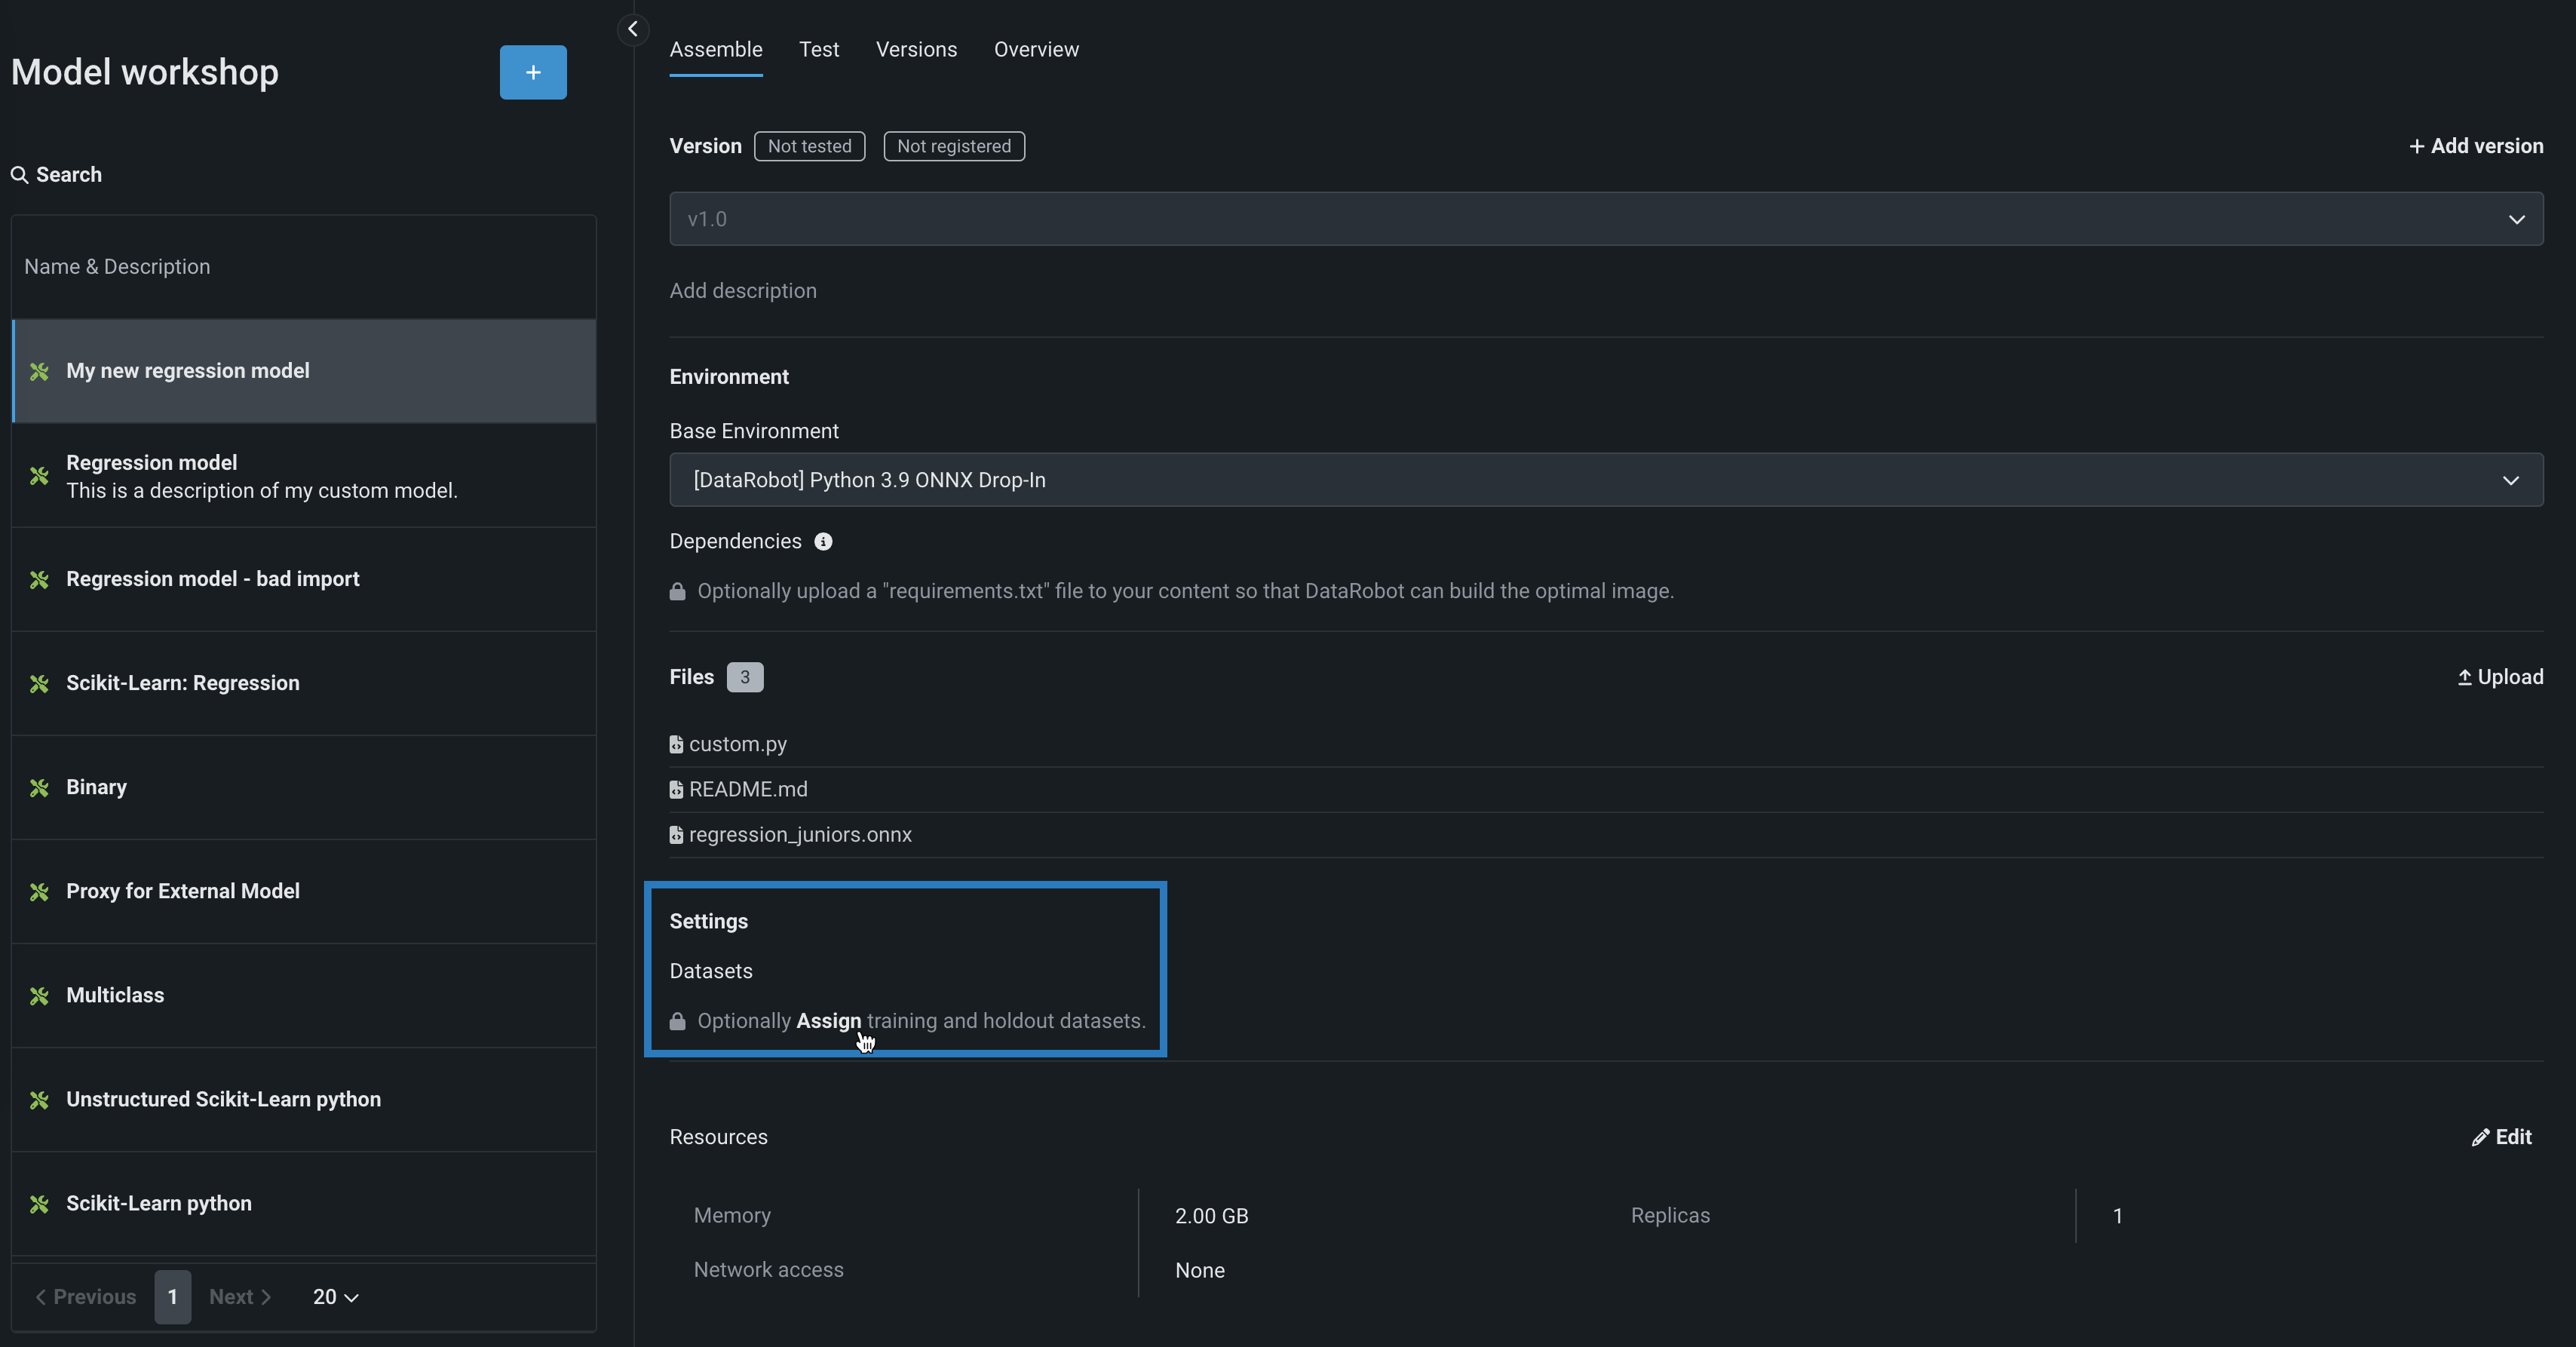
Assign custom model datasets
To enable feature drift tracking for a model deployment, you must add training data. To do this, assign training data to a model version. The method for providing training and holdout datasets for unstructured custom inference models requires you to upload the training and holdout datasets separately. Additionally, these datasets cannot include a partition column.
File size warning
The file size limit for custom model training data uploaded to DataRobot is 1.5GB.
To assign training data to a custom model after you define the Environment and Files:
-
On the Assemble tab, in the Settings section, under Datasets:
-
If the model version doesn't have training data assigned, click Assign.
-
If the model version does have training data assigned, click () Change, and then, under Training Data, click the delete () icon to remove the existing training data.
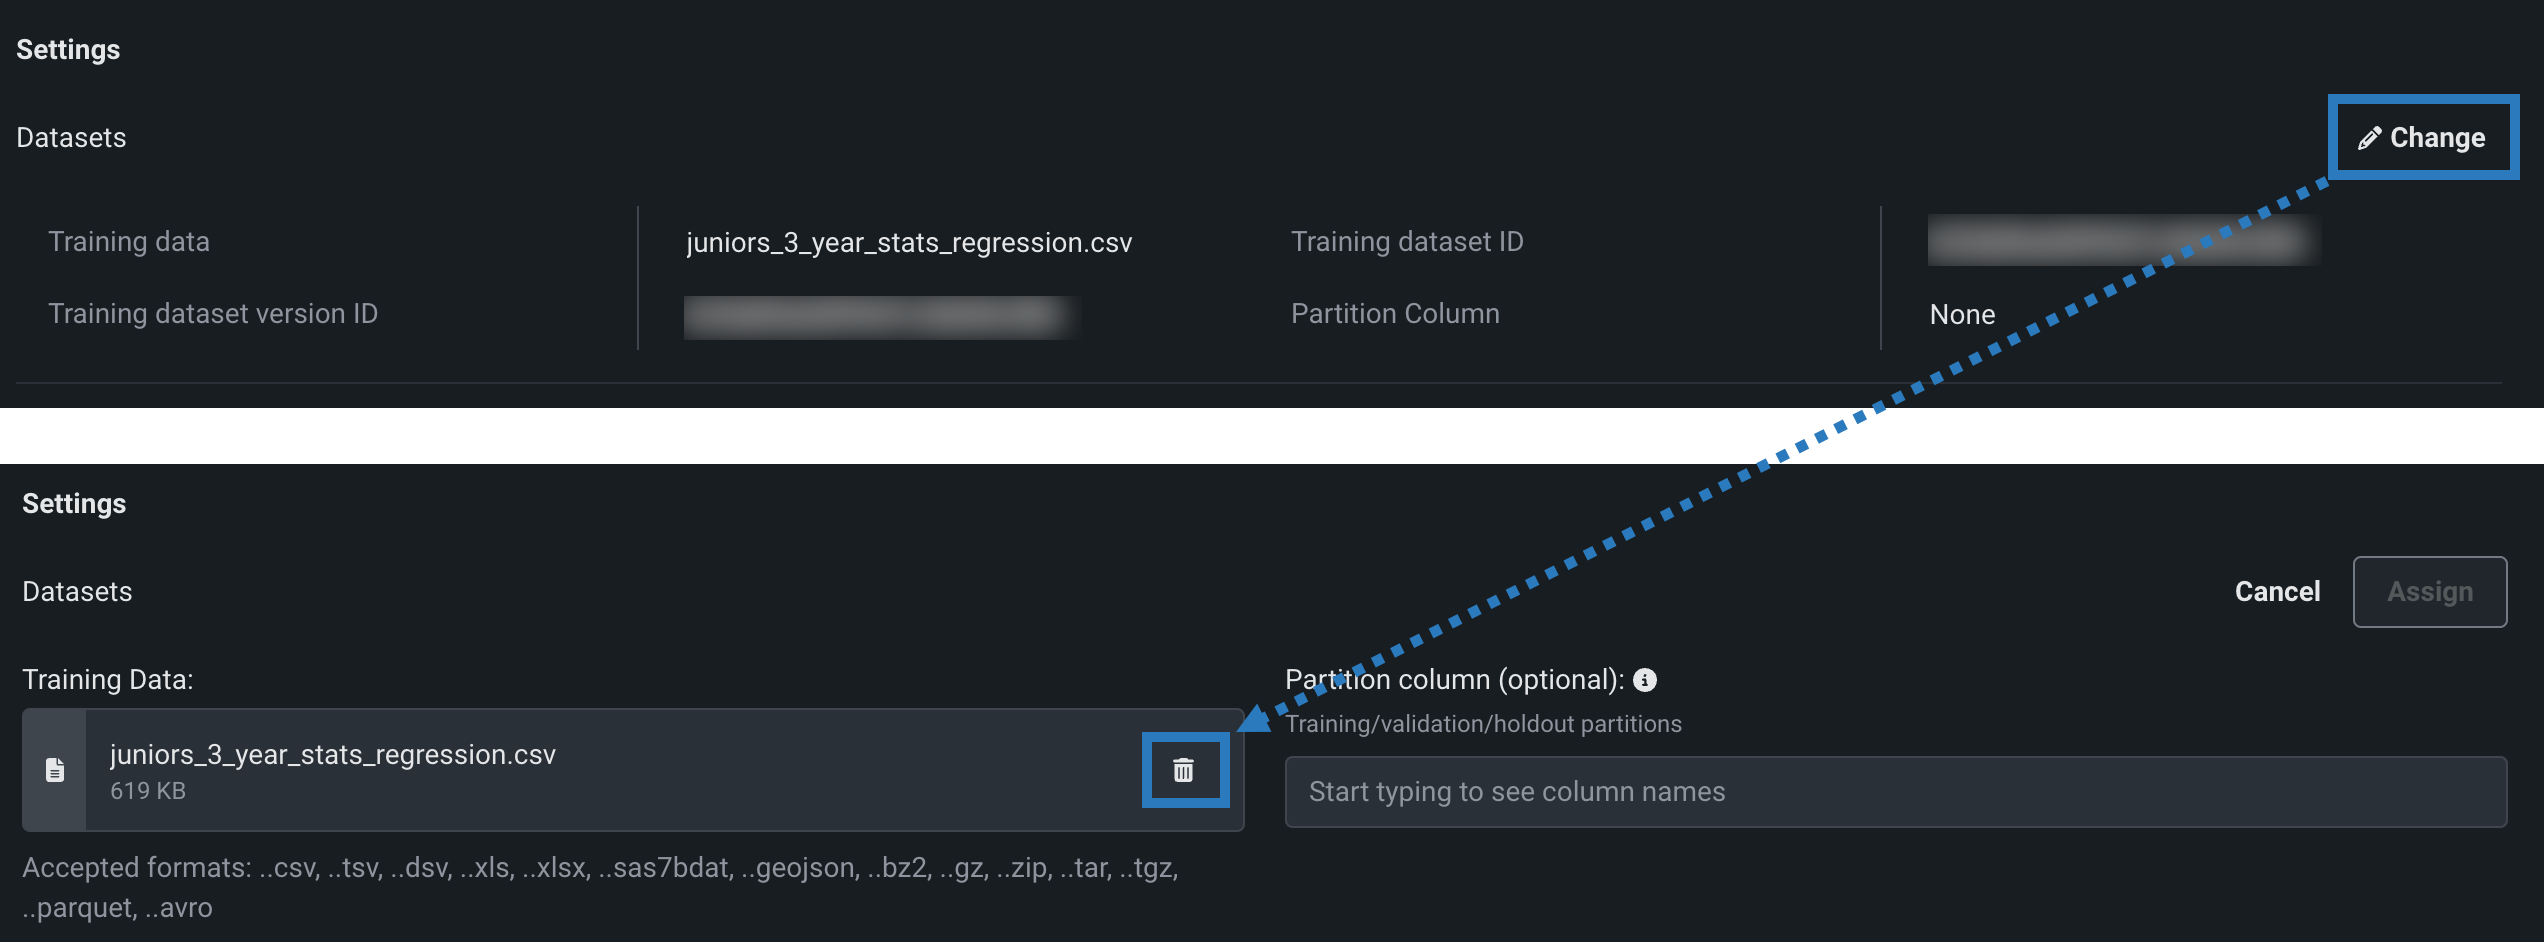
-
-
In the Training Data section, click + Select dataset and do either of the following:

-
To add a new dataset to the Data Registry, click Upload, select a file from your local storage, and then click Open.
-
To select an existing dataset from the Data Registry, in the Data Registry list, locate and click the training dataset you previously uploaded to DataRobot, and then click Select dataset.
Include features required for scoring
The columns in a custom model's training data indicate which features are included in scoring requests to the deployed custom model. Therefore, once training data is available, any features not included in the training dataset aren't sent to the model. Available as a preview feature, you can disable this behavior using the Column filtering setting.
-
-
(Optional) In the Partition column section, specify the column name (from the provided training dataset) containing partitioning information for your data (based on training/validation/holdout partitioning). If you plan to deploy the custom model and monitor its data drift and accuracy, specify the holdout partition in the column to establish an accuracy baseline.
Specify partition column
You can track data drift and accuracy without specifying a partition column; however, in that scenario, DataRobot won't have baseline values. The selected partition column should only include the values
T,V, orH. -
Click Assign.
Training data assignment error
If the training data assignment fails, an error message appears in the new custom model version under Datasets. While this error is active, you can't create a model package to deploy the affected version. To resolve the error and deploy the model package, reassign training data to create a new version, or create a new version and then assign training data.
Disable column filtering for prediction requests
Availability information
Configurable column filtering is off by default. Contact your DataRobot representative or administrator for information on enabling this feature.
Feature flag: Enable Feature Filtering for Custom Model Predictions
Now available for preview, you can enable or disable column filtering for custom model predictions. The filtering setting you select is applied in the same way during custom model testing and deployment. By default, the target column is filtered out of prediction requests and, if training data is assigned, any additional columns not present in the training dataset are filtered out of any scoring requests sent to the model. Alternatively, if the prediction dataset is missing columns, an error message appears to notify you of the missing features.
You can disable this column filtering when you assemble a custom model. In the Model workshop, open a custom model to the Assemble tab, and, in the Settings section, under Column filtering, clear Exclude target column from requests (or, if training data is assigned, clear Exclude target and extra columns not in training data):
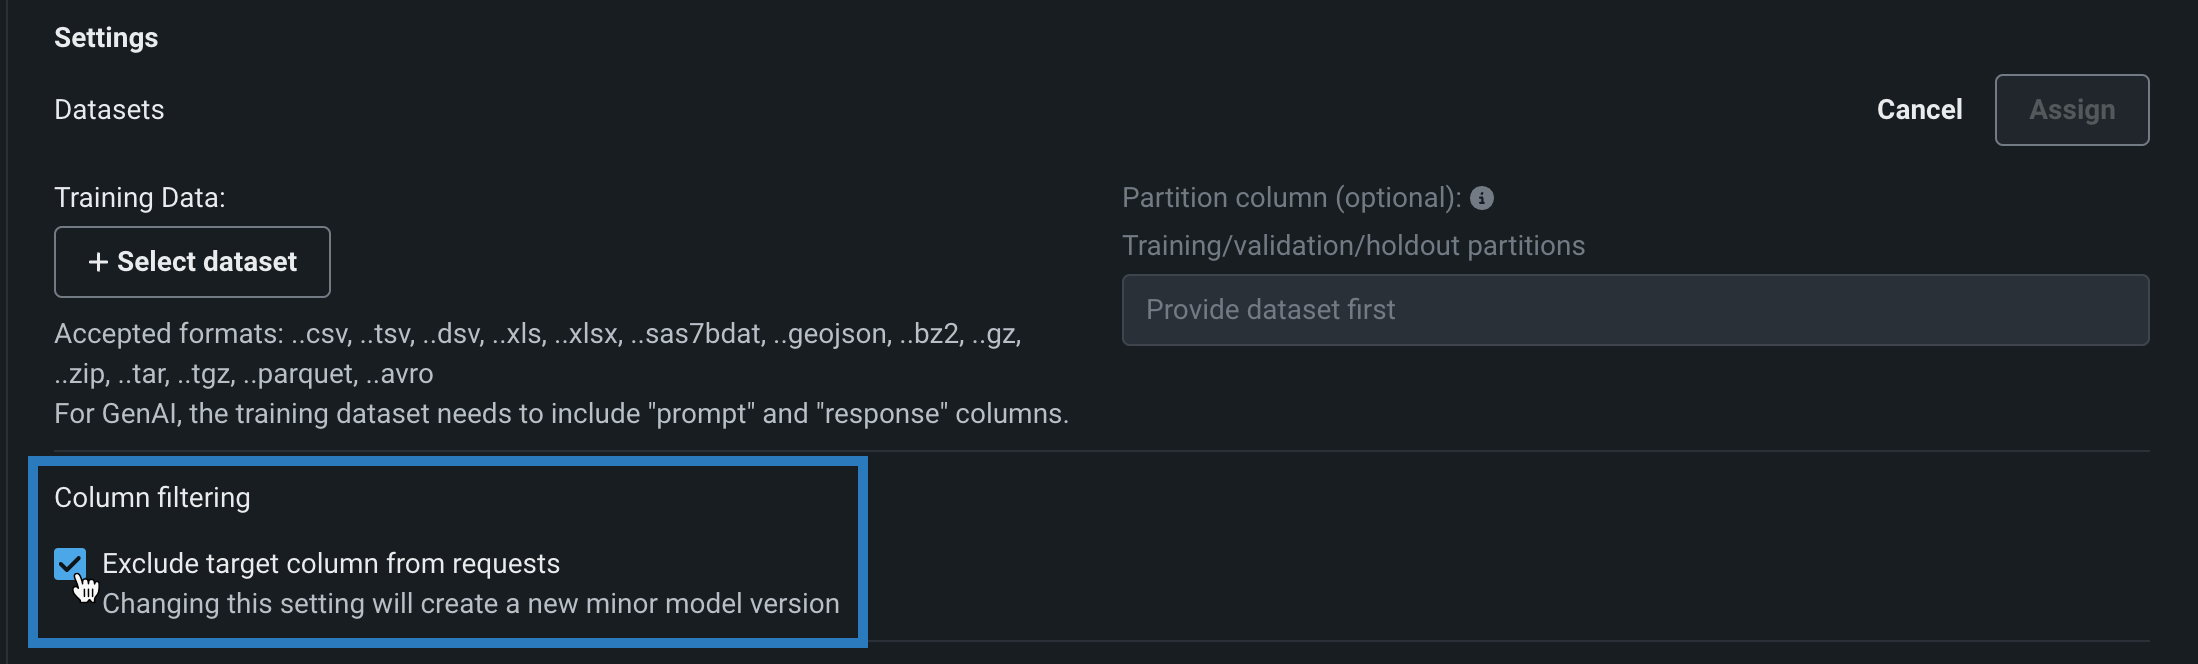
As with other changes to a model's environment, files, or settings, changing this setting creates a new minor custom model version.
The following behavior is expected when Exclude target column from requests / Exclude target and extra columns not in training data is enabled or disabled:
Training data assignment method
If a model uses the deprecated "per model" training data assignment method, this setting cannot be disabled and feature filtering is not applied during testing.
| Set to | Behavior |
|---|---|
| Enabled |
|
| Disabled |
|
DRUM predictions
Predictions made with DRUM are not filtered; all columns are included in each prediction request.
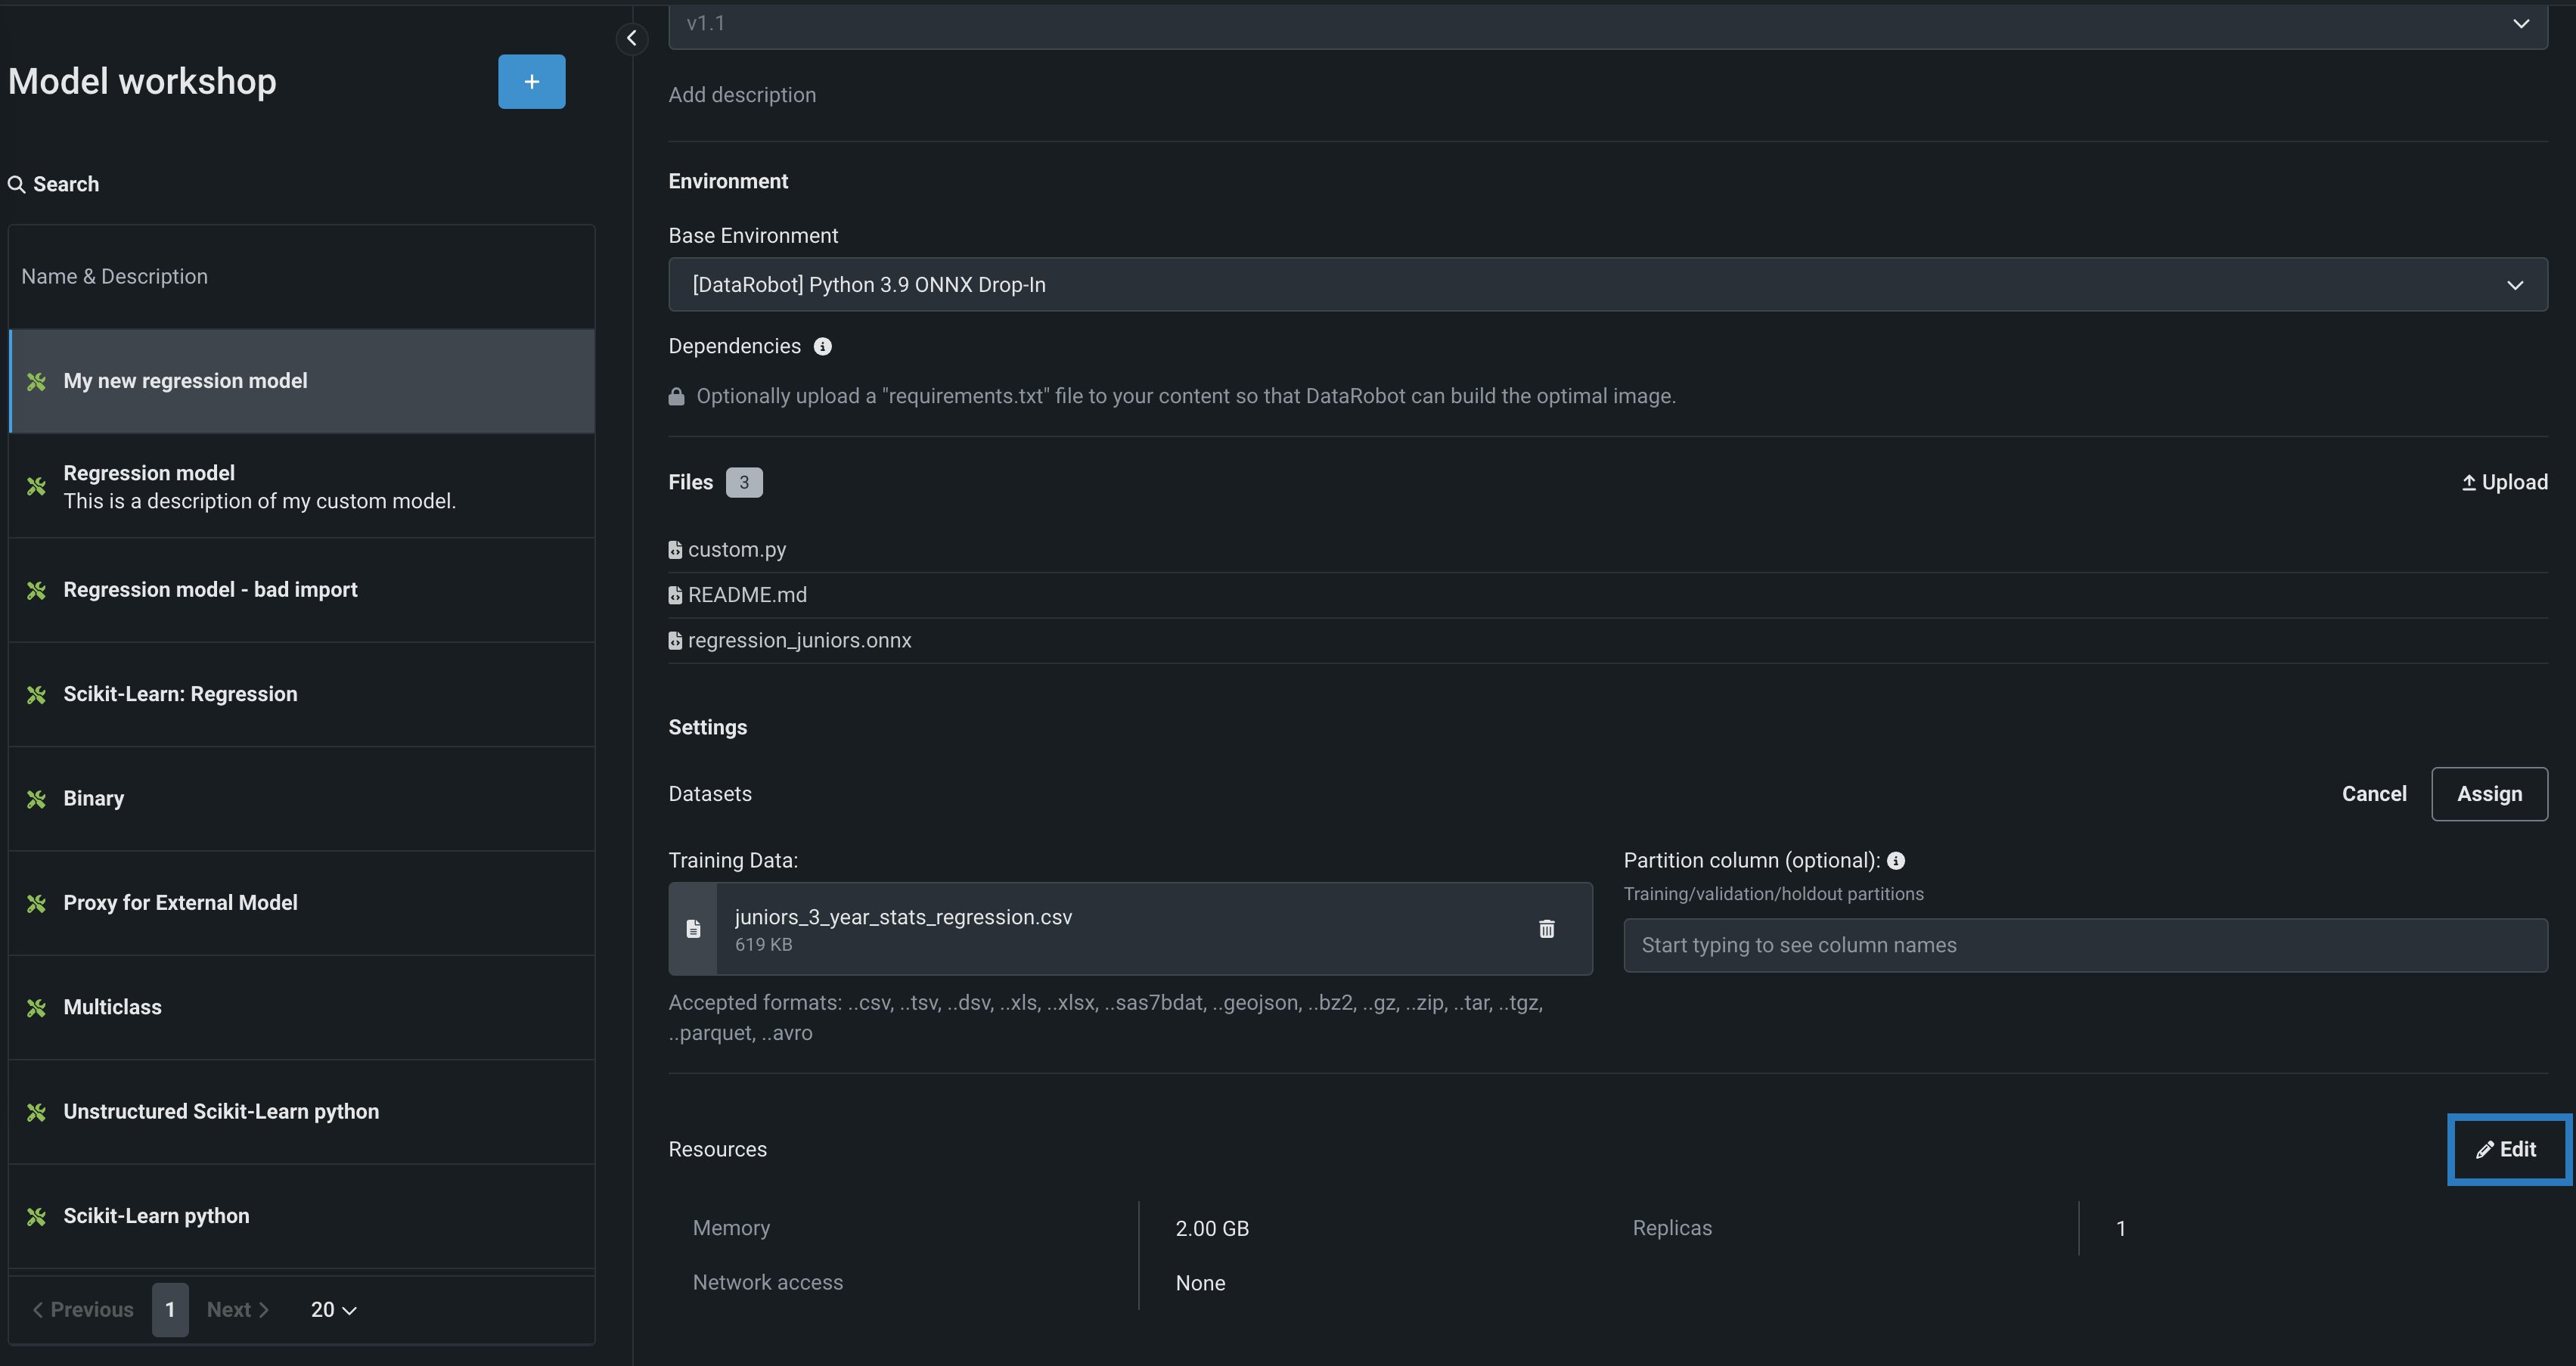
Configure custom model resource settings
After creating a custom inference model, you can configure the resources the model consumes to facilitate smooth deployment and minimize potential environment errors in production.
To configure the resource allocation and access settings:
-
On the Assemble tab, in the Settings section, next to Resources, click () Edit:
-
In the Update resource settings dialog box, configure the following settings:
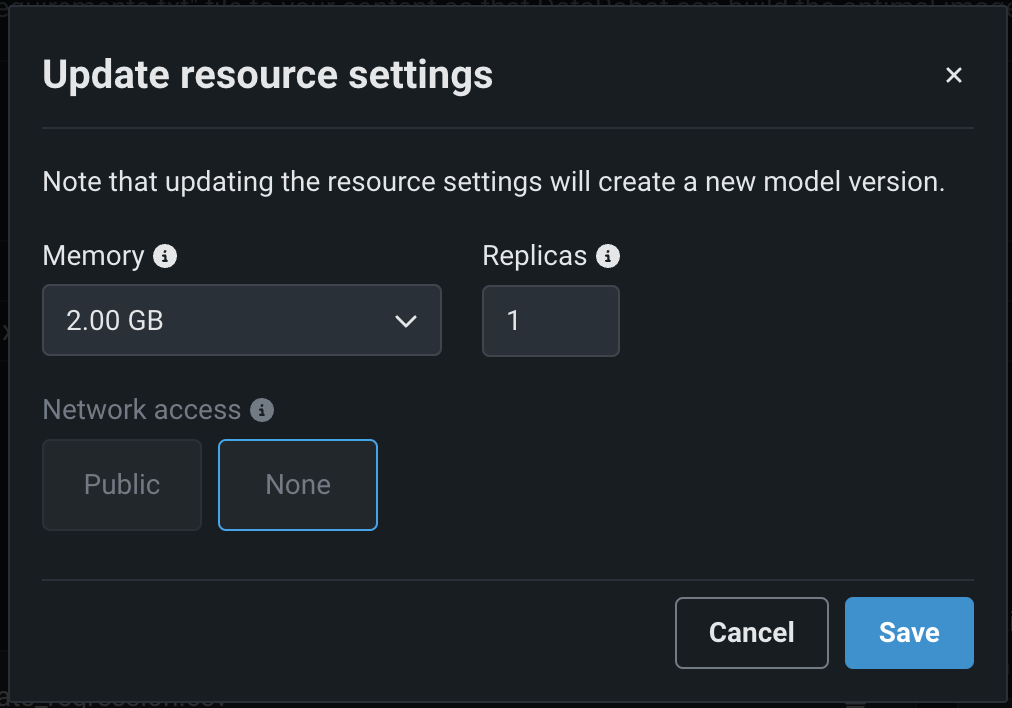
Resource settings access
Users can determine the maximum memory allocated for a model, but only organization admins can configure additional resource settings.
Setting Description Memory Determines the maximum amount of memory that can be allocated for a custom inference model. If a model is allocated more than the configured maximum memory value, it is evicted by the system. If this occurs during testing, the test is marked as a failure. If this occurs when the model is deployed, the model is automatically launched again by Kubernetes. Replicas Sets the number of replicas executed in parallel to balance workloads when a custom model is running. Increasing the number of replicas may not result in better performance, depending on the custom model's speed. Network access Premium feature. Configures the egress traffic of the custom model: - Public: The default setting. The custom model can access any fully qualified domain name (FQDN) in a public network to leverage third-party services.
- None: The custom model is isolated from the public network and cannot access third-party services.
DATAROBOT_ENDPOINTandDATAROBOT_API_TOKENenvironment variables. These environment variables are available for any custom model using a drop-in environment or a custom environment built on DRUM.Imbalanced memory settings
DataRobot recommends configuring resource settings only when necessary. When you configure the Memory setting above, you set the Kubernetes memory "limit" (the maximum allowed memory allocation); however, you can't set the memory "request" (the minimum guaranteed memory allocation). For this reason, it is possible to set the "limit" value too far above the default "request" value. An imbalance between the memory "request" and the memory usage allowed by the increased "limit" can result in the custom model exceeding the memory consumption limit. As a result, you may experience unstable custom model execution due to frequent eviction and relaunching of the custom model. If you require an increased Memory setting, you can mitigate this issue by increasing the "request" at the organization level; for more information, contact DataRobot Support.
Premium feature: Network access
Every new custom model you create has public network access by default; however, when you create new versions of any custom model created before October 2023, those new versions remain isolated from public networks (access set to None) until you enable public access for a new version (access set to Public). From this point on, each subsequent version inherits the public access definition from the previous version.
-
Once you have configured the resource settings for the custom model, click Save.
This creates a new version of the custom model with edited resource settings applied.
Frozen versions
You can only update resource settings in the most recent model version. Additionally, if the most recent model version was registered or deployed, you cannot apply the updated resource settings, and you'll encounter a "frozen version" warning if you try to save the changes. If you encounter this warning, create a new custom model version, update the resource settings, and then register and deploy the model with the correct settings.
Select a resource bundle
Availability information
Custom model resource bundles are available for preview and off by default. Contact your DataRobot representative or administrator for information on enabling this feature.
Feature flags: Enable Resource Bundles, Enable Custom Model GPU Inference
You can select a Resource bundle—instead of Memory—when you assemble a model and configure the resource settings. Resource bundles allow you to choose from various CPU and GPU hardware platforms for building and testing custom models. In a custom model's Settings section, open the Resources settings to select a resource bundle. In this example, the model is built to be tested and deployed on an NVIDIA A10 device.
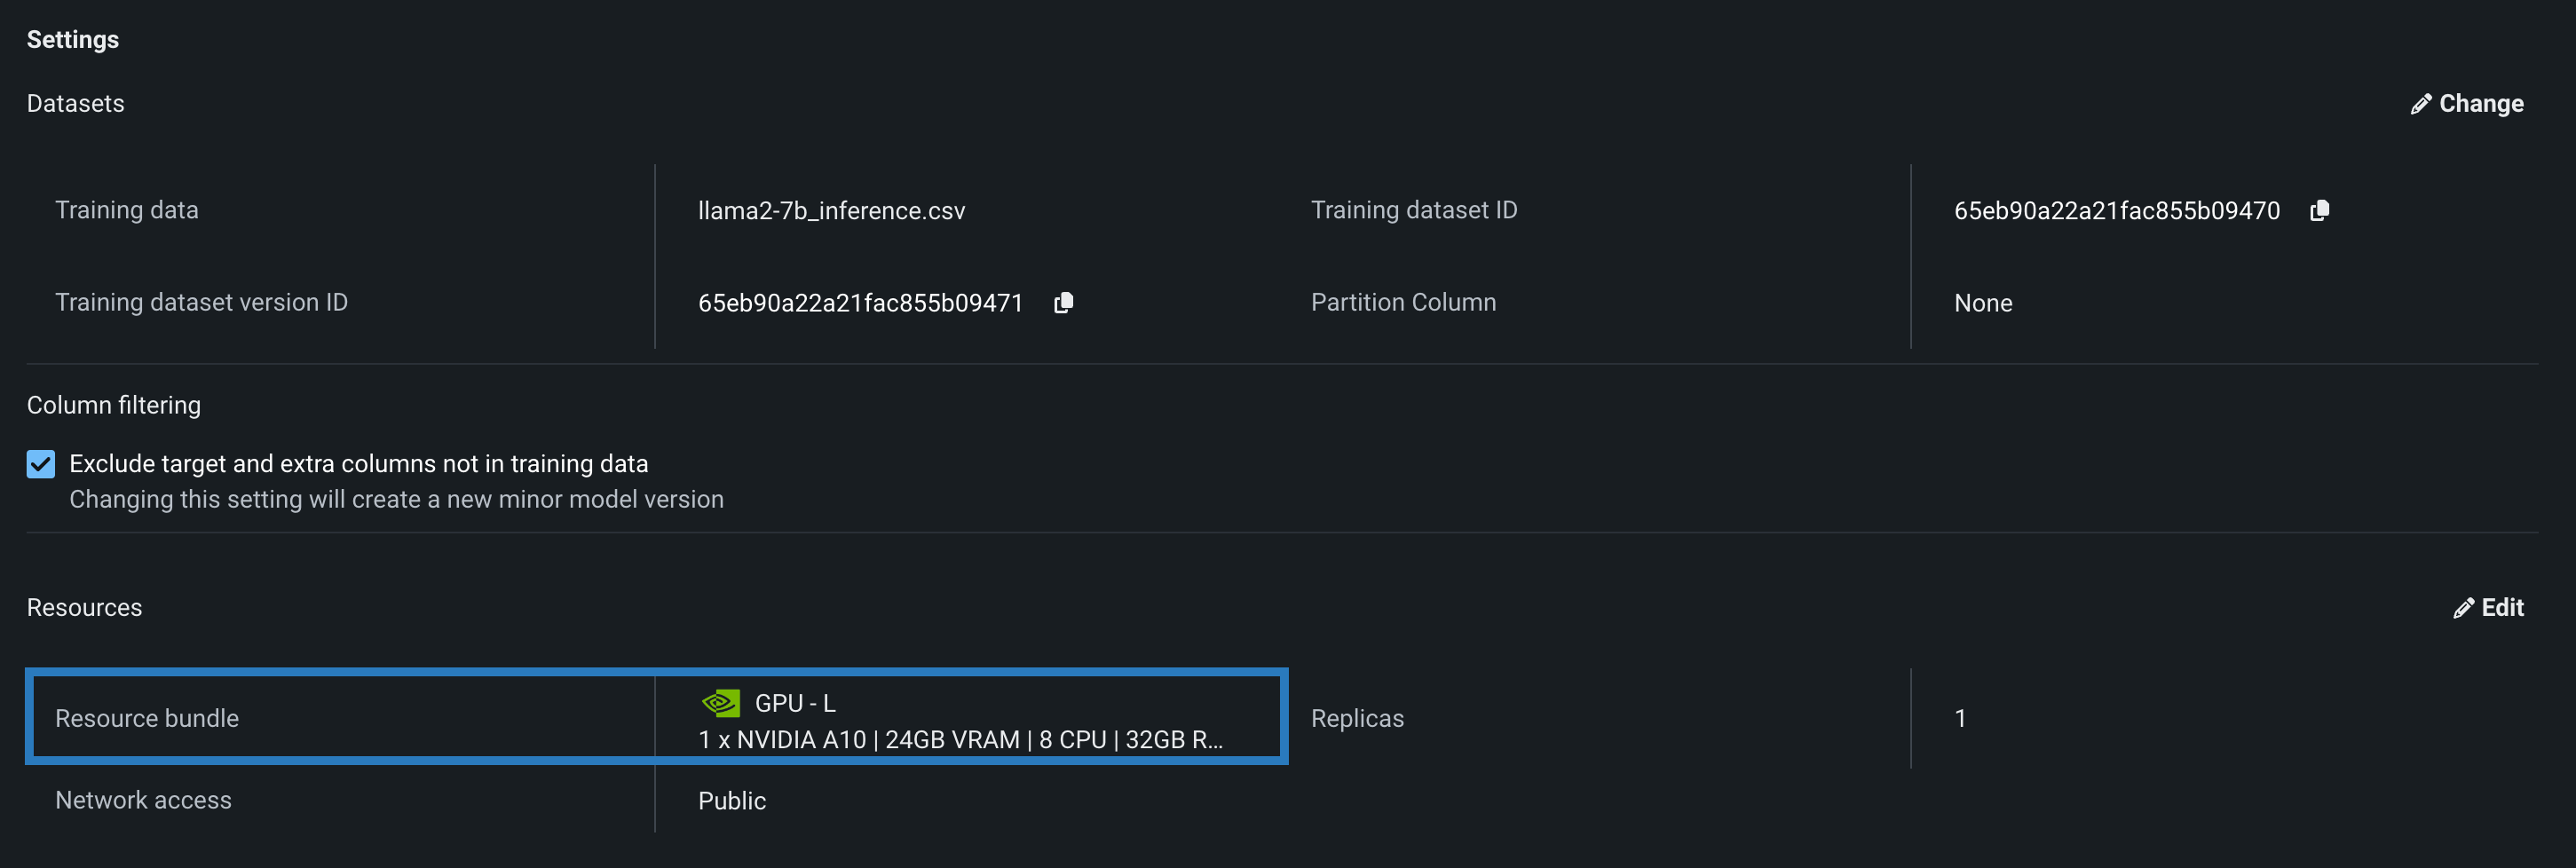
Click Edit to open the Update resource settings dialog box and, in the resource Bundle field, review the CPU and NVIDIA GPU devices available as build environments:
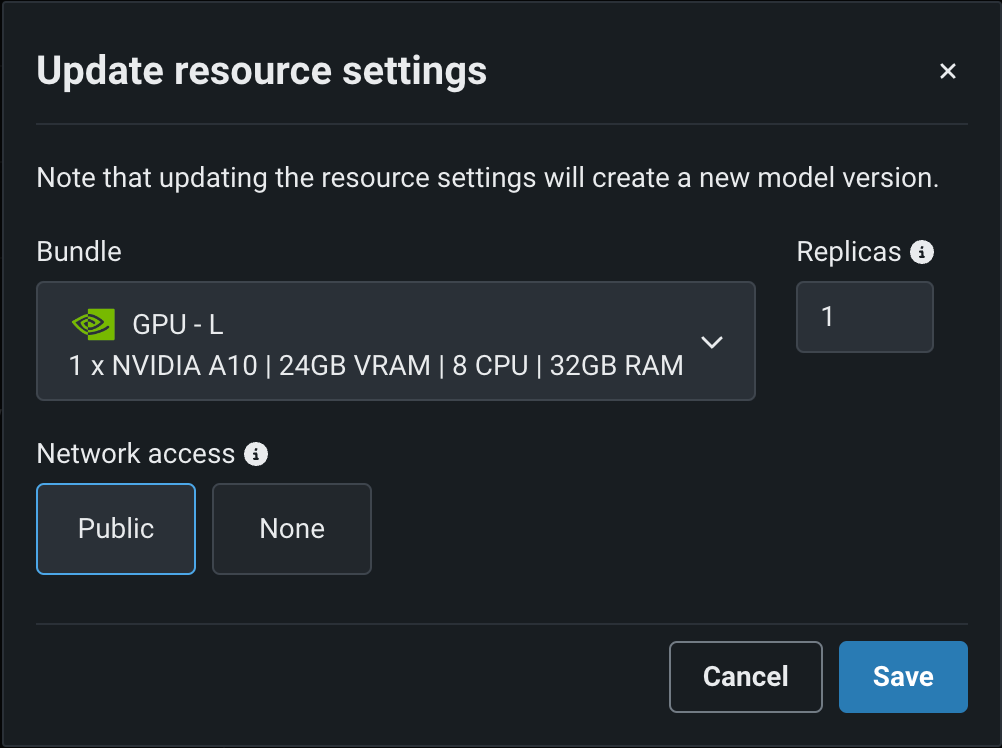
DataRobot can deploy models onto any of the following NVIDIA resource bundles:
| Bundle | GPU | VRAM | CPU | RAM | Description |
|---|---|---|---|---|---|
| GPU - S | 1 x NVIDIA T4 | 16GB | 4 | 16GB | Recommended for general deep learning workloads, or any machine learning workload that benefits from GPU acceleration. |
| GPU - M | 1 x NVIDIA T4 | 16GB | 8 | 32GB | |
| GPU - L | 1 x NVIDIA A10 | 24GB | 8 | 32GB | Recommended for running small LLMs. |
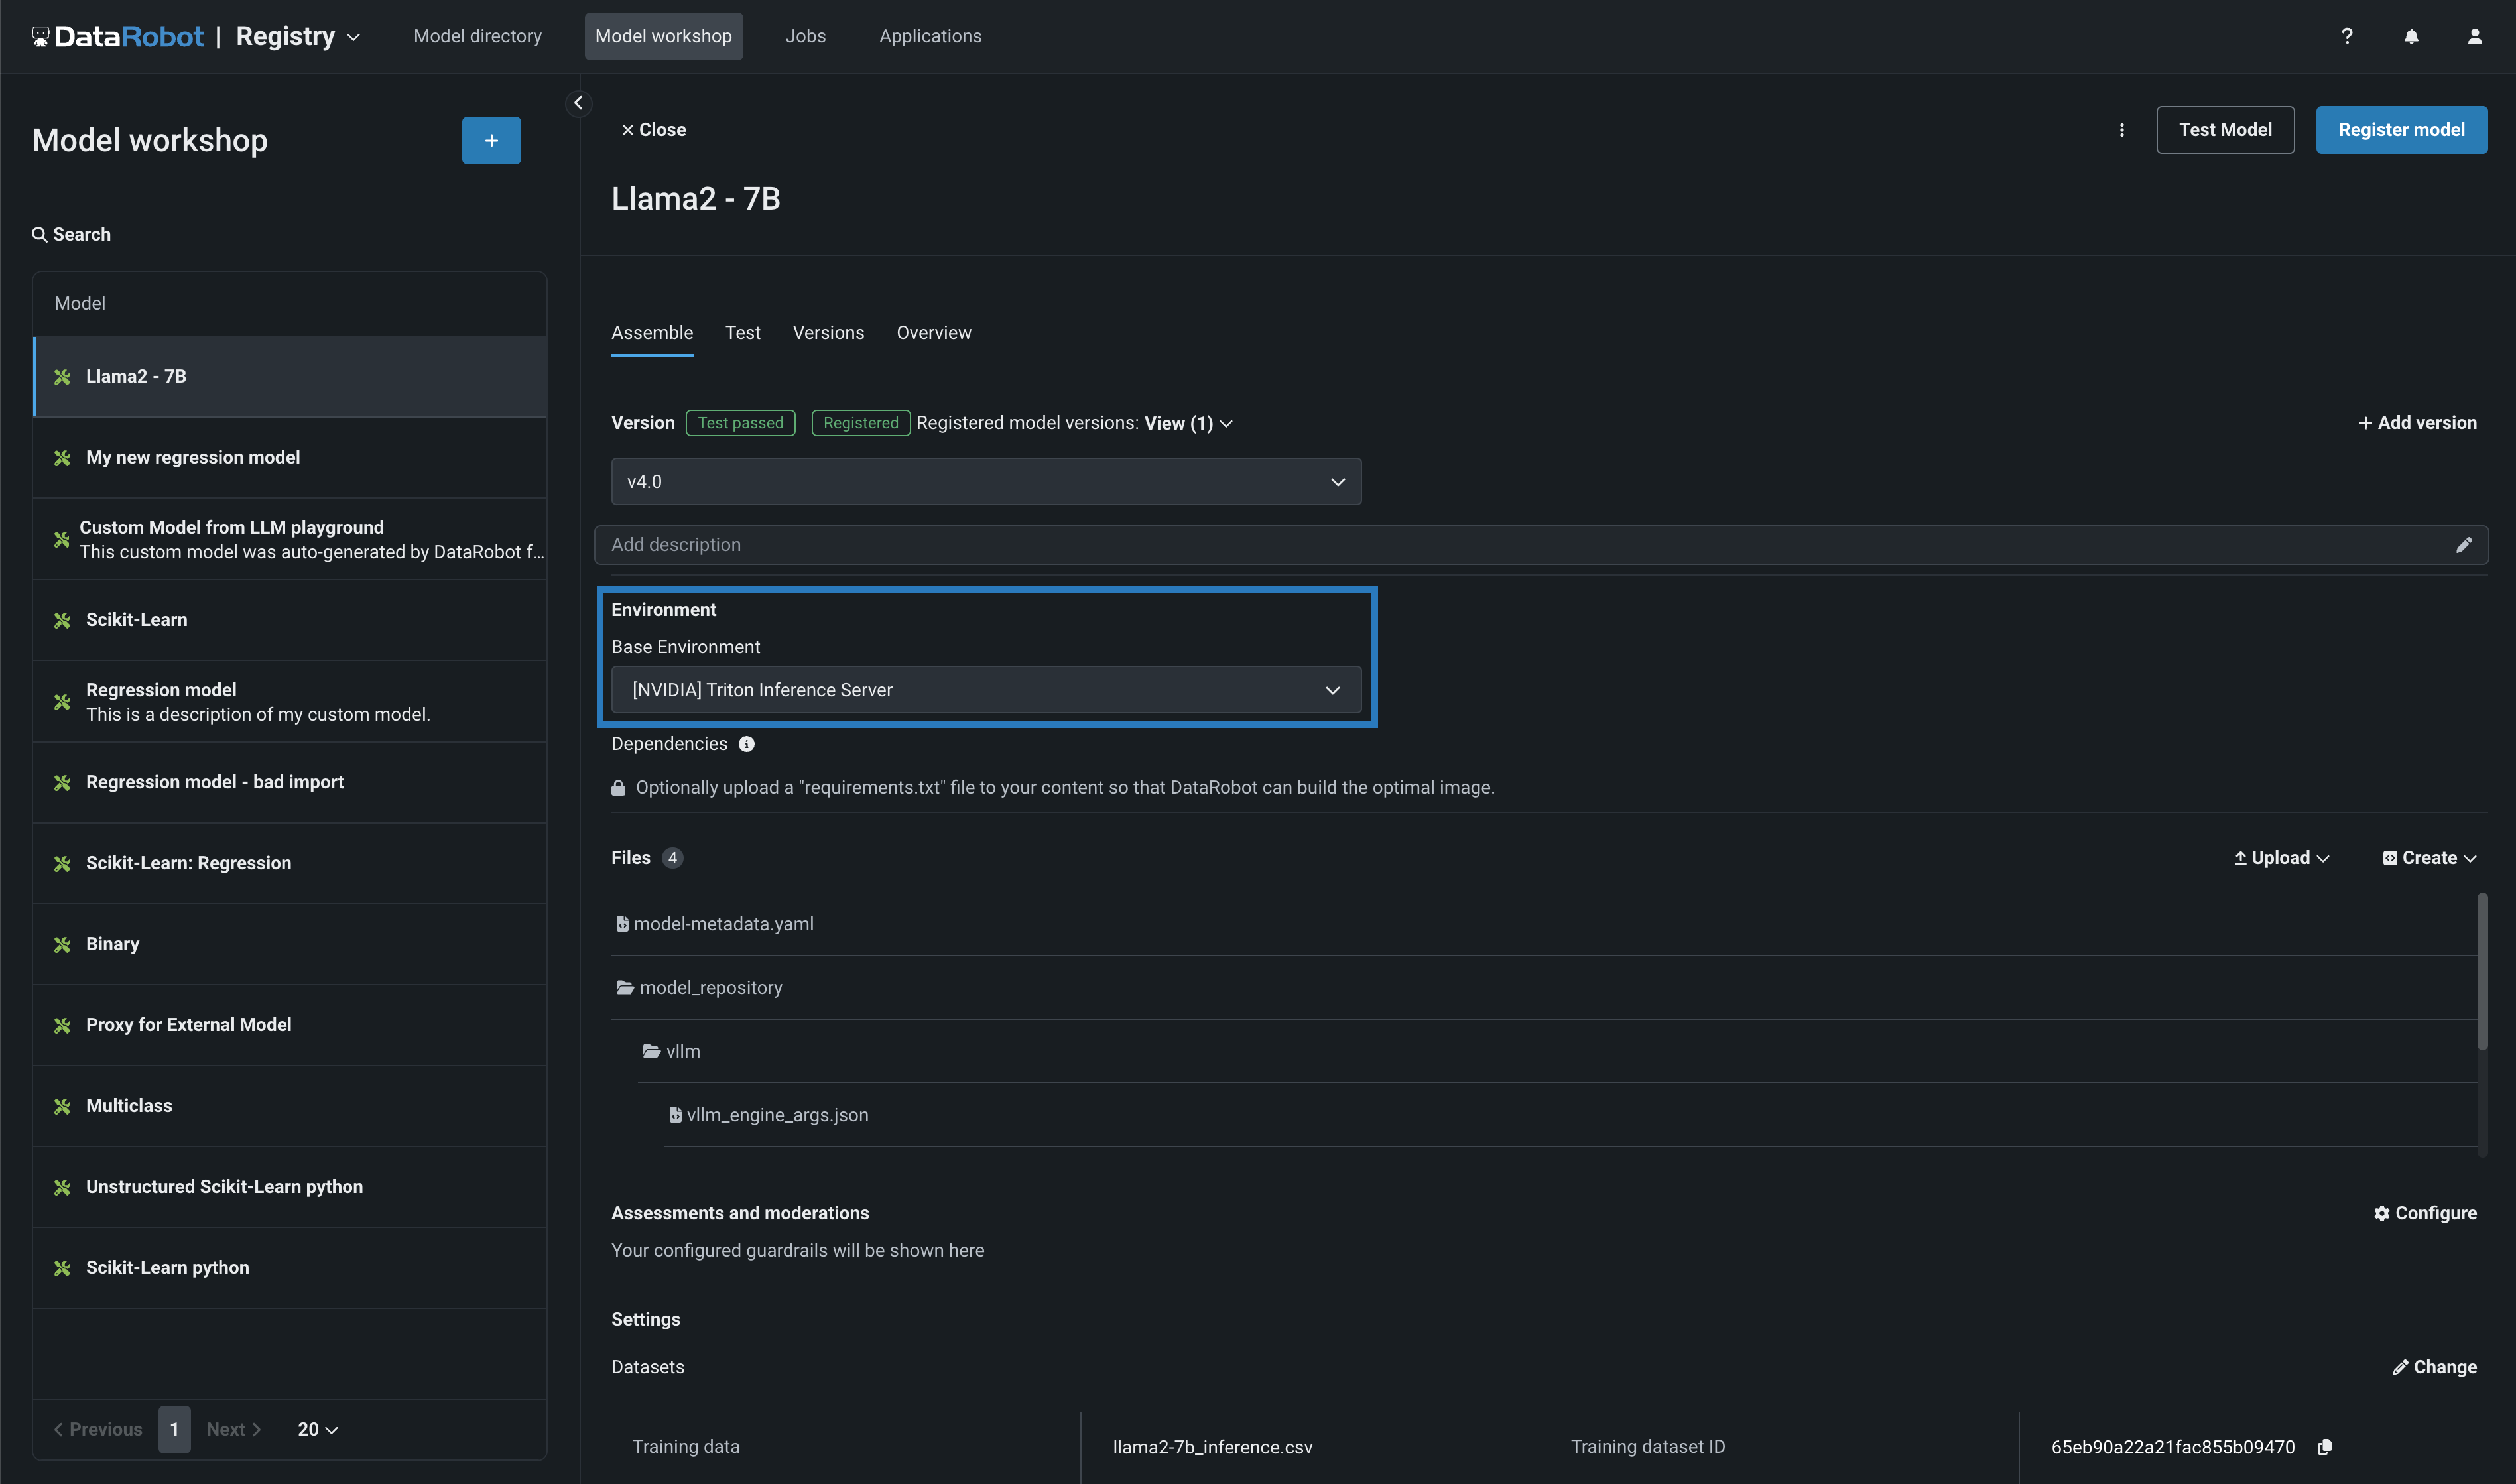
Along with the NVIDIA GPU resource bundles, this feature introduces custom model environments optimized to run on NVIDIA GPUs. When you assemble a custom model, you define a Base Environment. The model in the example below is running on an [NVIDIA] Triton Inference Server:
For more information on the DataRobot integration with NVIDIA, see Generative AI with NeMo Guardrails on NVIDIA GPUs.