Basic experiment setup
There are two AI experimentation "types" available in Workbench:
- Predictive modeling, described on this page for basic settings and here for advanced, makes row-by-row predictions based on your data.
- Time-aware modeling, described here, models using time-relevant data to make row-by-row predictions, time series forecasts, or current value predictions "nowcasts".
Experiments are the individual "projects" within a Use Case. They allow you to vary data, targets, and modeling settings to find the optimal models to solve your business problem. Within each experiment, you have access to its Leaderboard and model insights, as well as experiment summary information.
See the associated FAQ for important additional information.
Create basic
Follow the steps below to create a new experiment from within a Use Case.
Note
You can also start modeling directly from a dataset by clicking the Start modeling button. The Set up new experiment page opens. From there, the instructions follow the flow described below.
Create a feature list
Preview
Support for feature lists in Workbench is on by default.
Feature flag: Enable Feature Lists in Workbench Preview
Before modeling, you can create a custom feature list from the Data tab. If you select that list during modeling setup, DataRobot creates the modeling data using only the features in that list.
To create a new list:
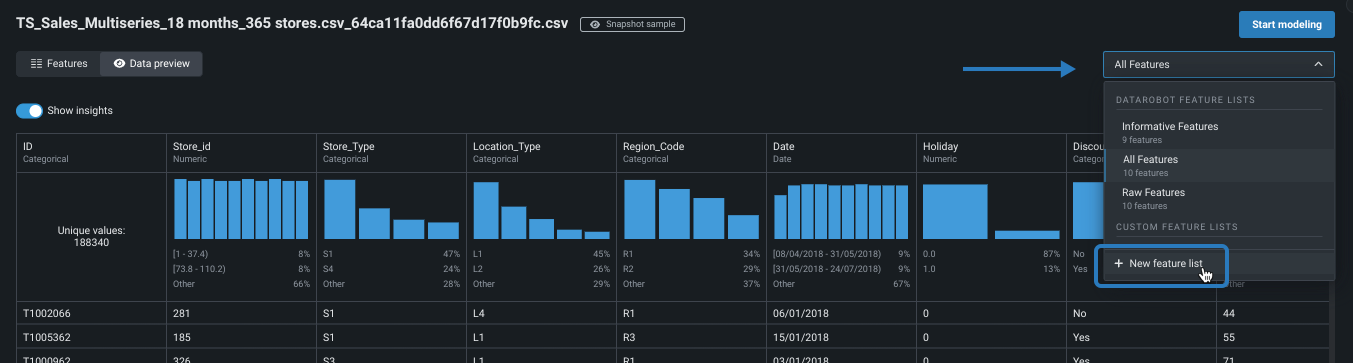
- From the Use Case, select the dataset you plan to model with to open the data preview.
-
Click the dropdown at the top of the page and select + New feature list to open the Features view.
-
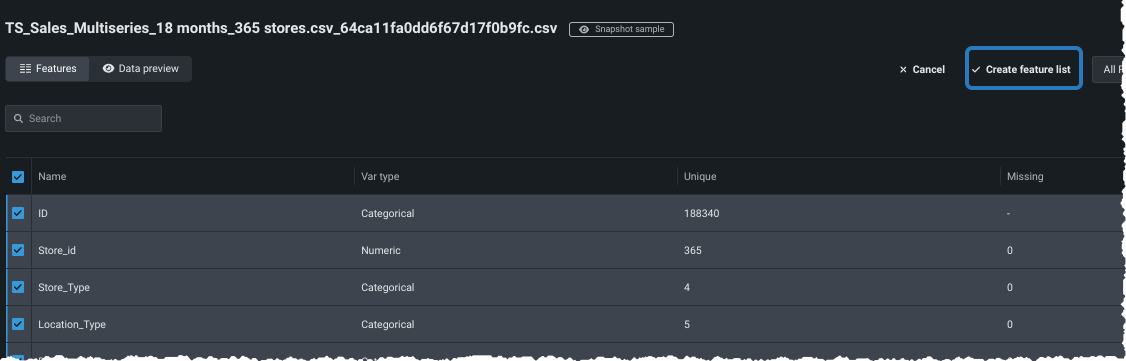
Select the checkbox next to each feature you want to include in your custom list. Then, click Create feature list, enter a name and description (optional), and click Save changes.
Add experiment
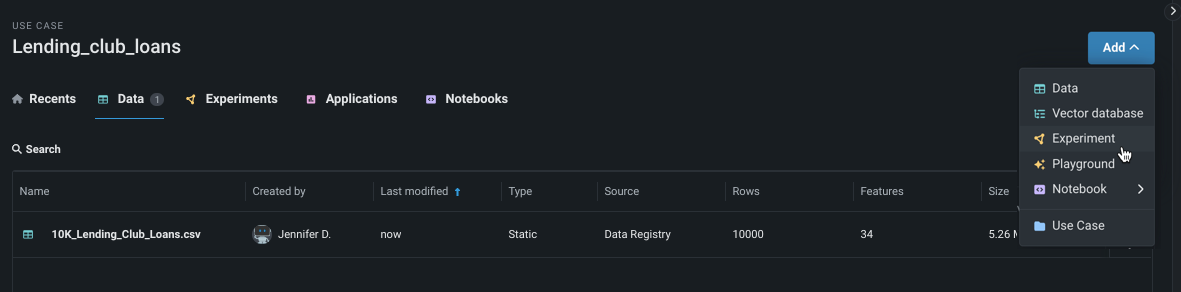
From within a Use Case, click Add and select Experiment. The Set up new experiment page opens, which lists all data previously loaded to the Use Case.
Add data
Add data to the experiment, either by adding new data (1) or selecting a dataset that has already been loaded to the Use Case (2).
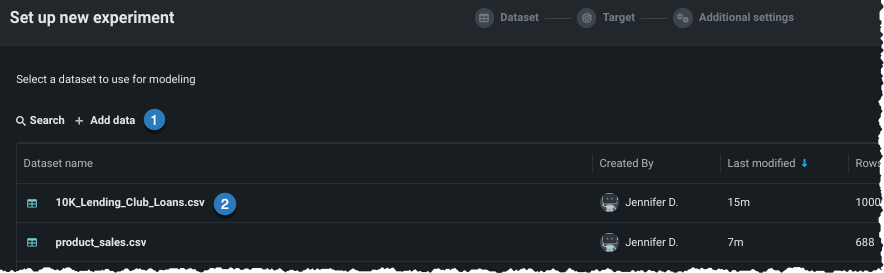
Once the data is loaded to the Use Case (option 2 above), click to select the dataset you want to use in the experiment. Workbench opens a preview of the data.
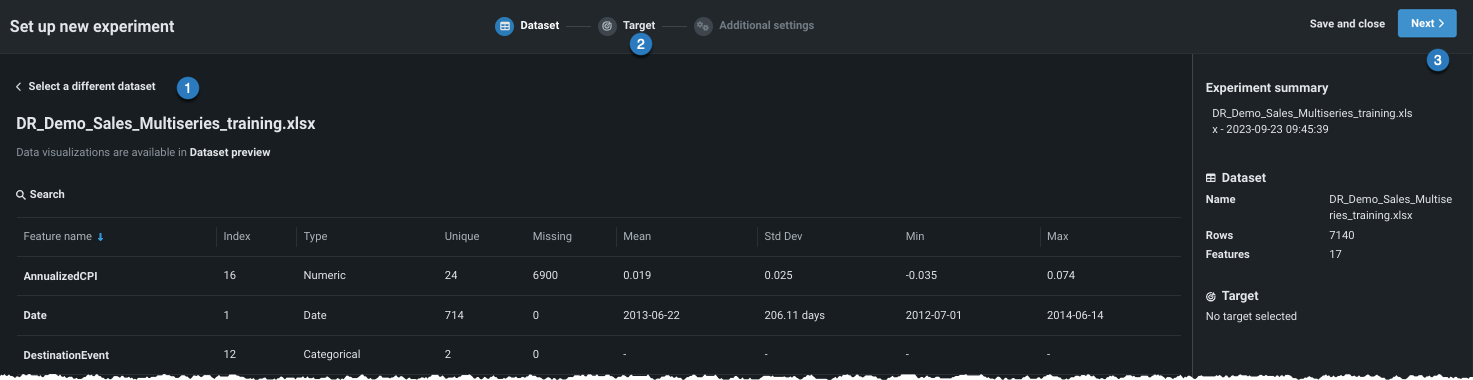
From here, you can:
| Option | |
|---|---|
| 1 | Click to return to the data listing and choose a different dataset. |
| 2 | Click the icon to proceed and set the target. |
| 3 | Click Next to proceed and set the target. |
Set target
Once you have proceeded to target selection, Workbench prepares the dataset for modeling (EDA 1).
Note
From this point forward in experiment creation, you can either continue setting up your experiment or click Save and close to save your progress to the Use Case as a draft.

If you open a Workbench draft in DataRobot Classic and make changes that introduce features not supported in Workbench, the draft will be listed in your Use Case but will not be accessible except through the classic interface.
When EDA1 finishes, to set the target, either:
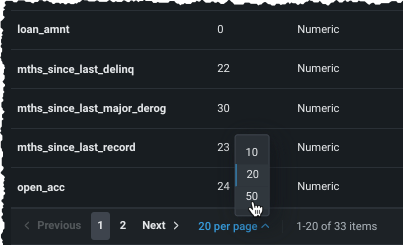
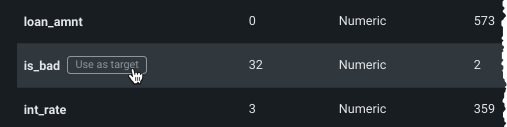
Scroll through the list of features to find your target. If it is not showing, expand the list from the bottom of the display:
Once located, click the entry in the table to use the feature as the target.
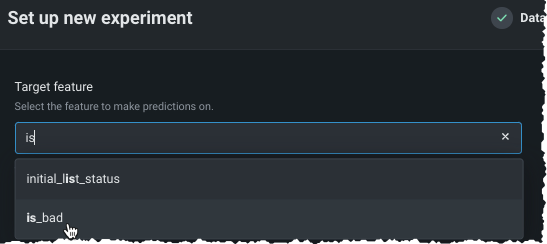
Type the name of the target feature you would like to predict in the entry box. DataRobot lists matching features as you type:
Depending on the number of values for a given target feature, DataRobot automatically determines the experiment type—either regression or classification. Classification experiments can be either binary (binary classification) or more than two classes (multiclass). The following table describes how DataRobot assigns a default problem type for numeric and non-numeric target data types:
| Target data type | Number of unique target values | Default problem type | Use multiclass classification? |
|---|---|---|---|
| Numeric | 2 | Classification | No |
| Numeric | 3+ | Regression | Yes, optional |
| Non-numeric | 2 | Binary classification | No |
| Non-numeric | 3-100 | Classification | Yes, automatic |
| Non-numeric, numeric | 100+ | Aggregated classification | Yes, automatic |
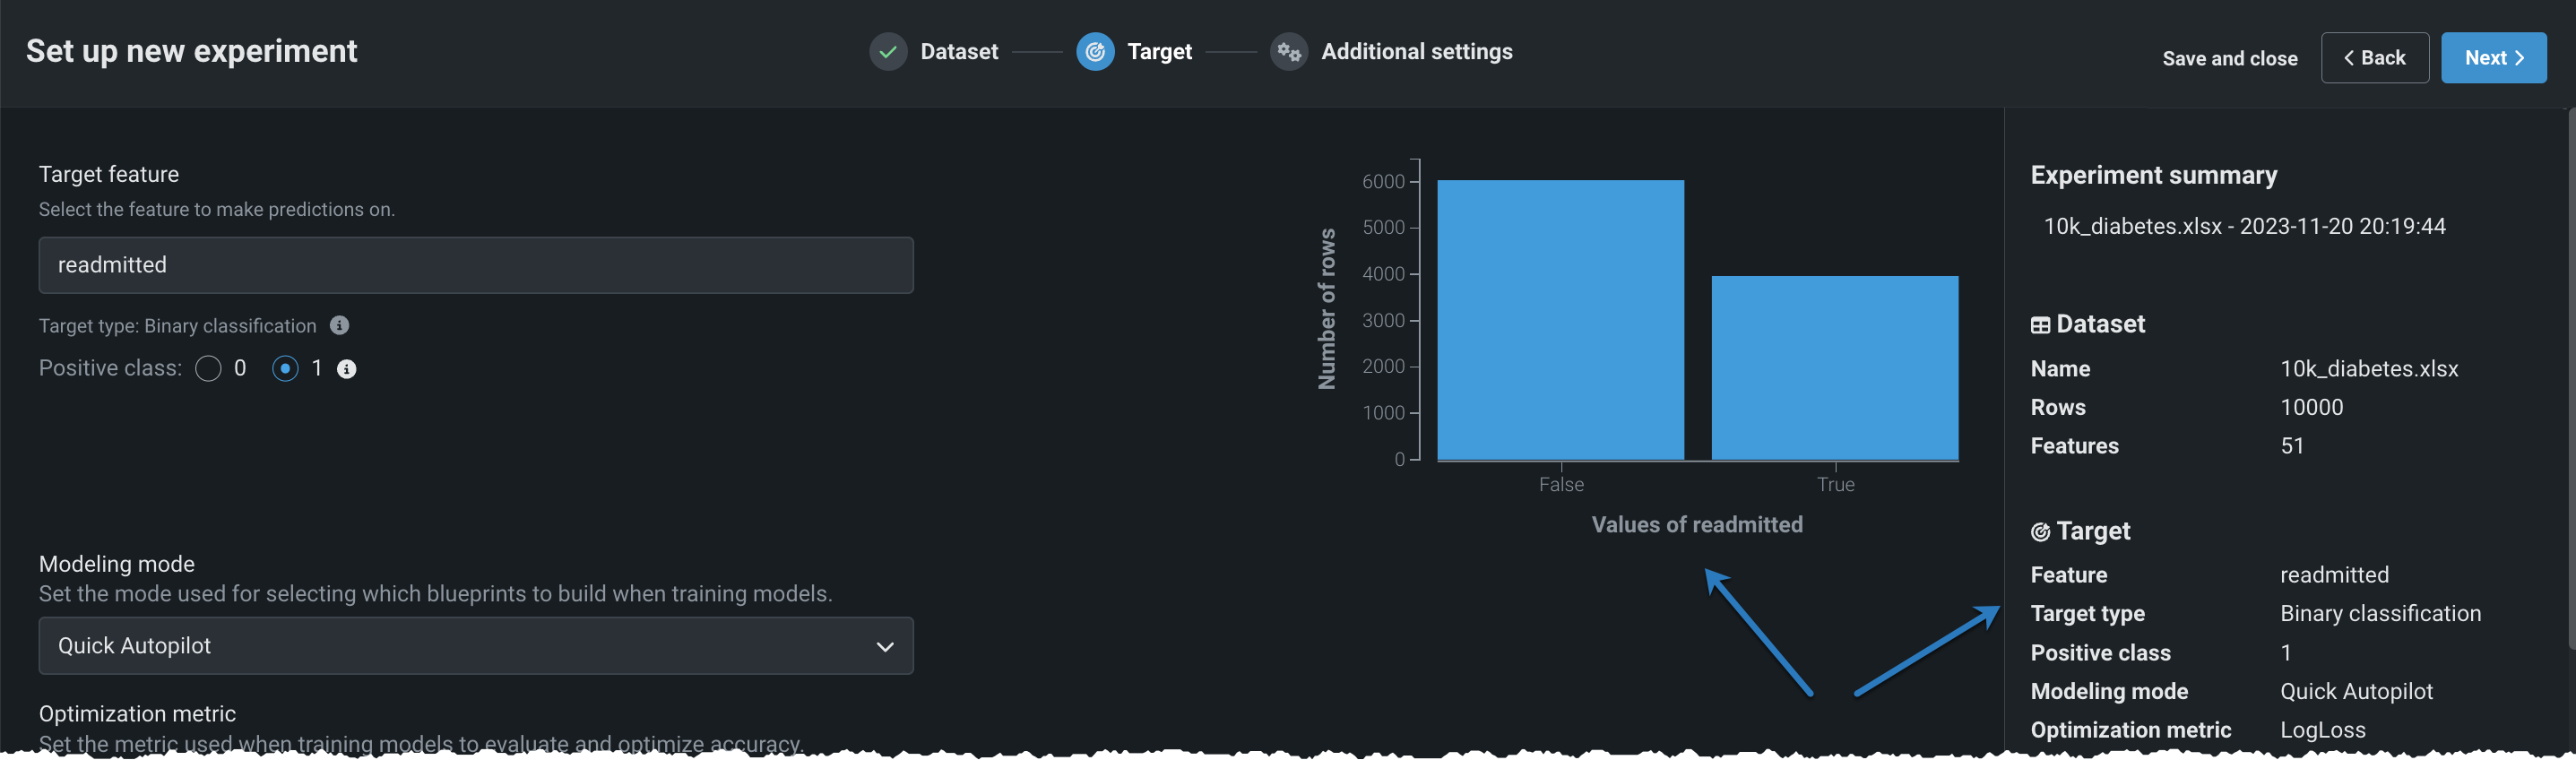
With a target selected, Workbench displays a histogram providing information about the target feature's distribution and, in the right pane, a summary of the experiment settings.
From here you can:
-
Change a regression experiment to a multiclass experiment.
-
Click Next to view Additional settings, where you can build models with the default settings or modify those settings.
-
For multiclass classification experiments, click Show more classification settings to further configure aggregation settings.
If using the default settings, click Start modeling to begin the Quick mode Autopilot modeling process.
Regression targets
Regression experiments are those where the target is a numeric value. The regression prediction problem predicts continuous values (e.g., 1.7, 6, 9.8...) given a list of input variables (features). Examples of regression problems include financial forecasting, time series forecasting, maintenance scheduling, and weather analysis.
Regression experiments can also be handled as classification by changing the target type from Numeric to Classification.
| Unique numeric values | Default experiment type | Can change? |
|---|---|---|
| 2 | Classification (binary) | No |
| 3+ | Regression | Yes |
To change a regression problem (numeric target) to classification, change the radio button identifying the target type:
Changing the target type enables the multiclass configuration options. If there are more than 1000 numeric values (classes) for the target, the Aggregate low-frequency classes option, described below, is enabled by default.
Classification targets
In a classification experiment, the model groups observations into categories by identifying shared characteristics of certain classes. It compares those characteristics to the data you're classifying and estimates how likely it is that the observation belongs to a particular class. Classification projects can be binary (two classes) or multiclass (three or more classes).
Availability: Preview
Multiclass classification is a preview feature, on by default, for non-time-aware experiments.
Feature flags: Unlimited multiclass
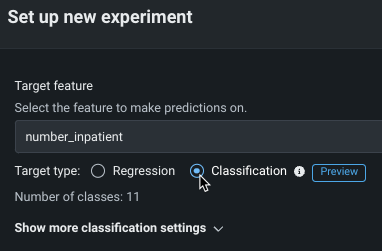
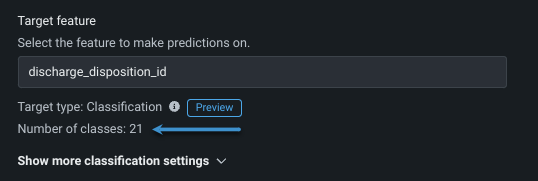
Configuration of a classification experiment depends on the type (number of classes), which is reported under the target feature entry as either Target type: Binary classification or Target type: Classification, in which case the number of classes is also reported:
A multiclass confusion matrix helps to visualize where a model is, perhaps, mislabeling one class as another.
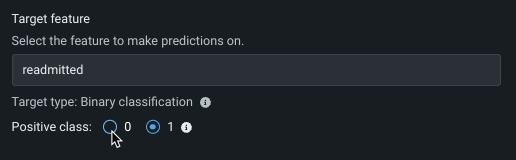
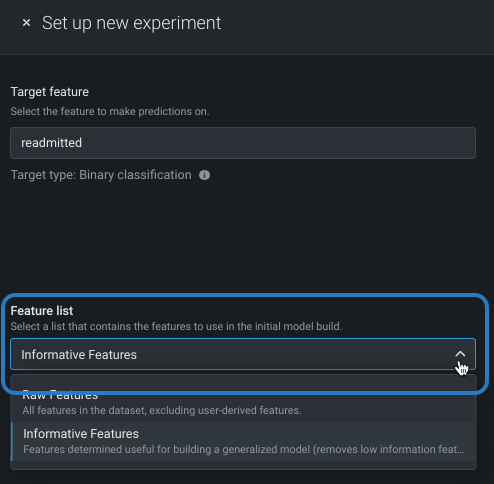
DataRobot creates a binary classification experiment when a target variable has two unique values, whether they are boolean, categorical, or numeric. Some examples include predicting whether or not a customer will pay their bill on time (yes or no) or if a patient will be readmitted to the hospital (true or false). The model generates a predicted probability that a given observation falls into the "positive" class (readmitted=yes in the last example). By default, if the predicted probability is 50% or greater, then the predicted class is "positive." You can change the positive class—the class to label as positive in model insights—by selecting the alternate radio button:
Multiclass classification problems answer questions that have more than two possible outcomes (classes). For example, which of five competitors will a customer turn to (instead of simply whether or not they are likely to make a purchase), which department should a call be routed to (instead of simply whether or not someone is likely to make a call). In this case, the model generates a predicted probability that a given observation falls into each class; the predicted class is the one with the highest predicted probability. (This is also called argmax.) With additional class options for multiclass classification problems, you can ask more “which one” questions, which result in more nuanced models and solutions.
To support more than 1000 classes, DataRobot automatically aggregates classes, based on frequency, to 1000 unique labels. You can configure aggregation settings or, by default, DataRobot will keep the top 999 most frequent classes and aggregate the remainder into a single "other" bucket.
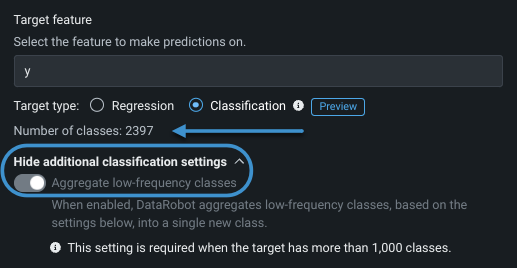
You can, however, configure the aggregation parameters to ensure all classes necessary to your project are represented. To configure, first, expand Show more classification settings and then toggle Aggregate low-frequency classes on.
The following table describes aggregation-related settings:
| Setting | Description | Default |
|---|---|---|
| Aggregate low-frequency classes | Enables the aggregation functionality, with the default setting based on the number of classes detected. | OFF for targets with fewer than 1000 values. ON for targets with 1000+ values and cannot be disabled. |
| Aggregated class name | Sets the name of the "other" bin—the bin containing all classes that do not fall within the configuration set for this aggregation plan. It represents all the rows for the excluded values in the dataset. The provided name must differ from all existing target values in the column. | Aggregated |
| Aggregation method | Frequency threshold: Sets the minimum occurrence of rows belonging to a class that is required to avoid being bucketed in the "other" bin. That is, classes with fewer instances will be collapsed into a class. Total class count: Sets the final number of classes after aggregation. The last class being the "other" bin. For example, if you enter 900, there will be 899 class bins from your data and 1 "other" bin of aggregated classes. Enter a value between 3-1000 (the maximum allowed number of classes). |
Frequency threshold, 1 row |
| Classes excluded from aggregation | Identifies a comma-separated list of classes that will be preserved from aggregation, ensuring the ability to predict on less frequent classes that are of interest. | None, optional |
Customize basic settings
Changing experiment parameters is a good way to iterate on a Use Case. Before starting to model, you can change a variety of settings:
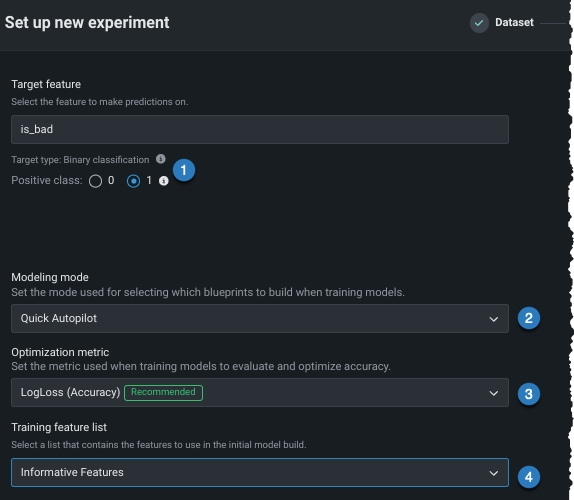
| Setting | To change... | |
|---|---|---|
| Positive class | For binary classification projects only. The class to use when a prediction scores higher than the classification threshold. | |
| Modeling mode | The modeling mode, which influences the blueprints DataRobot chooses to train. | |
| Optimization metric | The optimization metric to one different from DataRobot's recommendation. | |
| Training feature list | The subset of features that DataRobot uses to build models. |
Change modeling mode
By default, DataRobot builds experiments using Quick Autopilot. However, you can change the modeling mode to train specific blueprints or all applicable repository blueprints.
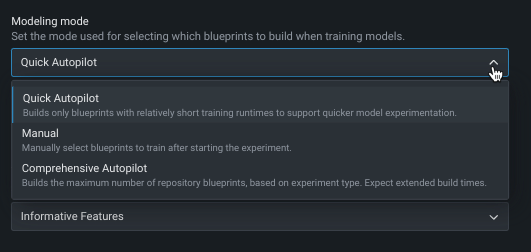
The following table describes each of the modeling modes:
| Modeling mode | Description |
|---|---|
| Quick (default) | Using a sample size of 64%, Quick Autopilot runs a subset of models, based on the specified target feature and performance metric, to provide a base set of models that build and provide insights quickly. |
| Manual | Manual mode gives you full control over which blueprints to execute. After EDA2 completes, DataRobot redirects you to the blueprint repository where you can select one or more blueprints for training. |
| Comprehensive | Comprehensive Autopilot mode runs all Repository blueprints on the maximum Autopilot sample size to ensure more accuracy for models. This mode results in extended build times. |
Change optimization metric
The optimization metric defines how DataRobot scores your models. After you choose a target feature, DataRobot selects an optimization metric based on the modeling task. Typically, the metric DataRobot chooses for scoring models is the best selection for your experiment. To build models using a different metric, overriding the recommended metric, use the Optimization metric dropdown:
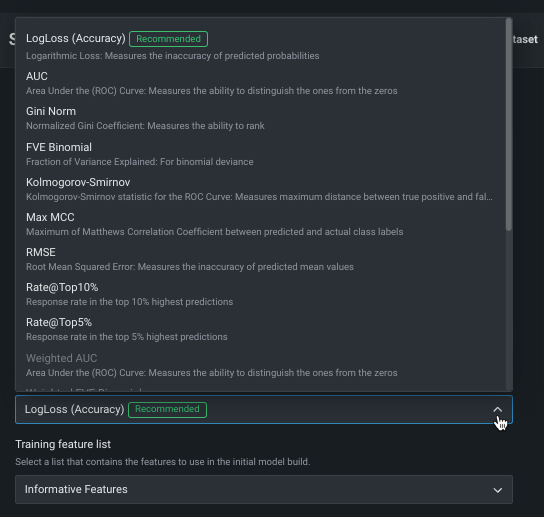
See the reference material for a complete list and descriptions of available metrics.
Change feature list (pre-modeling)
Feature lists control the subset of features that DataRobot uses to build models. Workbench defaults to the Informative Features list, but you can modify that before modeling. To change the feature list, click the Feature list dropdown and select a different list:
You can also change the selected list on a per-model basis once the experiment finishes building.
Set additional automation
Before moving to advanced settings or beginning modeling, you can configure other automation settings.
After the target is set and the basic settings display, expand Show additional automation settings to see additional options.
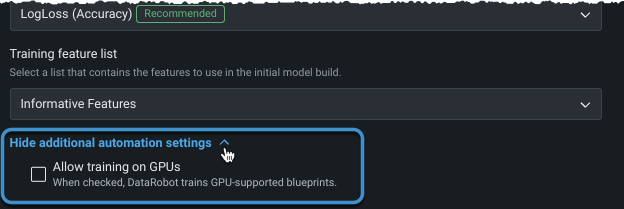
Train on GPUs
Availability information
GPU workers are a premium feature. Contact your DataRobot representative for information on enabling the feature.
For datasets that include text and/or images and require deep learning models, you can select to train on GPUs to speed up training time. While some of these models can be run on CPUs, others require GPUs to achieve reasonable response time. When Allow training on GPUs is selected, DataRobot detects blueprints that contain certain tasks and includes GPU-supported blueprints in the Autopilot run. Both GPU and CPU variants are available in the repository, allowing a choice of which worker type to train on; GPU variant blueprints are optimized to train faster on GPU workers. Notes about working with GPUs:
- Once the Leaderboard populates, you can easily identify GPU-based models using filtering.
- When retraining models, the resulting model is also trained using GPUs.
- When using Manual mode, you can identify GPU-supported blueprints by filtering in the blueprint repository.
- If you did not initially select to train with GPUs, you can add GPU-supported blueprints via the repository or by rerunning modeling.
-
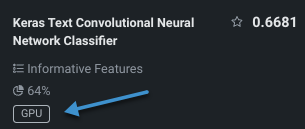
Models trained on GPUs are marked with a badge on the Leaderboard:
After changing any or all of the settings described, click Next and either:
- Click Start modeling to begin the Quick mode predictive modeling process.
- Customize more advanced settings.
-
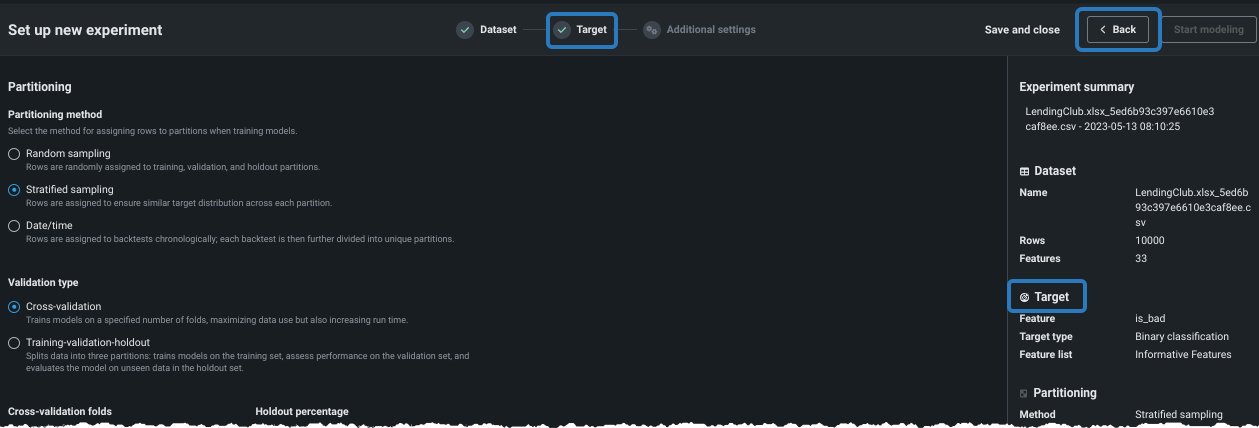
Changes the project's target or feature list before modeling by returning to the Target page. To return, click the target icon, the Back button, or the Target field in the summary:
What's next?
Configuration for large datasets
For datasets larger than 10GB, DataRobot automatically applies incremental learning, which chunks data to allow for more manageable and efficient training processes.
After you start modeling, DataRobot populates the Leaderboard with models as they complete. You can:
- Use the View experiment info option to view a variety of information about the experiment.
- Begin model evaluation on any available model.